

CHOOSE THE CORRECT FINISH
JEFF TROY
The kit box is empty, the instruction manual has all of its little boxes checked, but your airplane's still in bare bones. Now what? What do you do when construction is done and finishing time comes around?
A countless number of techniques, and an even greater number of materials are available for finishing model aircraft, but how does one decide which is the best material or method?
Choosing finishing methods and materials has long been one of modeling's major dilemmas and one of its most controversial battlegrounds. Every modeler you speak to has his or her own idea of which finishing methods and materials are best.
Who's right? Who's wrong? What do you use and why do you use it?
There is no such thing as a "best" material, and no such thing as a "best" method for finishing model airplanes. There are too many good methods and too many quality products for any one of them to be the "only" one to use in every situation. The question that should be asked is not which product and method are best, but which product and method are most suited to the specific model being constructed, and the way in which that model will be used.
High-temperature polyester iron-on films are great for convenience, but they're not great for everything. For openers, you can't iron them directly over foam. The temperature required to seal and shrink high-temp films will melt the foam underneath. Low-temperature polypropylene films will work nicely over foam, but they don't have the structural rigidity of polyester films, so they're not the best materials for non-rigid structures.
Paint is an excellent covering material, but it's heavier than film covering and the model's surface requires far more preparation before it can be applied. Paint also requires more skill and more sophisticated tools to apply properly. Paint can produce powerful results when it is skillfully applied over fiberglass cloth, iron-on underbase products, doped polyester, silk or silkspan—but without the "skillfully applied" ingredient the weight gain can be detrimental and the visual results can be horrifying.
Polyester fabrics are plentiful, and for the most part they are easy to apply. These materials are tough as nails and the perceived realism they bring to fabric-covered models is quite valuable. The downside is that they are a bit heavier than film coverings, and those that require painting will become even heavier after the paint has been applied.
Fiberglass is hard to beat as an underbase for paint and some metallic finishes, but fiberglass requires considerable skill and dexterity to apply correctly. Without experience, weight can build up quickly and the work hours can stretch far beyond your initial expectations.
A full-scale airplane is made of many materials, but the surface of each of these materials is normally finished as either a smooth or a woven texture. This is an oversimplification, but generally every part of a model will fall into one of these categories:
- smooth and glossy
- smooth and semigloss
- smooth and flat
- woven and glossy
- woven and semigloss
- woven and flat
Now examine the sheen of each part. Is it glossy, semigloss, or flat? The Jenny's struts are stained wood, but their spar-varnish coating results in a very smooth and very glossy final finish. The Sukhoi is covered with high-gloss paint. Most metal-skinned WWII fighters were painted with flat camouflage colors, while other aircraft might be skinned with unpainted, natural linen.
By now I'm sure you get the picture. The list of aircraft parts is long, but there are really only six basic categories needed to address each of them. Once you've decided how a part should look, getting it there is simply a matter of choosing a material from the appropriate group of materials and applying it according to the instructions.
Have a go for yourself. First, you must identify your particular airplane. Is it a Scale airplane or is it a sport model? For the purposes of finish choice, there are really only two kinds of model aircraft: Scale models, which attempt to capture the appearance and dimensions of actual man-carrying aircraft in miniature; and non-scale aircraft, which may perform all manner of specialized tasks, but are not attempting to pose as models of actual airplanes.
If yours is a Scale model, you should attempt to finish it in a manner that emulates its full-scale counterpart — you put the smooth-and-glossy finish precisely where the smooth-and-glossy finish is found on the full-scale airplane. You put the woven-and-flat finish where the full-scale is woven and flat.
Non-scale model schemes are often far more difficult to identify because there is no full-scale version to copy. You must invent the color choice and scheme, and you must determine the airplane's supposed finish texture. In spite of your autonomy here, your job will be far more effective and far more believable if you make your choices in keeping with what would normally be found on similar full-scale examples.
If your non-scale model is designed for Precision Aerobatics, its appearance would probably be more suited to a contemporary smooth and glossy finish than it would be to the flat and woven appearance of a Sopwith Camel (although woven aileron, elevator, and rudder surfaces might be a nice touch).
If your sport model is an old-timer, either the woven and semigloss or the woven and flat look might be just the ticket. High-wing trainers can be made to emulate anything from Piper Cubs to Cessna Skylanes, and their finishes can vary accordingly. They look every bit as handsome in woven and semigloss finishes as they do in smooth-and-glossy overcoats.
High-performance sailplanes are almost always best suited to smooth-and-glossy finishes, while low-wing sport airplanes look especially charming in the woven and semigloss scallop pattern that was so popular in the '30s and '40s.
Pay close attention to full-scale airplanes that might be used for the same general purposes as your non-scale model, then make an attempt to "do as they do" in your model's final appearance.
Now that you know what you're trying to accomplish, you should be ready to make your choices.
Do you want to paint a finish or iron it on?
Iron-on materials are familiar to more of us today than the old-school techniques of painting over a carefully prepared underbase. Iron-on materials are applied directly over wood surfaces, with no sealing or filling required.
Paint, on the other hand, must be applied over products whose characteristics give you either a smooth or a woven surface. These products may or may not be the iron-on variety. Some iron-on, but many are applied with nitrate dope, polyester resin, or epoxy resin.
To produce a smooth underbase for a painted finish, you can choose from the following products:
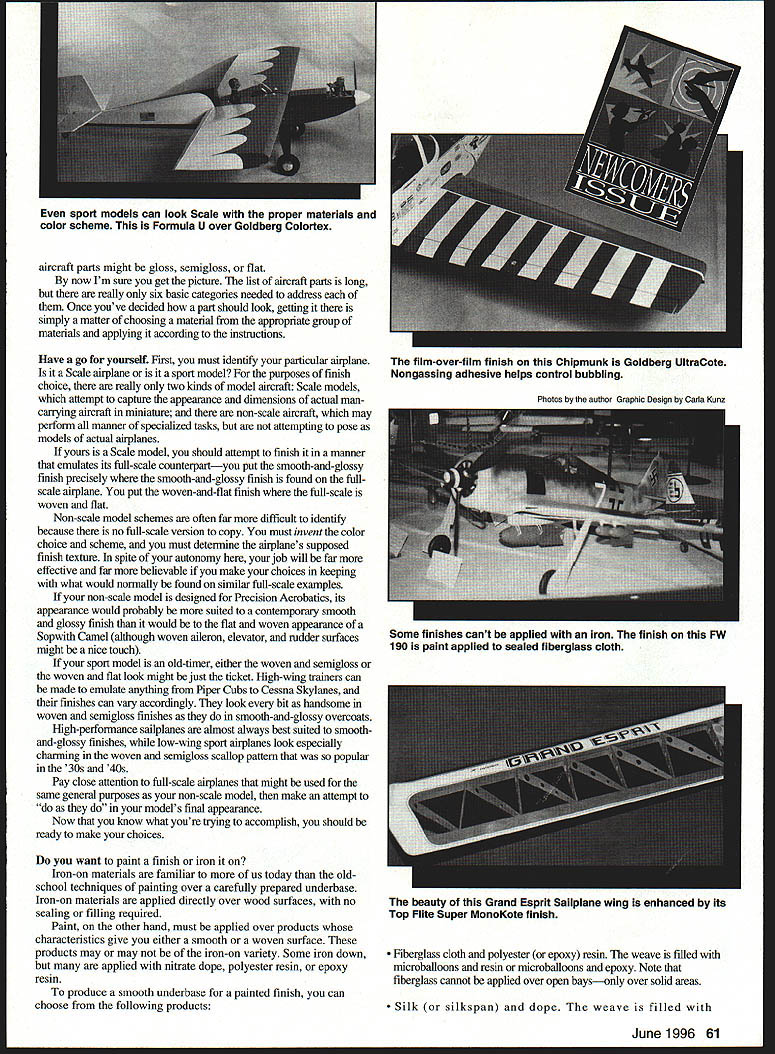
- Fiberglass cloth and polyester (or epoxy) resin. The weave is filled with microballoons and resin or microballoons and epoxy. Note that fiberglass cannot be applied over open bays—only over solid areas.
- Silk (or silkspan) and dope. The weave is filled with talcum powder and dope.
- Primed Micafilm.
- Clear MonoKote.
- Polyester fabric (Stits, Koverall) and dope. The weave is sealed with nitrate dope and sanded primer/sealer coats.
- Super Coverite, Super Shrink Coverite, ColorTex, SolarTex, WorldTex. The weave is sealed with nitrate dope and sanded primer/sealer coats.
To produce a woven-surface underbase for a painted finish, you can choose from the following products:
- Polyester fabric (Stits, Koverall) and dope.
- Super Coverite, Super Shrink Coverite, ColorTex, SolarTex, WorldTex.
Smooth and Glossy
- Iron-On: Super MonoKote, Black Baron Film
- Paints: K&B Super Poxy (gloss catalyst), Hobbypoxy (gloss catalyst), Black Baron epoxy, Formula U, Chevron
Smooth and Semigloss
- Iron-On: UltraCote, 21st Century Film, Oracover, SuperCote, Micafilm
- Paints: 21st Century Paint; K&B Super Poxy (gloss and satin catalyst mixed 50/50); Hobbypoxy (gloss and satin catalyst mixed 50/50); AeroGloss Dope; Sig Dope
Smooth and Flat
- Iron-On: Primed Micafilm
- Paints: K&B Super Poxy (satin catalyst), Hobbypoxy (satin catalyst), 21st Century Paint (military colors), Chevron (flats), Formula U (flats)
Woven and Glossy
- Iron-On: None available
Woven and Semigloss
- Iron-On: 21st Century Fabric
- Paints: 21st Century Paint; K&B Super Poxy; K&B Super Poxy (gloss and satin catalysts mixed 50/50); Hobbypoxy (gloss and satin catalysts mixed 50/50); AeroGloss Dope; Sig Dope
Woven and Flat
- Iron-On: ColorTex, WorldTex, SolarTex, Super Coverite, Super Shrink Coverite
You've probably noticed that I've made no attempt to instruct you in the use of these products. There are enough articles, books, and tip sheets written on these methods and materials to fill a small-town library. Browsing through any of the monthly aeromodeling publications will reveal several useful items, and a run through AMA's Supply and Service catalog will turn up several books on finishing techniques. My only purpose was to explain your choices—not their specific applications.
Once you've decided on a method and materials that are right for you, the best advice I can give you is to follow the directions that come with the products. Modelers have opinions, but they are often based on misinformation, rumor, or misuse, or in expectation rather than real performance. Did you ever notice that modelers who follow directions to the letter very rarely have problems with the products they purchase?
In almost every case, manufacturers know what works best for the products they produce. If you have questions about a method or a product, ask around; but don't hesitate to write or phone the manufacturer for advice or assistance concerning their products. Most in the hobby industry are quite eager to help you.
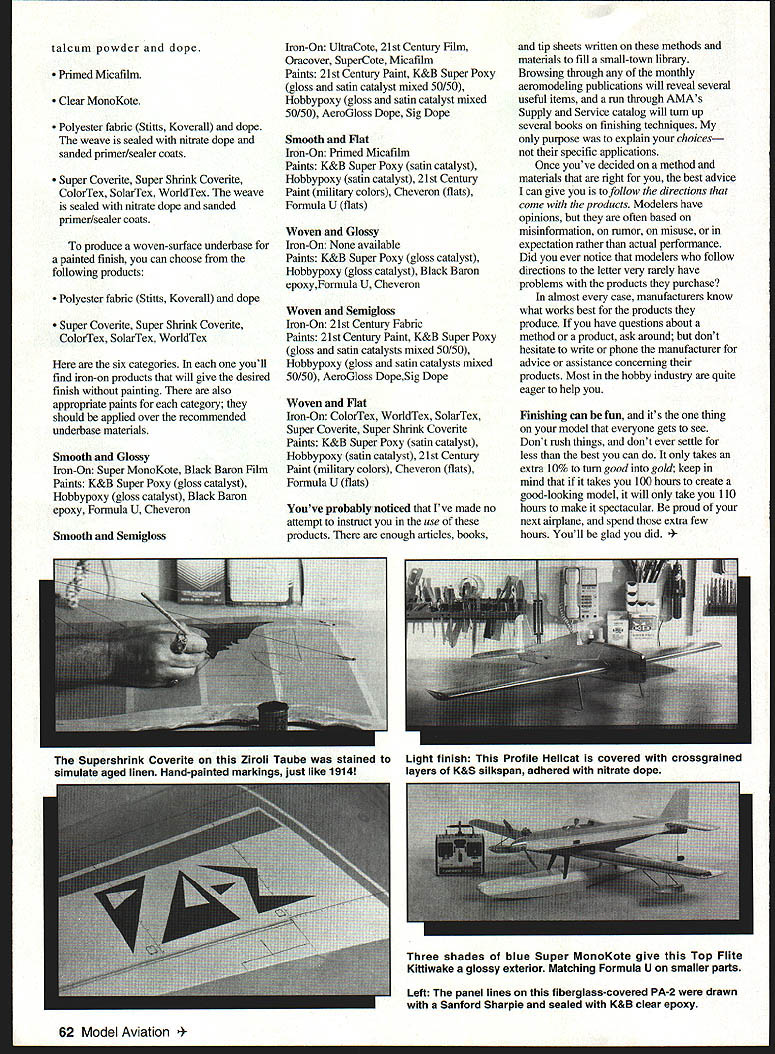
Finishing can be fun, and it's the one thing on your model that everyone gets to see. Don't rush things, and don't ever settle for less than the best you can do. It only takes an extra 10% to turn good into great; keep in mind that if it takes you 100 hours to create a good-looking model, it will only take you 110 hours to make it spectacular. Be proud of your next airplane, and spend those extra few hours. You'll be glad you did.
Transcribed from original scans by AI. Minor OCR errors may remain.

