
Christopher: RC Parachutist
The author's Christopher has never crashed. — Luther Hux
A radio-controlled parachutist for your model? Yes — that's something you can build, and it isn't too hard if you have sewing skills or can enlist a helper who does. This article presents a simple, sport version to encourage more modelers to try RC jumping. It emphasizes a wing-mounted pod and a self-contained release system so almost any model with enough power and ground clearance can carry the chutist. No special servo or release mechanism is required on the carrier aircraft.
Background and overview
The original Parachutist magazine article began, "Only a dummy would jump from 500 feet." It went on to point out risks with full-scale jumps; here we are talking about a one-foot-tall RC dummy named Christopher — "Chris" — who has provided years of safe, entertaining flying.
- The key simplifications:
- Wing-mounted pod for the packed chute and figure.
- Self-contained release system, independent of aircraft servos.
- A small, rugged radio package mounted in the figure.
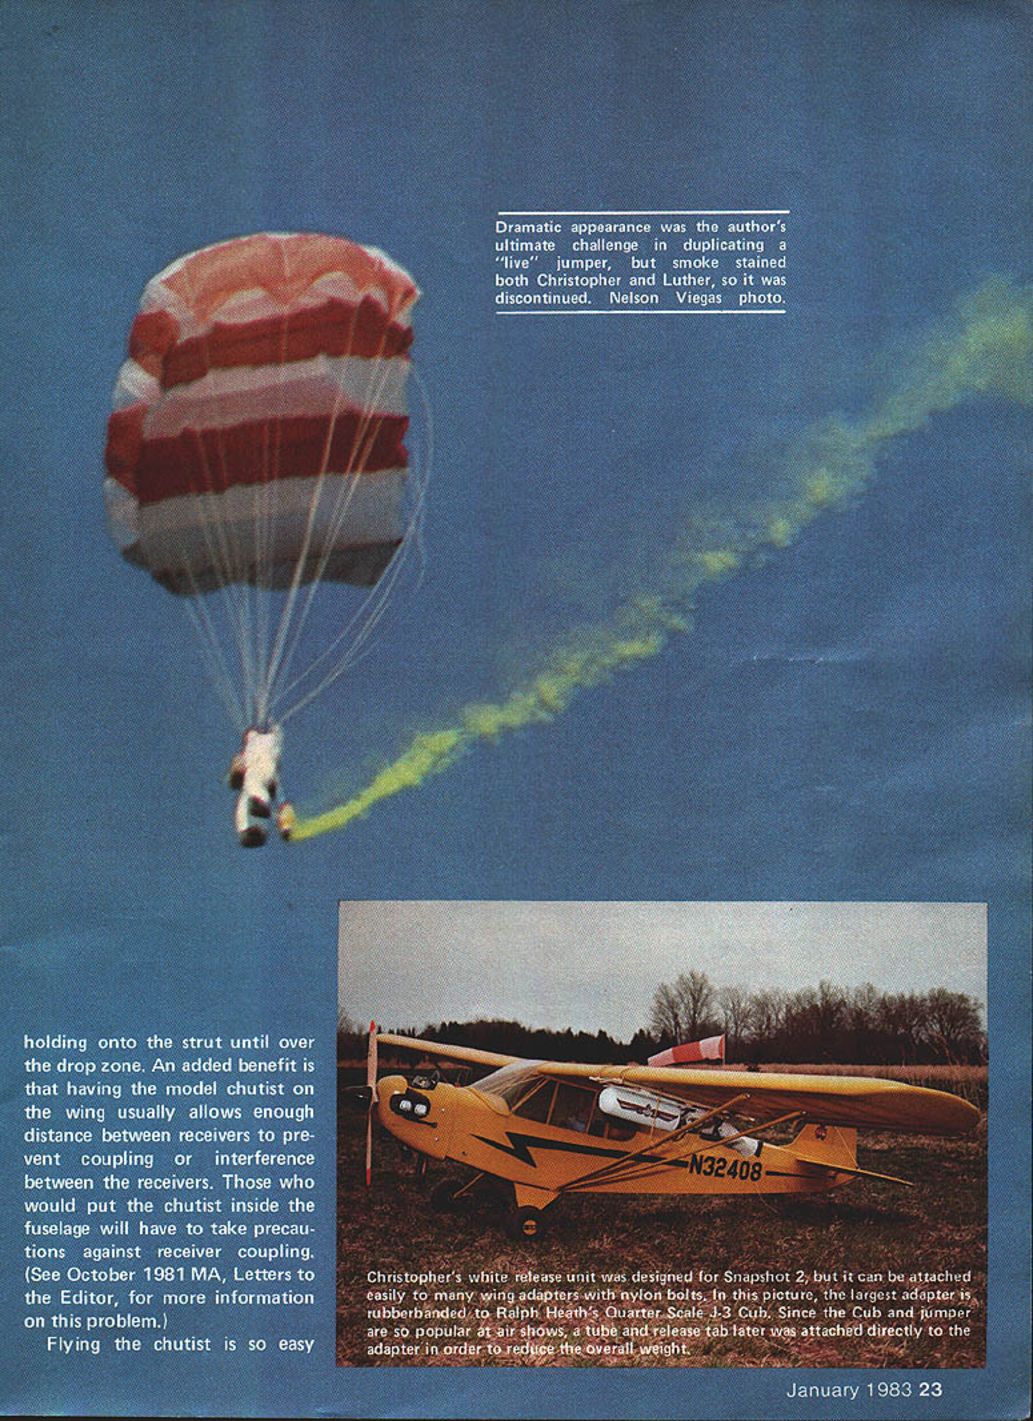
Releasing the parachutist from the wing is realistic; many full-scale jumps use a step/strut exit. Wing mounting also usually provides receiver separation that helps avoid coupling or interference. If you put the chutist inside the fuselage, take precautions against receiver coupling.
Flying the chutist is so easy you can hand the transmitter to your kids — they may have you retriever him from trees, but they can't actually crash the plane by flying the chutist.
Stories from the field
- Dawn (my wife) has flown Christopher for the Virginia Air Show Squadron for several years. Using a simple static-line release, there has never been a parachute-failure-to-open incident.
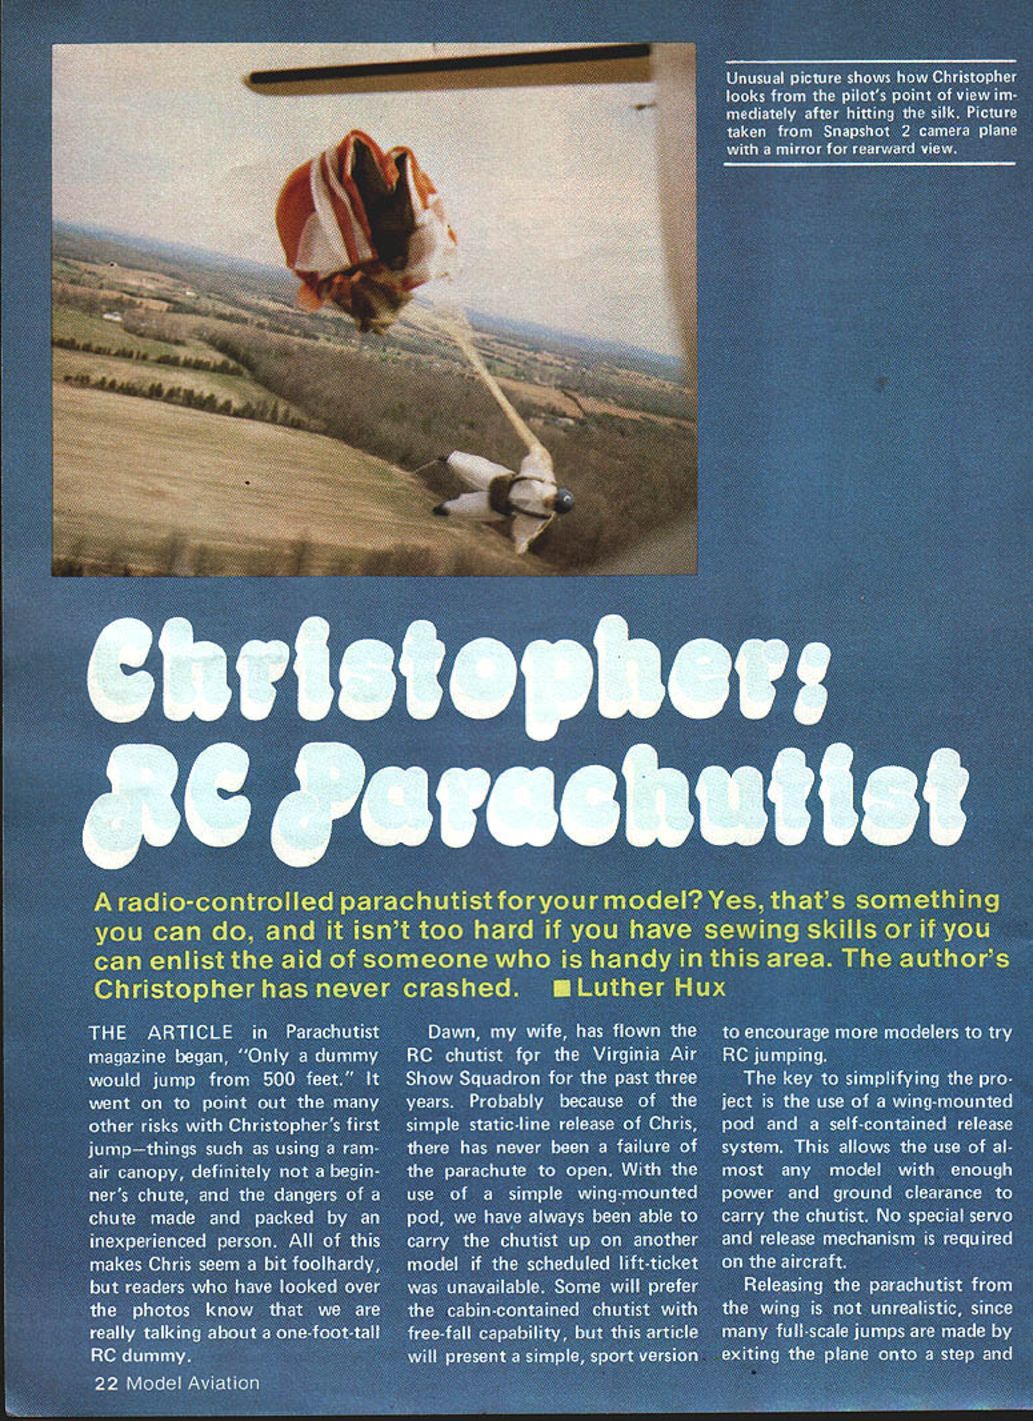
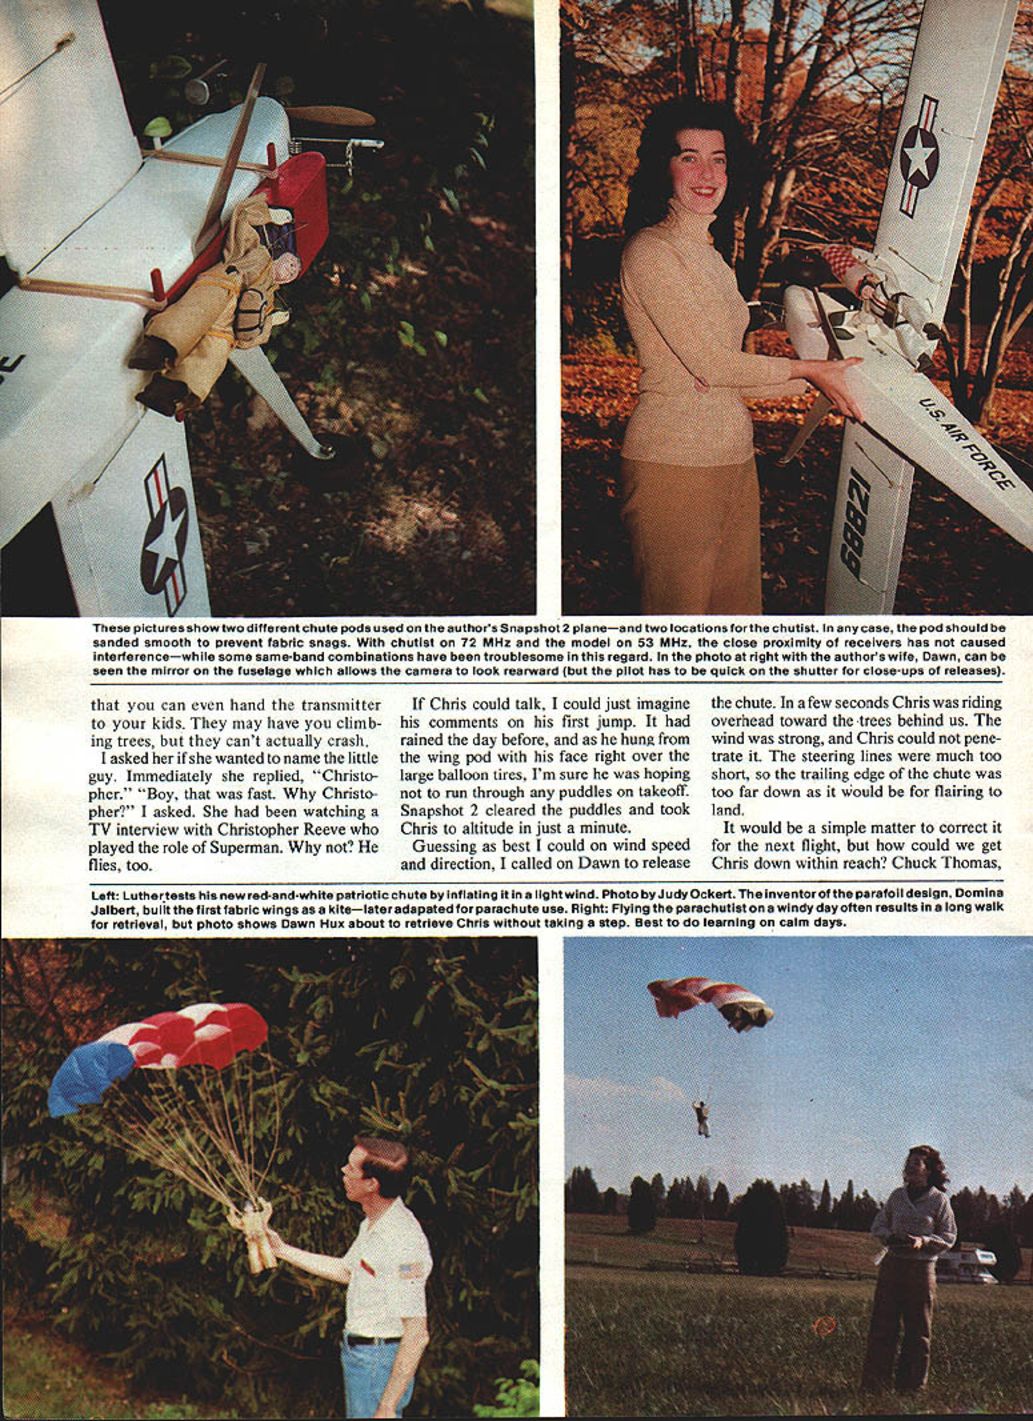
- Snapshot 2, a camera plane, has often carried Chris. With a first-surface mirror to let the wingtip camera look rearward, Snapshot 2 captured exit shots of Chris with his chute starting to open.
- On one jump from a J-3 Cub, a control problem forced the pilot to call for release; Chris safely deployed while the Cub later crashed and was repaired.
- Kite/parafoil lift has been used for practice: ParaCraft parafoil wings can lift Chris to about 200 feet so the operator concentrates only on flying the chutist. At some shows thermals kept Chris aloft for nearly five minutes, producing unexpected drift — so expect variable performance in different conditions.
Performance, adjustments, and lessons learned
- Initial problems included poor wind penetration and slow turns:
- Steering lines were too short; trailing edge too far down.
- Solution: cut two gores from the chute and increase Chris' weight (ballast) to gain forward speed and better wind penetration.
- Move steering lines from hands through wire loops and attach hands to the main harness for better leverage.
- Effects of weight and trim:
- Too little weight → floats, slow turns, poor penetration into headwinds.
- More weight and proper trailing-edge deflection → quicker turns and better control.
- At best, a chutist can hold position in about a 10 mph wind.
- If turns are too fast or straight flight is difficult: reduce weight and lengthen steering lines.
Planning and preparations
Please read all instructions before starting each phase of construction.
Selecting the radio and servos
- Receiver and battery:
- Receiver must be small.
- Battery around 100 mAh recommended.
- Servos:
- Use large, heavy-duty servos (not micro servos). Long servo arms are required.
- Most two-channel transmitters have rotating sticks — your transmitter should have two vertical sticks (one for each arm of the chutist). If yours does not, modify as needed.
- Transmitter modification:
- Spring-load the sticks toward the top of the case so the arms return to the up position. You can install simple springs rather than removing all springs and manually returning sticks.
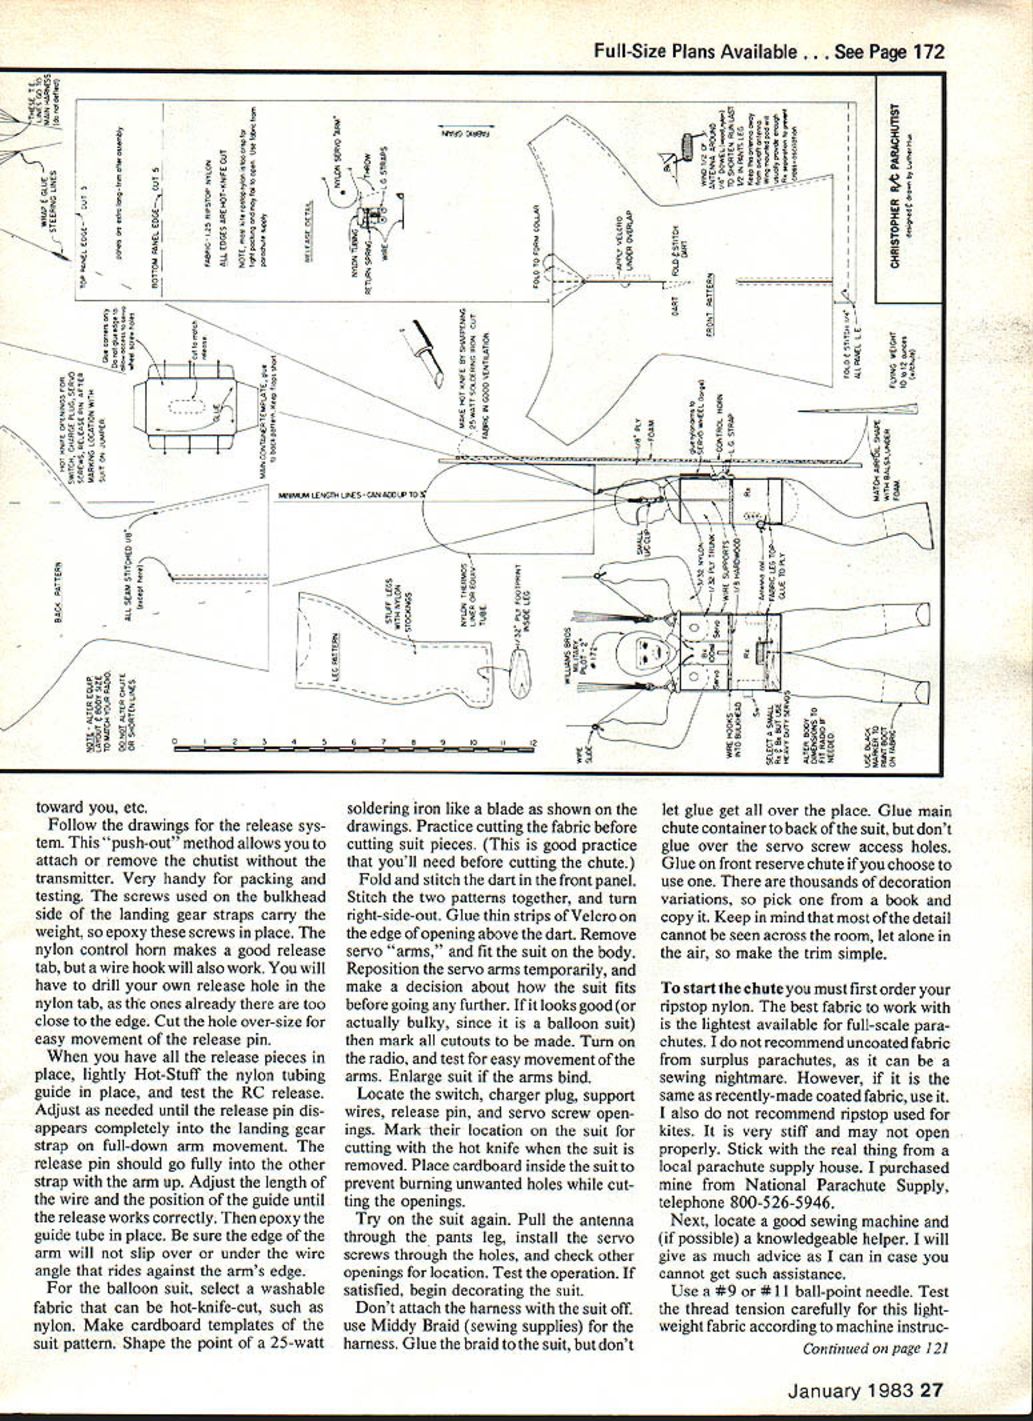
Fitting the radio to the figure
- Lay out radio parts over the plans and check fit.
- Assemble a 1/32" plywood radio box after cutting openings for the switch and servo shafts.
- Trim mounting tabs from servo cases if needed. Check servo rotation before installation.
- With the chutist face-down:
- Left servo should rotate counterclockwise when throttle stick moves from full to low.
- Right servo should rotate clockwise when elevator stick moves from down to up.
- Pulling sticks toward you should lower the arms.
- Wiring:
- Cut servo plug ends, route wires through a hole toward the battery area, and solder minimal-length plugs. Too much wire crowds the body.
- Use silicone glue to hold servos in place — glue only against the sides of servos so they can be removed with an X-Acto blade for repairs.
- Receiver:
- Wedge in foam and hold by the switch and charge plug. If battery fits too tight, remove plastic case and tape-wrap cells; silicone-glue in place but do not block vents.
Building the figure (body, head, legs, arms)
Head and support wires
- Paint details on the jumper's head; when dry mount on the plywood body.
- Bend support wires to shape. Drill a hole in the bulkhead and notch the figure head shoulders so the support wire fits flush; epoxy wires in place.
Legs and feet
- Cut four leg patterns from muslin (old bed sheets), stitch to make two leg stockings, turn right-side-out.
- Insert a plywood footprint into the shoe area to create a sole shape.
- Stuff legs with strips of old nylon stockings until firm; most chutists will be too light and require clay ballast later.
- Stitch legs together at the crotch, test fit on the body, adjust, and glue to the body. Color boots with a black marker.
Arms
- Cut arms from 3/32" nylon sheet.
- Bend arms to shape:
- Place on table edge with forearm over the edge.
- Heat with a MonoKote heat gun until pliable, bend slightly beyond desired angle, hold until cool.
- White stress marks indicate insufficient heat.
- Drill holes in the hands for the wire slide (doubling pull distance) and cut holes for servo wheel shafts.
- Use large servo wheels if available. Lightly sand wheel bottoms and shoulder area of arms.
- Mount arms on wheels and wheels on servo shafts. Turn on radio, move sticks and trims to the top position (arms up).
- With arms raised, mark locations so you can remove and Hot-Stuff the arms to the wheels in the proper position (do not glue on the servo itself).
- Test operation:
- Left stick pull should lower left arm as you pull stick back.
- Right stick push should lower right arm as you push stick forward.
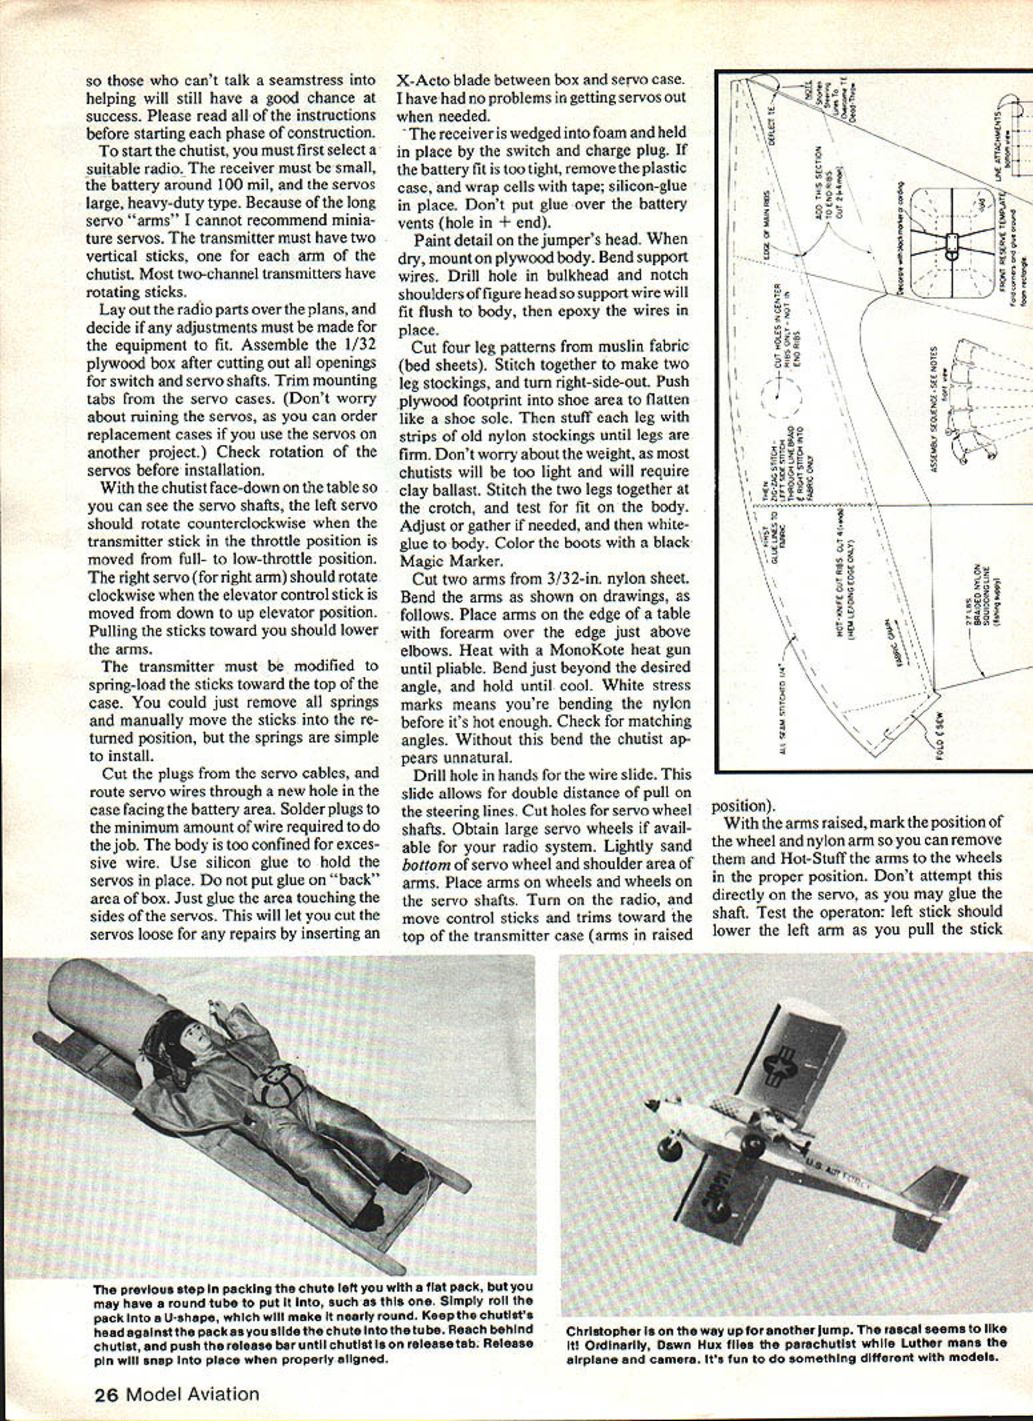
Release system and pod mounting
Release system
- Follow drawings for the "push-out" release method — this allows attaching/removing the chutist without the transmitter.
- Secure screws on the bulkhead side of the landing gear straps (they carry the weight) and epoxy them in place.
- Use a nylon control horn as a release tab, or a wire hook. Drill your own hole in the nylon tab (factory holes may be too close to the edge). Cut the hole oversize for free movement of the release pin.
- Lightly Hot-Stuff the nylon tubing guide in place temporarily and test the RC release.
- Adjust so the release pin disappears completely into the landing gear strap on full-down arm movement.
- The release pin should also go fully into the other strap with the arm up.
- When correct, epoxy the guide tube in place. Ensure the arm edge will not slip over or under the wire angle that rides against the arm.
Pod and mounting
- The pod shape is flexible; it must hold the packed chute snugly and the board must support the weight.
- Materials used by the author: Lite Ply for the board and a Thermos bottle nylon liner for the tube. L'Eggs hose "egg" can work for a nose cone.
- Avoid any edges or hardware that can snag lines or cut fabric.
- Attach the pod to the wing with rubber bands (nylon bolts are an alternative). Install blocks for curved wing bottoms or to allow aileron throw clearance.
- Pack the chute snugly in the pod, nose-first, and ensure the deployment path is clear.
Balloon suit and harness
- Select a washable fabric that can be hot-knife-cut (nylon works). Make cardboard templates of the suit pattern.
- Shape the point of a 25-watt soldering iron as a blade for hot cutting. Practice before cutting the suit.
- Fold and stitch the dart in the front panel, stitch the patterns together, and turn right-side-out.
- Glue thin strips of Velcro on the opening edge for closure.
- Fit the suit on the body, reposition servo arms temporarily, ensure arm movement is free, and enlarge openings if arms bind.
- Mark and cut openings for switch, charge plug, support wires, and release pin with cardboard inside the suit to protect unwanted burning.
- Use Middy Braid for the harness; glue braid to the suit but avoid excess glue. Glue main chute container to the back of the suit but do not glue over servo screw access holes.
- You may glue a front reserve chute if desired. Keep decoration simple — details are hard to see from the ground.
Chute materials and construction
Materials and tools
- Order ripstop nylon from a parachute supply house. Use the lightest fabric intended for full-scale parachutes.
- Avoid uncoated surplus fabric unless it's essentially the same as new coated fabric.
- Avoid stiff ripstop used for kites.
- Recommended source (author): National Parachute Supply.
- Sewing machine:
- Use a #9 or #11 ball-point needle.
- Test thread tension for lightweight fabric.
- Stitch about eight stitches per inch. Use a double-feed foot if available. Set needle position far right for straight stitch work.
- Cutting:
- Cut templates from illustration board. Hot-knife cutting is recommended; practice on spare fabric.
- Cut on a surface such as formica, coated wallboard, or heavy aluminum foil to avoid bonding to work surface.
- Work in a well-ventilated area. Keep hot-knife point clean.
Assembly steps
- Make a cut list: color, shape, quantity, which ribs have holes, and line attachment sides. Choose a dark color for the right end rib for orientation.
- Hem leading edges only to strengthen them; hot-knife edges mean no hemming elsewhere is needed.
- Use thick white glue (SoBo or Grrrip) to attach nylon squidding line to the ribs — squidding line resists tangles best.
- Set sewing machine to zig-zag: stitch the line to the ribs so the "zig" goes through the line and the "zag" through the fabric. Pull thread slightly at start to prevent tension loss. Tie knots at both ends of each stitch.
- Do not attach trailing-edge (T.E.) lines until assembly is complete.
- Stitch the long top panels together first (start at the leading edge to ensure alignment).
- Attach ribs to top panel seams.
- Attach bottom (short) panels to ribs, working from one end across to the other.
- If aligning three layers is difficult, reduce stitch density temporarily (six stitches per inch) to attach one side first, then the other. Return to eight stitches per inch for two-layer end ribs.
- Chalk-mark the T.E. where ribs end, stitch on that line, then hot-knife-cut 1/4" from the stitch.
- Optional vents to increase forward speed: leave a 1" section unstitched at the center of each gore T.E. so air can pass. Separate bonded hot-knife-cut layers behind the sewing gap to complete the passageway.
Steering lines and rigging
- Attach short steering lines to the T.E. Glue 1" of each steering line parallel to the T.E. and stitch in place.
- Lay the chute on its top and assemble steering lines at the harness on a 1/4 A control line clip (small Perfect Brand). Bind with thread and glue.
- Thread steering lines through the hand slides (these act as pulleys) and attach to clips. Deflect the T.E. attached to steering lines about 1" closer to the chute than center T.E. lines to overcome dead-throw caused by the rounded edge when inflated.
- Check line tensions in light steady wind (or indoors if space permits):
- Tight line → lengthen.
- Loose line → tighten.
- Let the majority rule; adjust odd lines.
- Once even, glue the steering line joint and trim excess line. Tuck steering lines to the hands inside the suit until jump-tested.
- With the chute hanging upside-down, servo arms should be able to raise the T.E. to be even with the L.E.
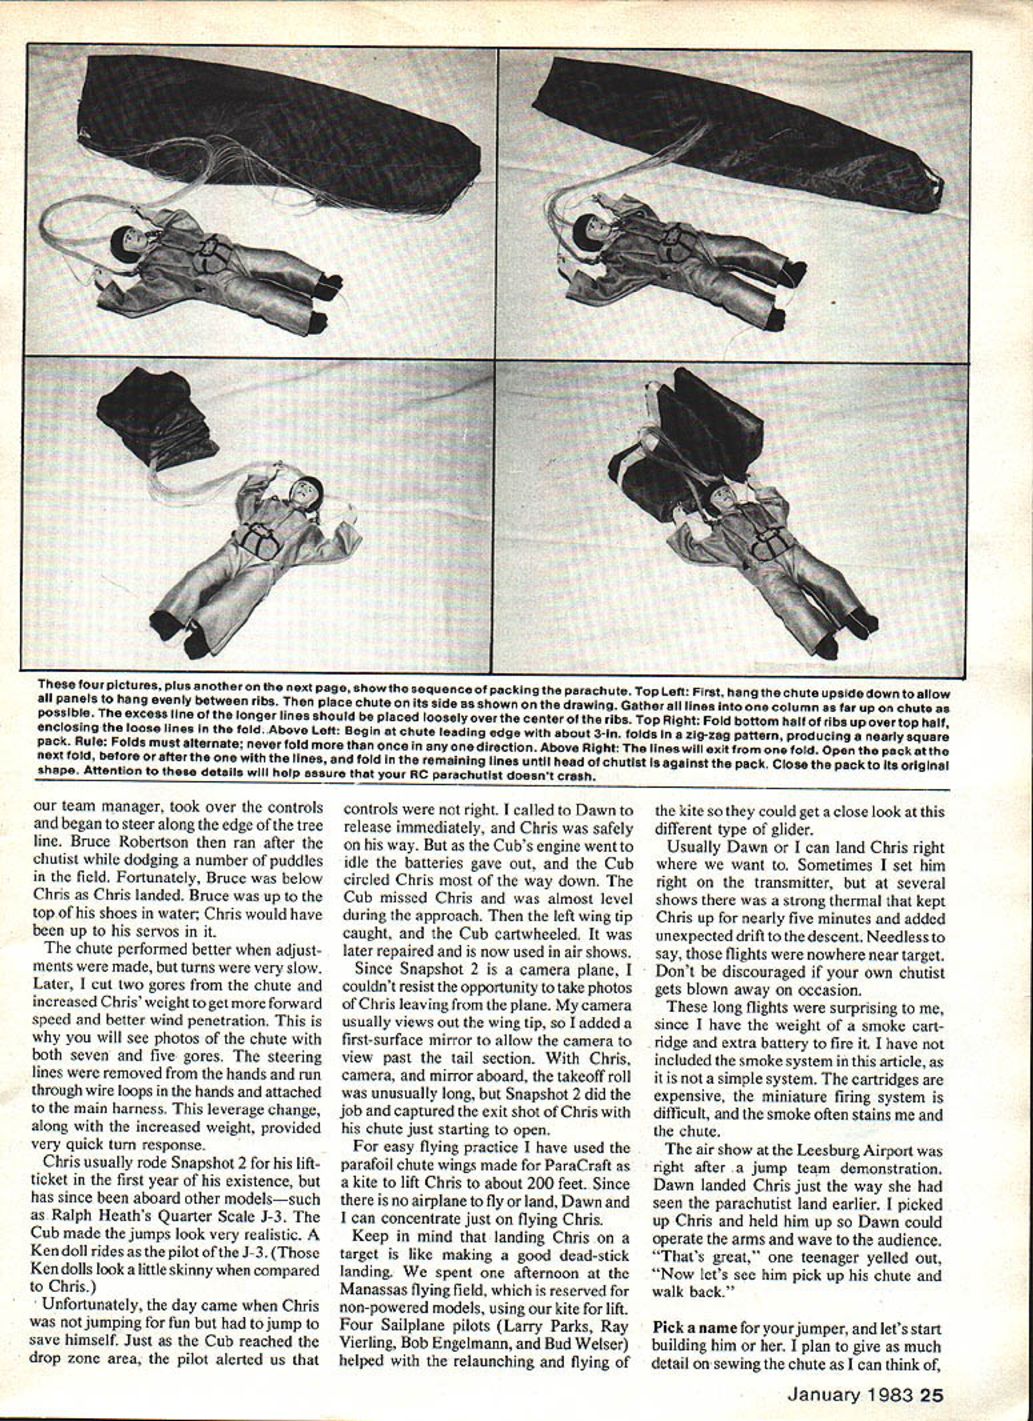
Packing, testing and practice
- Follow a photographic or written sequence for packing; test the release over a bed first.
- Because the chutist exits the plane at about 45°, hold the pod nose-up at 45° for ground testing (do not hold level). Without slipstream, a level hold may make the figure exit straight down and could damage fabric.
- Work out malfunctions before trying on the model.
- Building and testing suggestions:
- If testing from a building, do not pack the chute — launch it already open and choose a calm day.
- You should be able to complete a full 360° turn in about 100 feet or less in a calm environment.
- Best learning days are calm ones; windy days often result in long retrieval walks.
- For your first real jump choose a calm day.
- Recommended jump technique:
- Release at about 300 feet upwind with the plane at about 45° elevation from you.
- Pull transmitter sticks back and immediately release them — do not hold sticks down, as this increases servo strain when the chute opens.
- Aim to have the arms in the up position when the chute opens — this occurs about 15 feet behind the model.
- Best model throttle: 1/4 to 1/2 throttle for release.
- Aircraft clearance: ensure the chutist will clear the stabilizer and watch for antenna wires, counterweights, or other snag hazards.
Troubleshooting and tips
- Slow turns:
- Causes: too little weight or T.E. not deflected enough.
- Fixes: add weight (ballast), increase trailing-edge deflection, shorten steering lines for quicker response.
- If chutist is being carried overhead:
- Turn into the wind and try to hold position.
- If chutist drops in front of you:
- Turn downwind to increase speed toward you.
- Tangled lines after a rolling landing:
- Study the lines carefully — usually one or two moves will straighten them.
- Hot-knife cutting:
- Edges bond; separate edges as needed for vents or glue areas.
- Smoke effects:
- Smoke cartridges and firing systems are expensive, hard to miniaturize, and the smoke can stain the chute; the author did not include a simple smoke system in the article for these reasons.
- Practice with a kite/parafoil if you have no airplane available — it helps develop landing and steering skills.
Final notes and encouragement
- The pod and release tab position are important; poor placement can make models tail-heavy.
- Test releases thoroughly and make adjustments before flying off a model.
- Expect some long retrieval walks early on; practice in calm conditions to learn spotting and landing.
- Have fun: at one air show Dawn landed Chris and held him up for the crowd; one teenager yelled, "Now let's see him pick up his chute and walk back."
- Pick a name for your jumper and start building. With careful reading, planning, and practice, you should have a good chance at success and lots of fun learning to jump.
Transcribed from original scans by AI. Minor OCR errors may remain.

