

Clean It Up
By
L. F. Randolph
Overview
All engines get dirty, whether from inadvertent contact with the ground or from ordinary accumulation of dirt and grime while flying. This photo sequence shows just how easy this cleaning chore is. It should be done often.
New engines are not necessarily clean despite the efforts of manufacturers. A new engine should be visually inspected by removing the back cover, but manufacturers generally do not recommend further dismantling of a new engine if this inspection shows it to be clean.
A clean engine after going through the 14 illustrated steps. Our engines are quite simple in operation but are truly jewels of precision manufacturing. Dirt is their enemy; they deserve to be kept clean.
Crankcase designs
There are two basic types of crankcase design used in our engines:
- One type has the main bearing for the crankshaft in the front of the case and integral with it; access is through a back cover plate.
- The other type has the bearing made into the front cover, which is removable; this type may, or may not, have a back cover plate.
Both types are shown in the pictures.
Cleaning steps (steps 7–14)
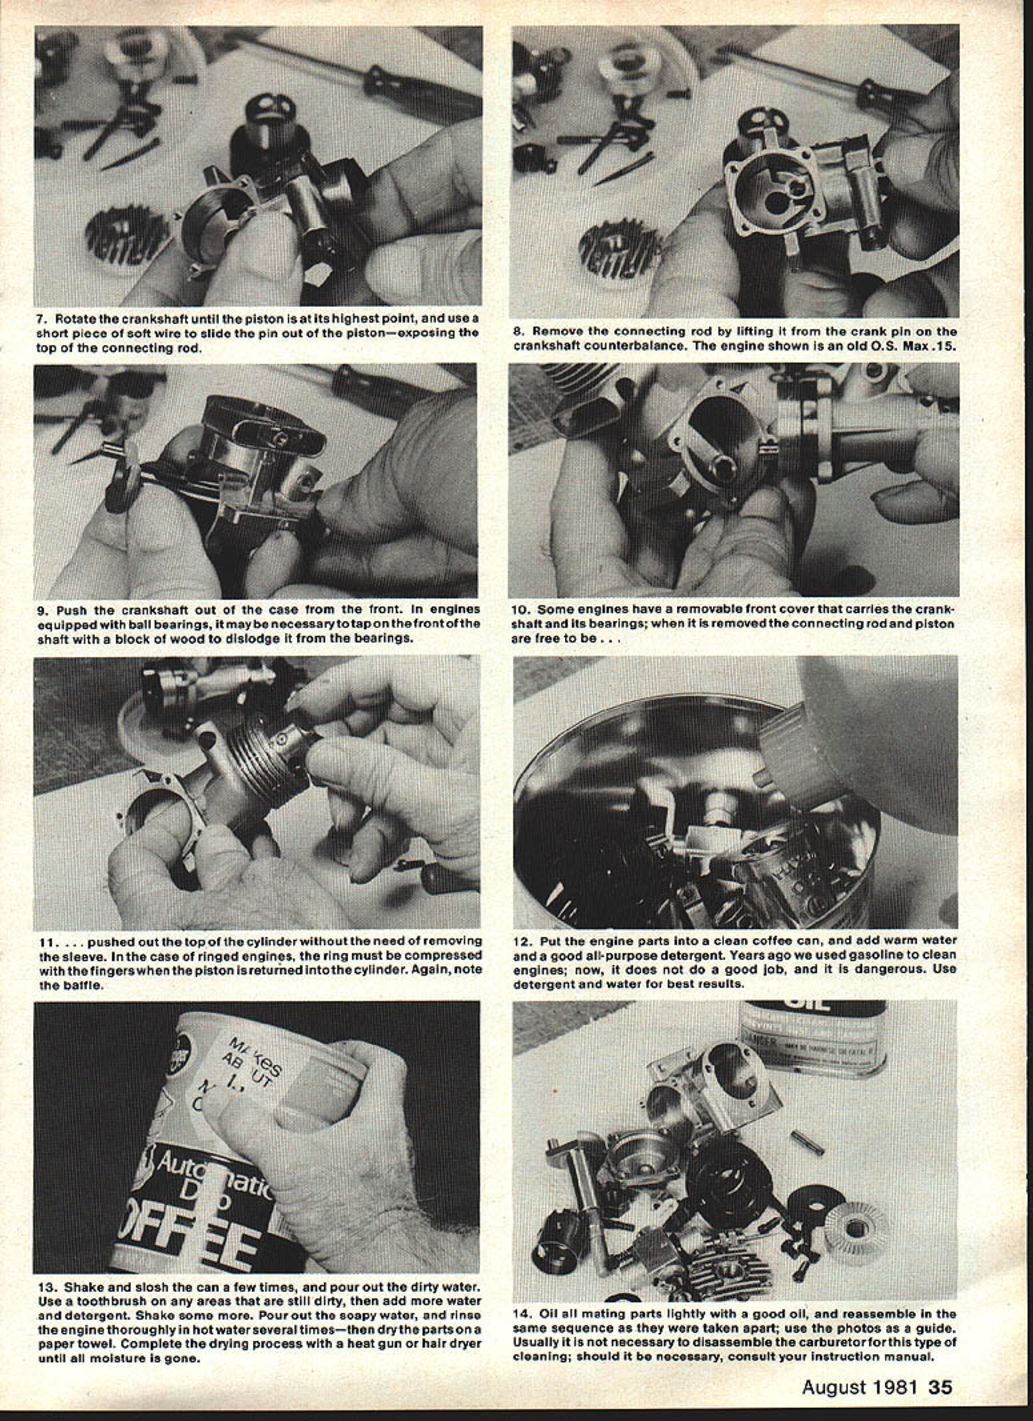
- 7. Rotate the crankshaft until the piston is at its highest point, and use a short piece of soft wire to slide the pin out of the piston, exposing the top of the connecting rod.
- 8. Remove the connecting rod by lifting it from the crank pin on the crankshaft counterbalance. (The engine shown is an old O.S. Max .15.)
- 9. Push the crankshaft out of the case from the front. In engines equipped with ball bearings, it may be necessary to tap on the front of the shaft with a block of wood to dislodge it from the bearings.
- 10. Some engines have a removable front cover that carries the crankshaft and its bearings; when it is removed the connecting rod and piston are free to be taken out.
- 11. The piston is pushed out the top of the cylinder without the need to remove the sleeve. In engines with piston rings, the ring must be compressed with the fingers when the piston is returned into the cylinder. Again, note the baffle.
- 12. Put the engine parts into a clean coffee can and add warm water and a good all-purpose detergent. Years ago we used gasoline to clean engines; now it does not do a good job, and it is dangerous. Use detergent and water for best results.
- 13. Shake and slosh the can a few times, and pour out the dirty water. Use a toothbrush on any areas that are still dirty, then add more water and detergent and shake some more. Pour out the soapy water and rinse the engine thoroughly in hot water several times. Dry the parts on a paper towel and complete the drying process with a heat gun or hair dryer until all moisture is gone.
- 14. Oil all mating parts lightly with a good oil, and reassemble in the same sequence as they were taken apart; use the photos as a guide. Usually it is not necessary to disassemble the carburetor for this type of cleaning; should it be necessary, consult your instruction manual.
Transcribed from original scans by AI. Minor OCR errors may remain.

