
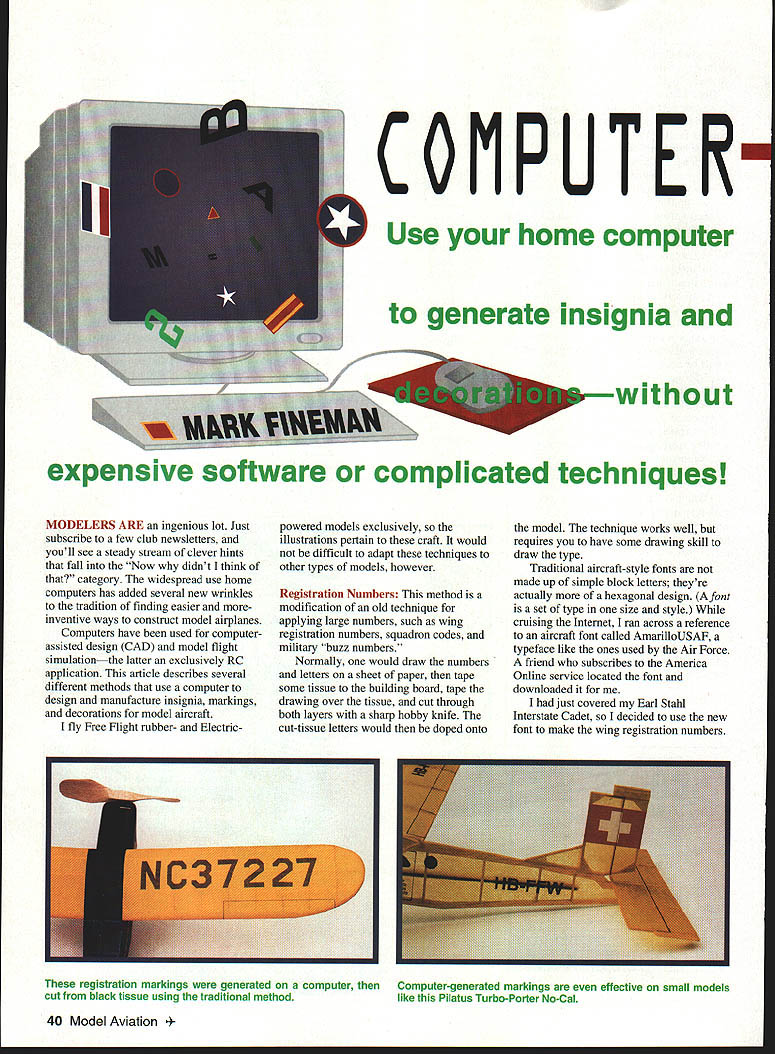
Computer Generated Markings
Mark Fineman
Modelers are an ingenious lot. Subscribe to a few club newsletters and you'll see a steady stream of clever hints that fall into the "Now why didn't I think of that?" category. The widespread use of home computers has added several new ways to design and manufacture insignia, markings, and decorations for model aircraft.
Computers have been used for computer-assisted design (CAD) and model flight simulation — the latter an exclusively RC application. This article describes several methods that use a computer to produce registration numbers, national insignia, decals, and other decorations. The illustrations and examples pertain mainly to Free Flight rubber- and electric-powered models, but these techniques can be adapted to other types of models.
Registration Numbers
This is a modern modification of an old technique for applying large numbers (wing registration numbers, squadron codes, military “buzz numbers”).
- Create the numbers and letters on a computer using a drawing program (CorelDraw or similar). Traditional aircraft-style fonts tend to be hexagonal rather than simple block letters; an example is the AmarilloUSAF/Amarillo_USAF typeface commonly used for Air Force markings.
- Size the type exactly to fit the model and save the drawing to disk. Print the drawing and make photocopies to preserve the original.
- Tape a photocopy over a piece of black tissue and cut through both layers with a sharp hobby knife. You can apply a length of drafting tape as a baseline and mark exact positions of individual letters before cutting; the marked tape can then be used as a positioning guide on the model.
- Dope (adhere) the cut tissue letters onto the wing or fuselage as you would with the traditional method.
This approach eliminates the need for hand-lettering and works well on small models. Cutting from black tissue using the traditional method produces crisp results.
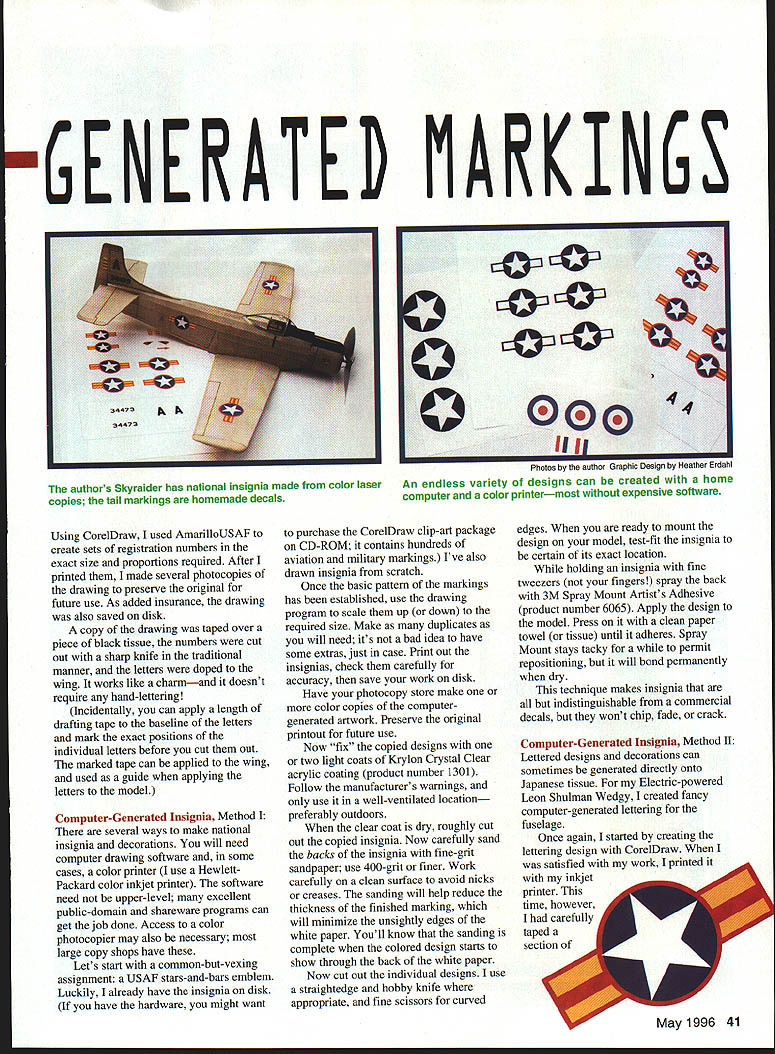
Computer-Generated Insignia
There are several ways to make national insignia and decorations. You will need computer drawing software and, in some cases, a color printer or access to a color photocopier. The examples below assume use of a home inkjet printer (I use an HP color inkjet) and CorelDraw, but public-domain and shareware programs will also work. Large copy shops can produce color copies if your printer cannot.
Once a basic marking pattern has been established in the drawing program, scale it to the required size and make duplicates. Print and check carefully for accuracy, then save the work on disk. Have a photocopy store make color copies if desired, and preserve the original printout for future use.
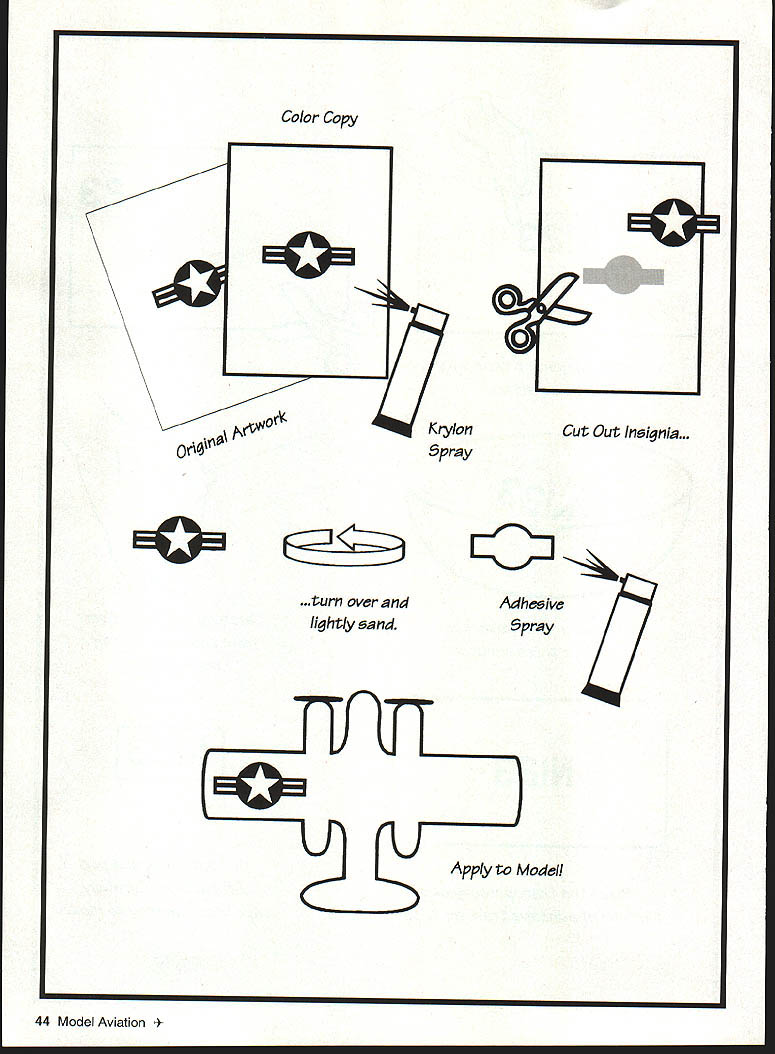
Method I — Photocopy + Clear Coat + Spray Mount
Equipment and supplies:
- Computer and drawing software (e.g., CorelDraw)
- Color printer or color photocopies
- Krylon Crystal Clear acrylic spray (product no. 1301)
- 400-grit (or finer) sandpaper
- Straightedge, hobby knife, fine scissors
- Fine tweezers
- 3M Spray Mount Artist's Adhesive (product no. 6605)
- Clean paper towel or tissue
Steps:
- Print or photocopy the insignia and check for accuracy. Preserve the original printout.
- Fix the copied designs with one or two light coats of Krylon Crystal Clear acrylic (follow manufacturer warnings; use in a well-ventilated area, preferably outdoors). Allow to dry.
- Roughly cut out the copied insignia.
- Carefully sand the backs of the insignia with 400-grit or finer sandpaper on a clean surface to reduce thickness and minimize white edges. Sand until the colored design begins to show through the back of the paper.
- Cut out the individual designs using a straightedge, hobby knife, and fine scissors for curves.
- Test-fit each insignia on the model to determine exact location.
- While holding the insignia with fine tweezers, spray the back with 3M Spray Mount Artist's Adhesive. Apply the design to the model and press with a clean paper towel until it adheres. Spray Mount stays tacky for repositioning but bonds permanently when dry.
Notes:
- This technique produces markings that are very similar to commercial decals and that won’t chip, fade, or crack.
- Make extras. It’s wise to have spares in case of mistakes.
Method II — Printing Directly onto Japanese Tissue
This method can produce nearly invisible demarcation lines when applied carefully, and works well for many fuselage and surface decorations.
Steps:
- Create the lettering or design in your drawing program and print it.
- Tape a section of Japanese tissue flat to an ordinary sheet of printer paper so the tissue lies smoothly over the paper.
- Run the sheet through the inkjet printer so the design prints on the tissue.
- Cut the printed tissue to the desired shape and fit it to the model framework. Use undecorated tissue for surrounding areas so the seam is nearly invisible.
- Attach the tissue to the framework with diluted white glue. Finish the model with a non-water solvent finish such as Crystal Coat rather than water-based dope to avoid running of the water-soluble ink.
- Limitations: Because the printed lettering is effectively transparent, this method cannot produce light-colored type on dark tissue.
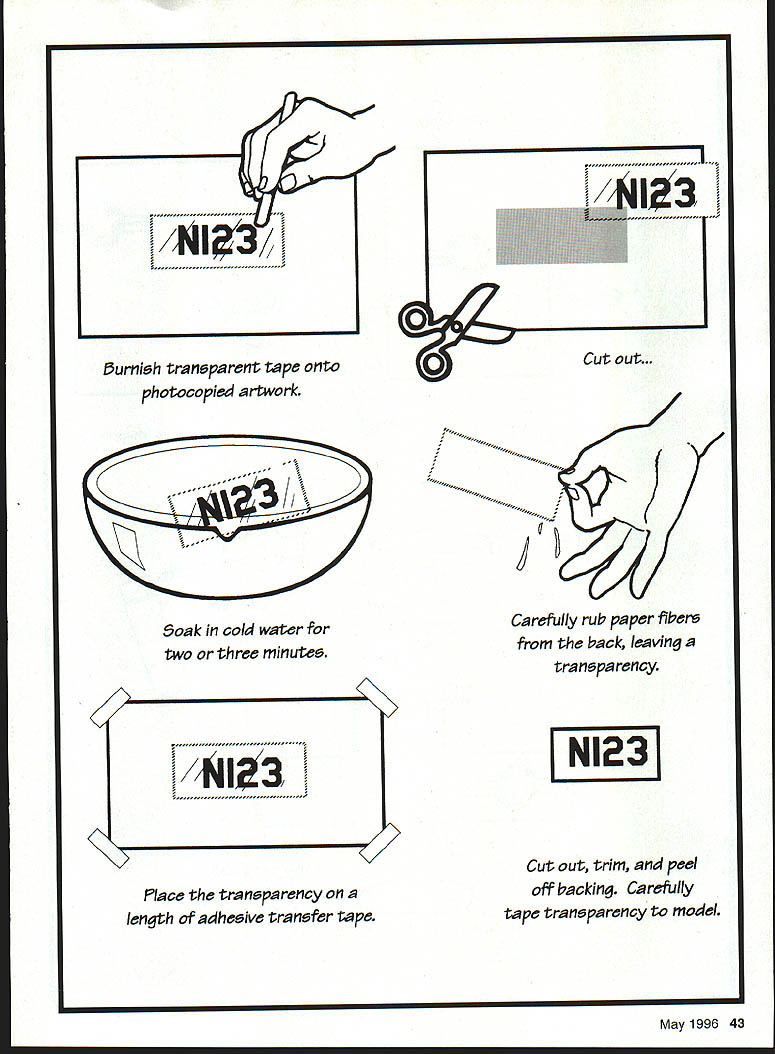
Homemade Decals (Pressure-Sensitive)
You can make custom pressure-sensitive decals using common materials and a photocopier.
Materials:
- Photocopied artwork (always use a copy, never the original)
- Transparent tape (Scotch Magic Tape works well)
- Double-sided, linerless transfer tape (adhesive on both sides, removable coated liner)
- Shallow dish of cold water
- Blunt burnishing tool (end of a hobby knife)
- Masking tape
- Straightedge, hobby knife, fine scissors
- Paper towel
Steps:
- Prepare a photocopy of the artwork. Use a copier toner-based copy; single-color toner (black or red) yields the best results.
- Stick a length of transparent tape over the artwork so the toner contacts the adhesive. Burnish the tape with a blunt tool to ensure good contact.
- Roughly cut out the taped artwork.
- Place the taped artwork in a dish of cold water for 2–3 minutes (do not soak longer). The paper will separate from the tape.
- While holding the taped artwork above the dish, gently rub away the paper fibers under the water until only the toner remains trapped in the tape adhesive. Dip back into the water as needed. When fibers are gone, remove excess water by shaking or wiping carefully.
- On your workbench, tape a length of the transfer tape down with the liner side against the tabletop and the sticky side facing up (masking tape on the corners will keep it from moving).
- Press the transparent tape (toner-side down) onto the exposed adhesive of the transfer tape so the toner bonds to the transfer tape. Rub smooth with a fingertip.
- Trim the decal with a straightedge, hobby knife, or fine scissors.
- Peel off the liner from the transfer tape and apply the decal to the model. Press with a paper towel and trim edges as needed.
Notes and tips:
- Do not use the original artwork; always work from a photocopy.
- The soaking period should be no longer than two or three minutes; excessive soaking may cause adhesive to pull away.
- Pressure-sensitive decals work best on light-colored surfaces since the tape is transparent.
- Multicolor photocopies often produce pale, poorly saturated decals; single-color toner works best.
- The size of a decal is limited only by the width of the transparent tape you use. Two-inch-wide packaging tape can work, but its high gloss may be reduced by lightly sanding with very fine grit sandpaper before application.
Final Notes and Tips
- Save digital files and make extra printed copies whenever possible.
- When using spray adhesives or clear coats, follow all manufacturer safety instructions and work in well-ventilated areas.
- Test-fit and position before making permanent bonds.
- Many variations and refinements of these techniques are possible; experimentation may yield solutions tailored to specific models and finishes.
Transcribed from original scans by AI. Minor OCR errors may remain.

