

CONTESTER
By R. J. Dunham
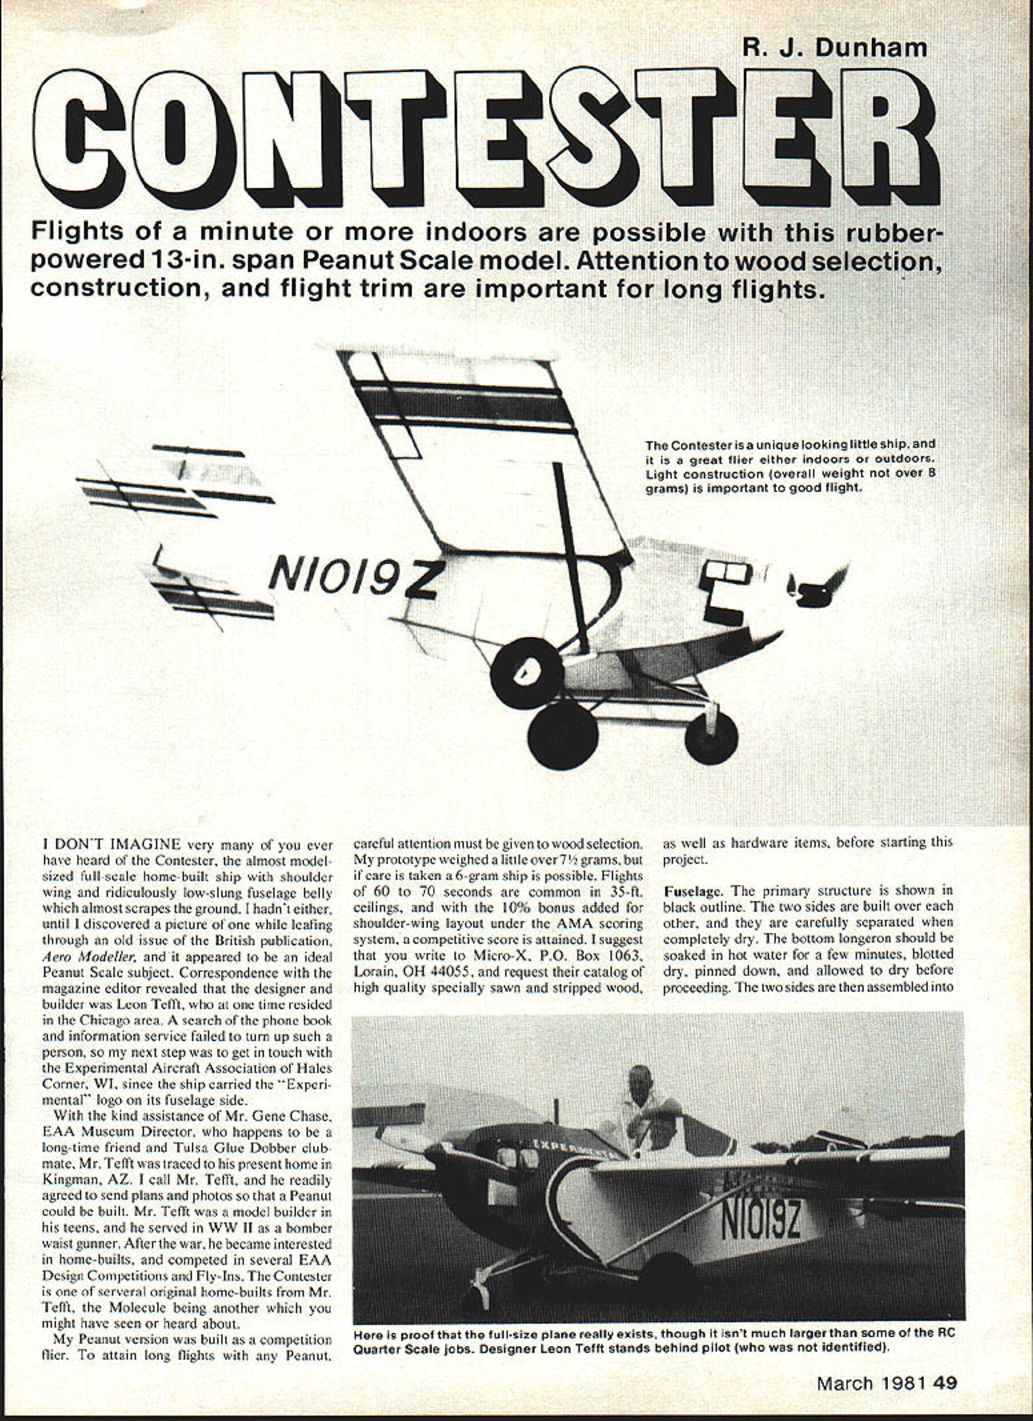
Flights of a minute or more indoors are possible with this rubber-powered, 13‑in. span Peanut Scale model. Attention to wood selection, careful construction, and precise flight trim are important for long flights.
I don't imagine very many of you have ever heard of the Contester — the almost model-sized full-scale home-built ship with a shoulder wing and a ridiculously low-slung fuselage belly that almost scrapes the ground. I hadn't either until I discovered a picture of one while leafing through an old issue of the British publication Aero Modeller. It appeared to be an ideal Peanut Scale subject. Correspondence with the magazine editor revealed that the designer and builder was Leon Tefft, who at one time resided in the Chicago area. A search of the phone book and information service failed to turn up such a person, so my next step was to get in touch with the Experimental Aircraft Association (EAA) of Hales Corner, WI, since the ship carried the "Experimental" logo on its fuselage side.
With the kind assistance of Mr. Gene Chase, EAA Museum Director and a long-time friend and Tulsa Glue Dobber clubmate, Mr. Tefft was traced to his present home in Kingman, AZ. I called Mr. Tefft, and he readily agreed to send plans and photos so that a Peanut could be built. Mr. Tefft was a model builder in his teens, served in WWII as a bomber waist gunner, and after the war became interested in home-builts, competing in several EAA design competitions and fly-ins. The Contester is one of several original home-builts from Mr. Tefft; the Molecule is another which you might have seen or heard about.
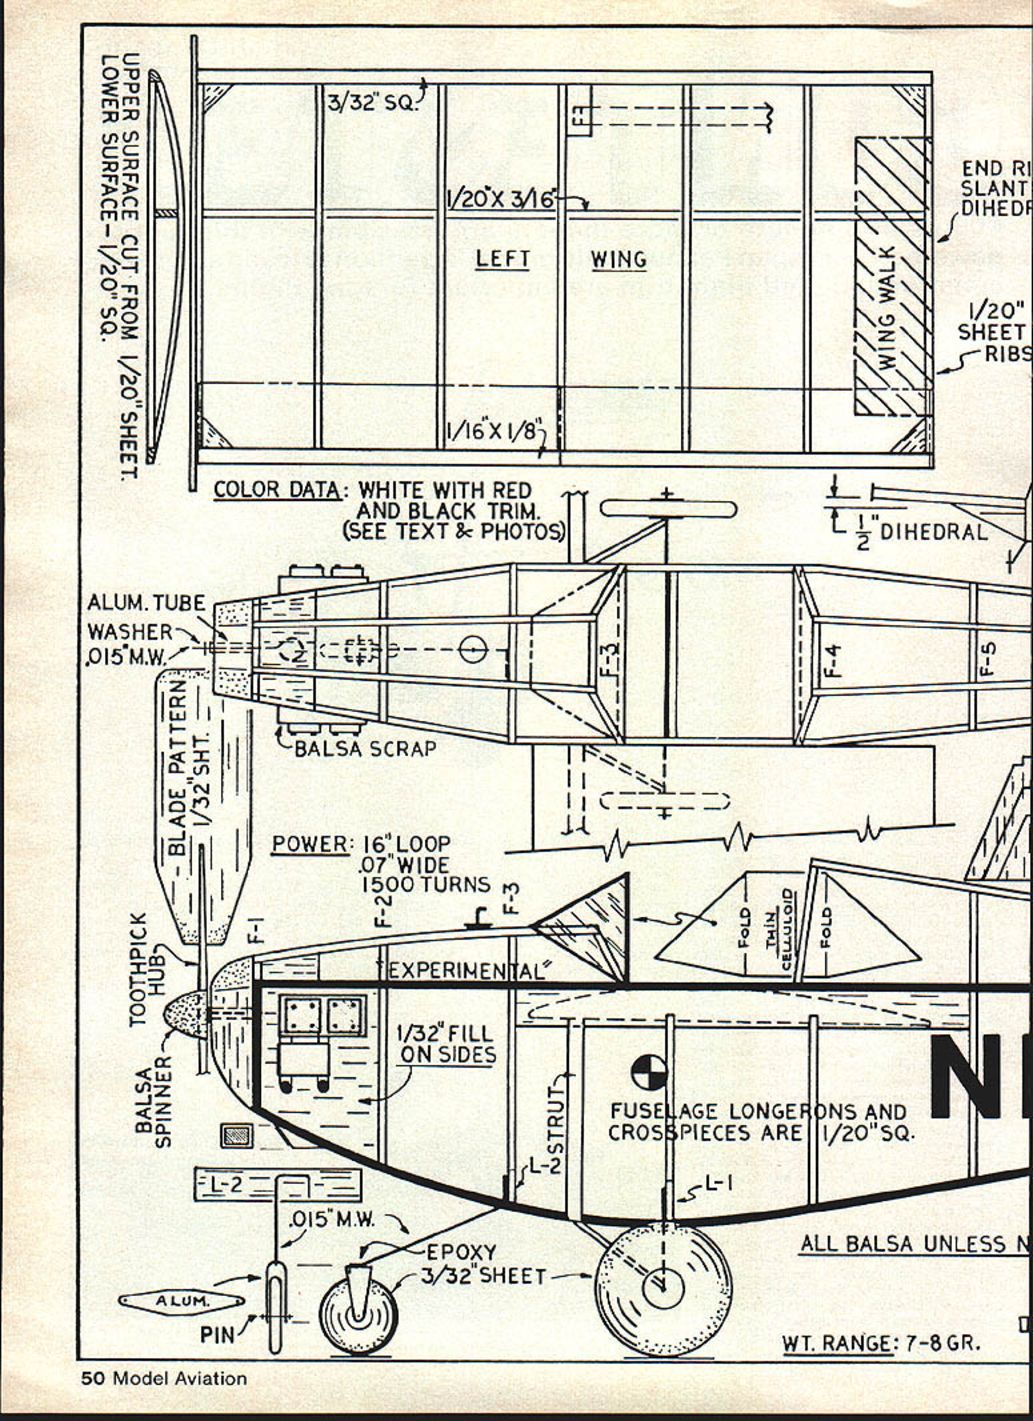
My Peanut version was built as a competition flier. To attain long flights with any Peanut, careful attention must be given to wood selection. My prototype weighed a little over 7½ grams, but with care a 6‑gram ship is possible. Flights of 60 to 70 seconds are common in 35‑ft. ceilings, and with the 10% bonus added for shoulder‑wing layout under the AMA scoring system, a competitive score is attained. I suggest you write to Micro‑X, P.O. Box 1063, Lorain, OH 44055, and request their catalog of high-quality specially sawn and stripped wood, as well as hardware items, before starting this project.
Mid-wing Peanut
(Note: the full-scale Contester is a shoulder‑wing home-built; the Peanut version is built in a mid/shoulder configuration to suit Peanut Scale rules and optimize indoor performance.)
Fuselage
- The primary fuselage structure is built as two side panels constructed over each other and carefully separated when completely dry.
- Soak the bottom longeron in hot water for a few minutes, blot dry, pin down, and allow to dry before proceeding.
- Assemble the two sides into a box, adding cross pieces and uprights.
- Place 1/32" square stringers where shown on the plan.
- At points where the fuselage makes abrupt changes (front-sheeted areas and at the wing attach top view), carefully crack the longerons to permit fill-in.
Landing gear and nose wheel:
- After scoring the gear wire with a sharp razor, reinforce the scored areas, bend to shape, and glue in place with a small dab of cement.
- Wheels are cut from light 3/32" sheet.
- Cement nose/turtleback formers, round them, and give a coat of clear dope; paint the center hubs black.
- Use paper punch-card stock for hub centers.
- The landing-gear wires may be given the appearance of thickness by adding 1/32" strips.
Covering and finish:
- Cover the entire fuselage with lightweight Japanese tissue, shrink tight with rubbing alcohol, and give a coat of very thin nitrate dope.
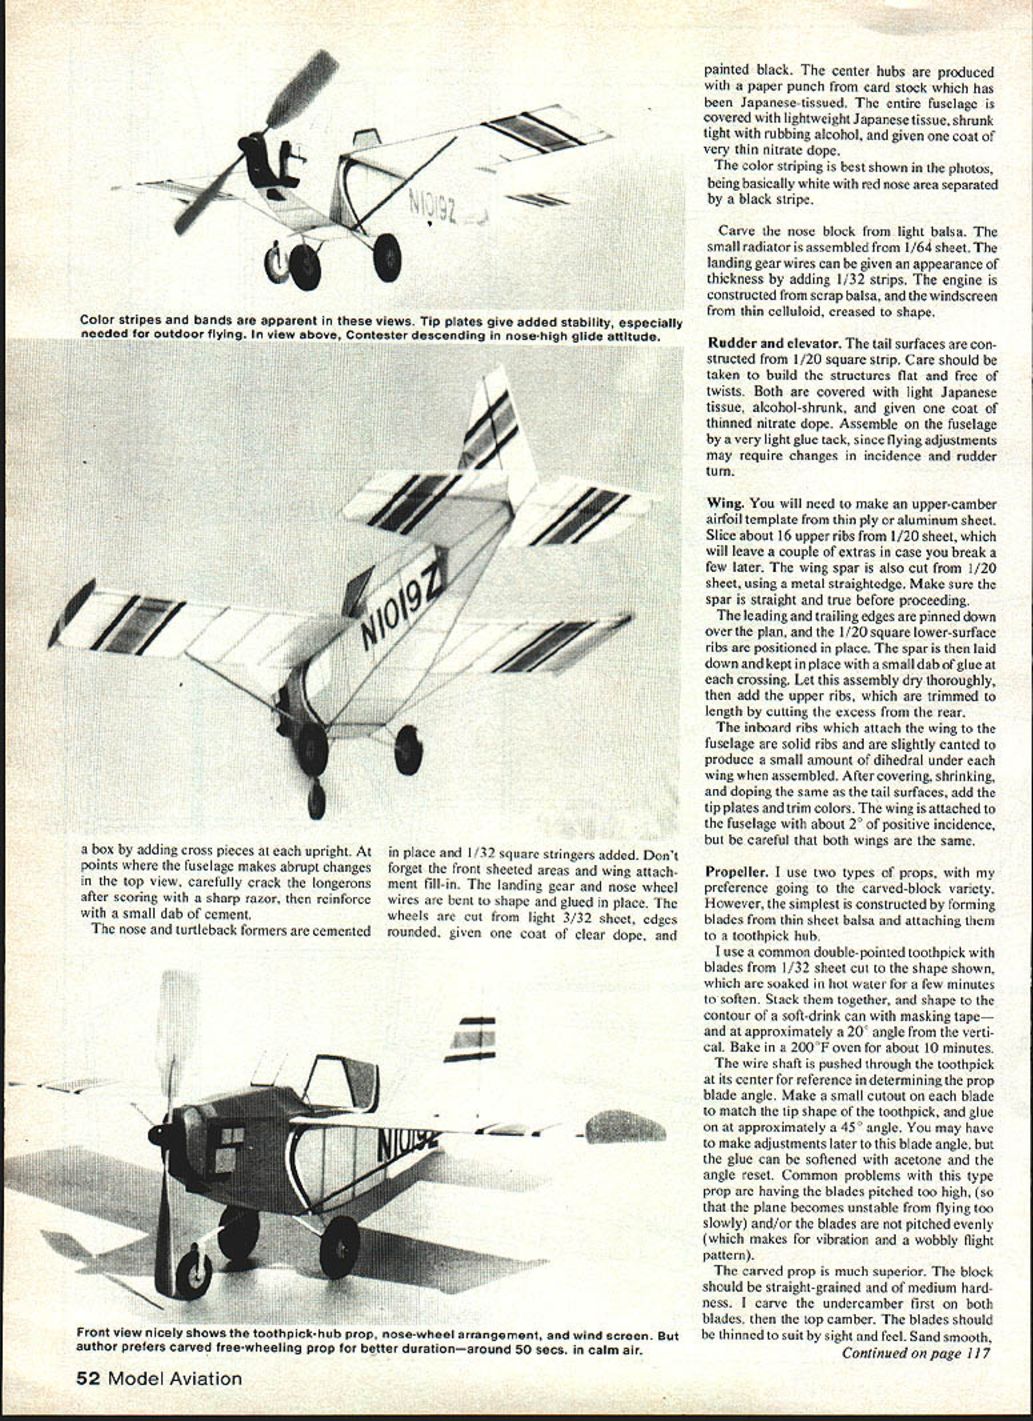
- Color striping is best shown in the photos: the model is basically white with the nose area red, separated by a black stripe.
Nose and details:
- Carve the nose block from light balsa.
- Assemble a small radiator from 1/64" sheet.
- The engine can be built from scrap balsa.
- The windscreen is made from thin celluloid creased to shape.
Tail Surfaces
- Rudder and elevator are constructed from 1/20" square strip.
- Take care to build these structures flat and free of twists.
- Cover with light Japanese tissue, shrink with alcohol, and give a coat of thinned nitrate dope.
- Assemble the fuselage with very light glue tack, since flying adjustments may require changes in incidence and rudder trim.
Wing
- Make an upper-camber airfoil template from thin ply or aluminum sheet.
- Slice about 16 upper ribs from 1/20" sheet (allowing a couple of extras in case of breakage).
- Cut the wing spar from 1/20" sheet using a metal straightedge; ensure the spar is straight and true before proceeding.
- Pin the leading and trailing edges down over the plan, and position the 1/20" square lower-surface ribs in place.
- Lay down the spar and secure it with a small dab of glue at each crossing. Let the assembly dry thoroughly.
- Add the upper ribs, trimming their excess from the rear.
- The inboard ribs that attach the wing to the fuselage are solid ribs and are slightly canted to produce a small amount of dihedral under each wing when assembled.
- After covering, shrinking, and doping (same as the tail surfaces), add the tip plates and trim colors.
- Attach the wing to the fuselage with about 2° of positive incidence; be careful that both sides are the same.
Propeller
Two types of props are used; the carved-block prop is preferred, but a simple sheet‑blade prop is easy to make.
Sheet-blade (toothpick hub) prop:
- Use a common double-pointed toothpick as a hub and blades from 1/32" sheet cut to the shape shown on the plan.
- Soak blade blanks in hot water for a few minutes to soften.
- Stack and shape them to the contour of a soft-drink can using masking tape, at approximately a 20° angle from the vertical.
- Bake in a 200°F oven for about 10 minutes.
- Push the wire shaft through the toothpick at its center for reference when setting blade angle.
- Make a small cut on each blade to match the tip shape of the toothpick, and glue on at approximately a 45° angle.
- You may need to adjust blade angle later; soften the glue with acetone and reset as necessary.
- Common problems with this type: blades pitched too high (causing instability/flying too slowly) and uneven blade pitch (causing vibration and a wobbly flight).
Carved prop:
- Use a straight-grained block of medium hardness.
- Carve the undercambers first on both blades, then the top camber.
- Thin the blades by sight and feel, sand smooth, and give two coats of clear dope.
Flying
- I prefer a right-hand pattern. You may need a bit of right rudder and/or right thrust; each ship is different.
- Start power flights with about 600 turns on a loop of 1/16" rubber strip about 14" long, using a geared winder.
- As successful flights are made, progress to more winds. You may need to experiment with rubber size to find the optimum combination.
- Employ a winding tube at higher turns to protect against breakage. This tube can be constructed from balsa, or any ready-made small-diameter plastic or fiberglass tube that will slide through the nose opening.
- When properly adjusted, this ship is capable of flights in the neighborhood of 50 to 70 seconds indoors. Outdoor flight times vary greatly, depending mostly on your air‑picking capabilities.
Write me in care of this magazine if you have questions or need further documentation.
Transcribed from original scans by AI. Minor OCR errors may remain.

