
Control Line: Aerobatics
Ted Fancher
The Magnum — first impressions
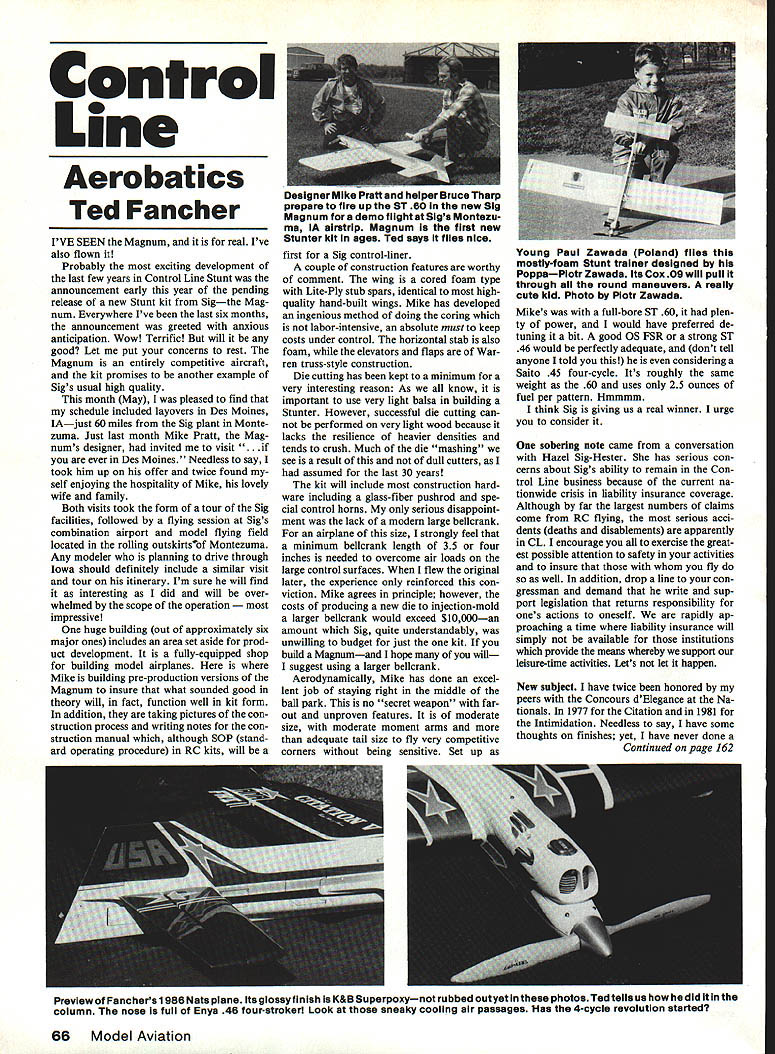
I've seen the Magnum, and it is for real. I've also flown it. Probably the most exciting development in the last few years in Control Line Stunt was the announcement earlier this year of the pending release of a new Stunt kit from Sig — the Magnum. Everywhere I've been the last six months the announcement was greeted with anxious anticipation: "Wow! Terrific!" Let me put your concerns to rest: the Magnum is an entirely competitive aircraft, and the kit promises to be another example of Sig's usual high quality.
Visit to Sig
In May I was pleased to find my schedule included layovers in Des Moines, IA — just 60 miles from the Sig plant in Montezuma. Mike Pratt, the Magnum's designer, had invited me to visit, and I took him up on the offer. Twice I enjoyed the hospitality of Mike, his wife, and family.
Both visits included a tour of Sig's facilities followed by a flying session at Sig's combination airport and model flying field in the rolling outskirts of Montezuma. Any modeler planning a drive through Iowa should include a similar visit — you'll be overwhelmed by the scope of the operation. One large building (of approximately six major ones) includes product development space: a fully equipped shop for building model airplanes. Mike was building pre-production Magnums to ensure what looked good in theory would work in kit form. They are also photographing the construction process and writing notes for the construction manual — standard for RC kits, but a first for a Sig control-liner.
Construction features
A couple of construction features are worthy of comment:
- Wing: cored-foam type with Lite-Ply stub spars, identical in concept to most high-quality hand-built wings. Mike has developed an ingenious, not labor-intensive method of doing the coring to keep costs under control.
- Horizontal stabilizer: foam.
- Elevators and flaps: Warren-truss-style construction.
Die cutting has been kept to a minimum for an important reason: successful die cutting cannot be performed on very light balsa because it lacks the resilience of heavier densities and tends to crush. Much of the die "mashing" we see is a result of this and not simply dull cutters, as I had assumed for the last 30 years.
The kit will include most construction hardware, including a glass-fiber pushrod and special control horns.
Bellcrank — a caveat
My only serious disappointment is the lack of a modern large bellcrank. For an airplane of this size I strongly feel a minimum bellcrank length of 3.5 to 4 inches is needed to overcome airloads on the large control surfaces. When I flew the original, my experience reinforced this conviction. Mike agrees in principle; however, producing a new die or injection mold for a larger bellcrank would exceed $10,000 — an amount Sig was unwilling to budget for a single kit. If you build a Magnum, I suggest using a larger bellcrank.
Aerodynamics and power
Aerodynamically, Mike has done an excellent job staying right in the middle of the ballpark. This is no "secret weapon" with far-out, unproven features. It is of moderate size, with moderate moment arms and more than adequate tail size to fly very competitive corners without being overly sensitive.
Mike's flight used a full-bore ST .60; it had plenty of power and I would have preferred detuning it a bit. A good OS FSR or a strong ST .46 would be perfectly adequate. I'm even considering a Saito .45 four-cycle — it's roughly the same weight as the .60 and uses only about 2.5 ounces of fuel per pattern. I think Sig is giving us a real winner. I urge you to consider the Magnum.
Liability concerns
One sobering note came from a conversation with Hazel Sig-Hester. She has serious concerns about Sig's ability to remain in the Control Line business because of the current nationwide crisis in liability insurance coverage. Although by far the largest number of claims come from RC flying, the most serious accidents (deaths and disablements) are apparently from CL. I encourage you all to exercise the greatest possible attention to safety in your activities to ensure that those who wish to fly may continue to do so. Also, contact your congressman and urge that responsibility for one's actions be returned to the individual. We are approaching a time when liability insurance may simply not be available to the institutions that support our leisure-time activities. Let's not let that happen.
Finishes
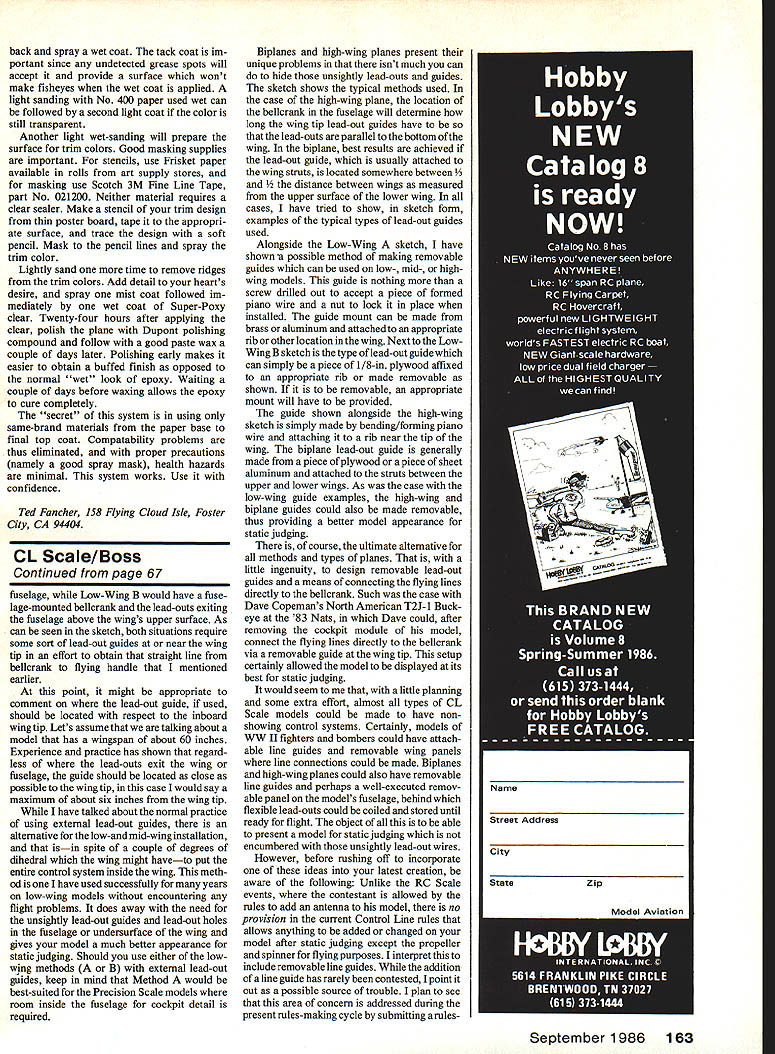
I have twice been honored by my peers with the Concours d'Elegance at the Nationals — 1977 for the Citation and 1981 for the Intimidation. I've had some hesitation recommending finishes because many modern systems present health hazards and because many systems are fraught with problems: bubbling fillets, curdling clears, paints that cling to masking tape more than the airplane, etc.
I've just completed finishing my Citation V for this year's Nats, and at last I'm pleased enough to recommend a system. The finish is Concours-quality, extremely durable, free of the evils described above, and light in weight. The system is properly-applied K&B Superpoxy with a few supporting steps. Here's how I do it.
Preparation and base
- Cover the wood:
- Apply silkspan over two coats of Sig clear butyrate dope thinned 50%.
- Cover wing and tail before installing them in the fuselage, overlapping the centerline about one inch each side. This produces a uniformly rigid wing that won’t tend to break at the wing/fuse joint.
- Reinforce the nose:
- After assembly, cover the nose back to the high point of the wing with very light glass cloth applied with HobbyPoxy Formula II glue thinned to brushing consistency with HobbyPoxy thinner.
- Hint: tack the cloth in place with instant glue before brushing.
- Seal the bare wood:
- Thin leftover Formula II until it's watery and brush it over the bare-wood aft fuselage. This will scale the pores of the wood and provide a firm base for the rest of the finish.
- Apply dope and silkspan:
- Give the fuselage two full coats of clear, then cover with light silkspan.
- Apply two coats of clear thinned 50% to the entire airframe, allow to dry, and add fillets.
- I strongly suggest epoxy-based fillets such as Sig Expoxolite. From this point on, everything will be epoxy.
Sanding and priming
- Cure and sand:
- Allow the dope and fillets to dry at least 24 hours.
- Sand lightly to remove gloss and feather any paper edges; then wipe the entire model thoroughly with Sig Airplane Cleaner or Prep-Sol — especially the fillets.
- Keep the ship scrupulously clean from here on.
- Primer and filling:
- Spray a medium coat of K&B primer and allow it to cure.
- Eyeball for low spots and blemishes and fill them with spackling compound.
- Sand the entire airplane back until the paper grain is uniformly visible. Do not sand through the paper.
- Sand lightly with No. 220 dry, then No. 320 dry. Use new paper frequently to avoid pressing.
- Second primer:
- Spray a second light-to-medium coat of primer and repeat the filling/sanding process.
- Examine surfaces at an angle to strong light, respray any flawed areas, and resand.
- The final surface should be uniformly flat with no paper grain showing, finished with No. 400 paper used wet.
- Final cleaning:
- Rinse the plane completely with clear water, let it dry, and wipe again with Sig Cleaner or Prep-Sol.
- Make a final wipe-down with a tack rag to remove lint and static.
Epoxy color and top coats
- Mix ratio:
- Mix epoxy base color in a ratio of 3 parts epoxy to 1 part hardener and 1 part thinner. This ratio is key to a light epoxy finish and should be used for all colors and the clear top coat.
- Application:
- If orange peel appears, add small amounts of thinner until the paint flows smoothly. Heating the paint also helps flow.
- Spray a mist coat over the entire plane to provide a tacky surface, then immediately apply the final coat.
- I use two fairly heavy coats of epoxy color, sand lightly with No. 400 dry, then apply a final coat and allow it to cure 24 hours.
- Final rubbing and buffing:
- Rub out the cured finish with pumice and water, then use 1500 grit wet.
- Finish by buffing with auto glaze. The resulting finish is hard, very tough, and light in weight.
That's the system I recommend — durable, concours-quality, and safe if you observe normal precautions when working with epoxy and solvents.
Transcribed from original scans by AI. Minor OCR errors may remain.

