
Control Line: Aerobatics
Ted Fancher
158 Flying Cloud Isle Foster City, CA 94404
After 30-some years of trying to get professional-looking lettering and numbers for use on Stunt ships, I think the solution is finally at hand. Maybe I'm the only Stunt flier in the country who doesn't already know about this, but if not, the rest of you should run, not walk, to the post office and send a letter to AeroGraphics Custom Lettering, 511 W. Franklin Blvd., Gastonia, NC 28052; telephone 1-704/864-2038. Ask them to send you their brochure on custom-made vinyl letters produced just for modelers.
Over the years I've tried everything from decals to hand-cut stencils, to freehand painting, to large transfer-type letters such as Letraset. None have been totally satisfactory for my use.
The transfer letters come close but still have significant shortcomings:
- While numerous type styles are available, they are normally offered only in black or perhaps white.
- They are only available in complete alphabet and number sets.
- To obtain numbers large enough to meet AMA's size requirement generally requires buying a two-sheet alphabet set, most of which gets thrown away.
- If you—as I do—have an AMA number which repeats one or more digits (AMA 1828), it is necessary to buy a second set only to obtain the one additional number. At a cost as much as $24 a set, the expense is exorbitant.
Enter Dave and Karen Powers at AeroGraphics with their custom-made vinyl letters. They use a computer-generated graphics system to custom make specific name and number combinations to the exact specifications of the modeler. Immaculately cut from high-grade vinyl only 2 mils thick (about the thickness of a moderate coat of paint), the letters and/or numbers are individually cut and automatically spaced by the computer.
The modeler receives the graphic ready to apply, sandwiched between a backing (which is peeled off just prior to application) and a lightly adhesive, semitransparent application tape which holds the letters in place during application. The tape is then peeled off and discarded, leaving the lettering in place on the model.
At the present time there are 20 colors and nine different type styles available. But that's just the start of the versatility of AeroGraphics' custom lettering. The magic of computers allows the selection of literally any size from 1/2 in. to 24 in. in height. Even smaller sizes are available in several of the type styles. In addition, the letters can be slanted either backward or forward at any angle desired to adapt to your paint scheme.
At reasonable extra cost the letters can be expanded or contracted to precisely fit a specific space requirement. They are also available in two-color shaded or outlined styles. If you are concerned that the thickness of the numbers may be excessive, or if you desire to exactly match the color to your airplane, AeroGraphics also produces paint masks (stencils), cut with the same precision as the appliqués, which will allow you to spray the color in any color you desire and as thin as you wish.
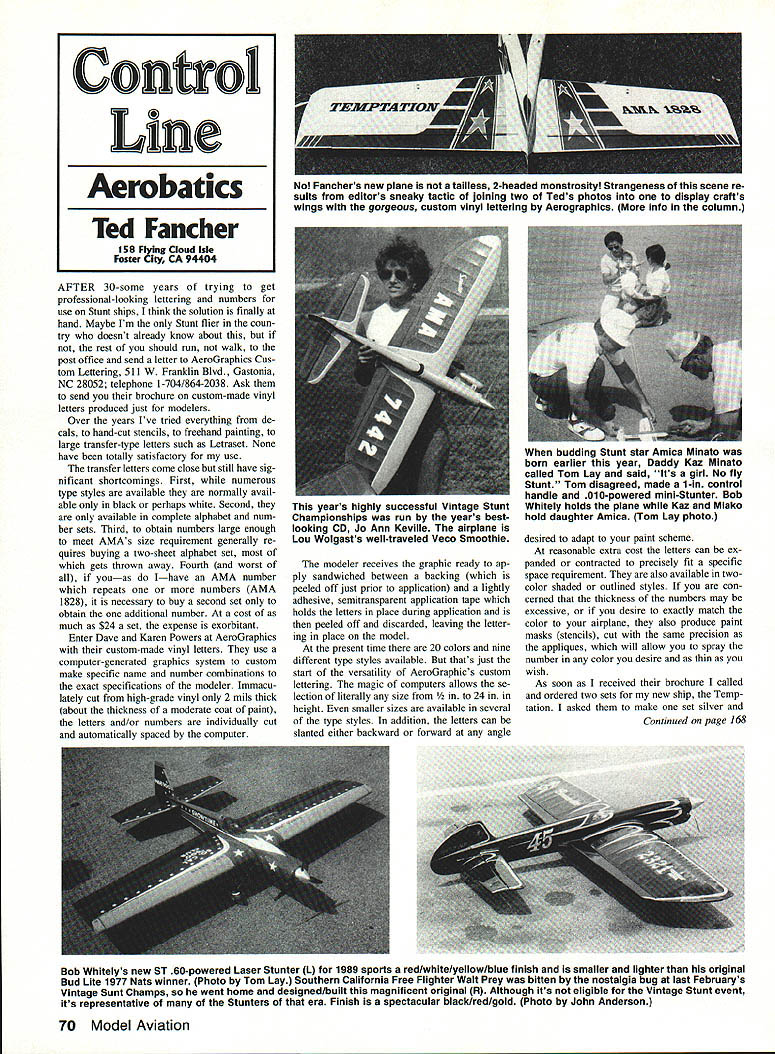
As soon as I received their brochure I called and ordered two sets for my new ship, the Temptation. I asked them to make one set silver and one black, using 1/4-in.-high Clarendon Bold type (all capitals) with the name slanted 25° forward and the AMA number slanted 25° backward.
Four working days later the appliqués arrived in the mail, and an hour after that they were on the plane ready for clear coating. Application was as simple as it sounds, and they went on without a hitch. They looked magnificent! Just see the photo for yourself.
Since the pictures were taken I've clear-coated the ship using K&B SuperPoxy with absolutely no adverse effect on the numbers.
If, however, you plan on doping over them, be advised that unless applied cautiously, dope will soften the letters and cause curdling. Clear dope must be sprayed on in several very light and dry coats to prevent this. If your spray rig allows you to vary the amount of liquid, use this method to apply mist coats. If you are using spray cans, spray the first several coats light and fast from about 18 in. away so that the paint is nearly dry when it hits the letters. After four or five coats like this, normal coats may be applied to the entire ship. Just be cautious not to load the lettered area down with wet dope which may soften the earlier coats.
The cost? $5.75 a set, about 15% of the $48 that Letraset would have cost. Try it, and I think you'll like it.
Speaking of finishing, let's talk a bit about the frustration I suffered as a result of the finishing process on my new Temptation. I'm going to talk about what Mike Keville referred to as the "F-word" in a letter on the subject the other day.
What is the "F-word," you ask? Through tightly clenched teeth I whisper, "fillers." That miserable, embarrassing area where the fuselage mates with the wings and tails. That exotic, sensuous, curved area everyone who looks at your airplane likes to caress in search of telltale blemishes. When they discover symptoms of such malignancy, they like to impale you with an evil grin and say pleasantly, "Had a little trouble with the F......s, didn't you?"
"Little! Did you say a 'little' bit of trouble? Would you call having Mt. St. Helens erupt in your backyard a 'little' bit of trouble? Would you believe the name Temptation came from the many temptations I considered, each having to do with the untimely demise of this inanimate, time-and-money sponge? Let me tell you about a 'little bit of trouble' as it pertains to the 'F-word'!
For a number of years I have been using Sig Epoxolite for fillets on my Stunt ships. This is an exceptional product which is extremely strong, of a reasonable weight, and which can be shaped to nearly final dimensions with a rather dampened finger before it cures.
While there are a lot of nice things to say about Epoxolite, one of them is not that it takes well to being covered with paint. Many a word has been written about the need to take extra precautions when painting over it. Here's why.
To successfully cover a fillet between two surfaces which are at angles to one another, it is imperative that the paint adhere aggressively to the fillet itself. Because all paints shrink as they age, they will tend to pull away from areas to which they are poorly attached if the adjoining surfaces are at significant angles to one another. When the paint adheres tightly to the fuselage and to the wing—but not to the fillet—it will leave flat, bubbled areas where it is pulled away from the smoothly radiused fillet. Because these flat bubbled areas become reflecting surfaces, they are extremely noticeable and severely degrade the appearance of an otherwise attractive airplane.
Because Stunt fliers historically use butyrate-type dopes for covering and base filler-coating, and because butyrate dopes don't stick well to Epoxolite, we have had to devise ways to get the finish to adhere. It has been found that both Gloss or Nitrate paints can be easily applied over the butyrate. This approach has proven to be generally successful. It is important to remember that the Gloss or Nitrate dopes must not be used on top of any butyrate paints, as they will lift the butyrate. Butyrate can be applied on top of either, however.
Well, I had done that, using nitrates as a sealer and then proceeded with an all-dope finish. I then filled the entire ship. What at the time I thought were numerous bubbles appeared over all the upper fillets. Don't ask me why, but the top coat still looked pretty good. Attempts to rub these off proved futile (as they always do), and I finally gave up and stripped all the paint away clear down to the Epoxolite.
Thinking that perhaps I hadn't allowed the filler to cure properly, I decided to isolate it from the paint by covering the entire filleted areas with a fairly thick layer of Model Magic Filler. This is a water-based material which is very light, sands easily and beautifully, and (I figured) should be inert and unaffected by other finishing materials.
I decided to further assure against incompatibility problems by sanding down the entire ship and refinishing with white epoxy, which has proven to be just about faultless when sprayed over our surface preparation.
The results appeared beautiful, and the extensive and complex trim colors were added—red, blue, gold, silver, black, and a dusty gold accent color. Hours of time and tons of masking tape were devoured, but the results were worth it. It looked great, and the weight was still "reasonable," even with the addition of the extra white epoxy.
Gung-ho to finish it up, I hurried out to the shop the next day to begin the black-lining and Letraset application—the final stages prior to clear coating. But, to my wonder, a thin hairline crack in the right wing fillet (on the top of the wing, of course) had appeared. With trembling hands I probed the crack and quickly learned that it was not only a crack but just the surface evidence that the entire second fillet, Model Magic and paint, had lifted off the underlying Epoxolite. Further inspections showed that the entire ship was doing the same thing.
After washing my mouth out with soap and ensuring that I was no longer either suicidal or homicidally inclined toward the plane, Sharon untied my hands and I once more peeled the layers down to the Epoxolite. This time I spent more time analyzing the material itself.
What I finally learned was that the Epoxolite, although hard, was not truly cured. It should be hard like a rock. Instead it was more like hard rubber. Because the chemical curing process was not complete, it repelled anything applied over it. Why this was the case I'm not sure. Perhaps I had not mixed it correctly, or perhaps it was a bad batch from the factory. As I thought back over the application I do remember that the Epoxolite seemed to take longer to set up than in the past. Perhaps this should have been a clue to have removed it before I ever got to the finishing process.
In any case, the solution was to completely remove the fillets down to the bare wood with a Dremel tool. New fillets were applied using fresh Epoxolite. The new fillets cured normally and were rock hard. Since I was using SuperPoxy paint now, I merely applied two coats of SuperPoxy primer to the fillets, masked off as much of the wings as I could to prevent having to refinish them, and repainted the fuselage for the third time.
I'm not exactly sure of the moral of this story. Perhaps it is that with the wealth of space-age goodies at our disposal, it is incumbent on us to ensure their compatibility through either testing or examination of the instructions. Also, be sure we know what to expect from any material we use, and if it doesn't meet those expectations, to make darn sure we remove the stuff and replace it with something that does work right.
More likely, though, it just feels good to tell somebody when you've screwed up. Confession is good for the soul—although lousy for building airplanes.
Transcribed from original scans by AI. Minor OCR errors may remain.

