
Control Line: Aerobatics
Frank McMillan
12106 Gunter Grove San Antonio, TX 78231
Paradise! I just returned from the Texas State Championships at the Scobie Model Flying Park in Houston. For those of you who haven't seen this facility, it is simply beautiful. There are two seamless, dead-level concrete circles and no trees, which means "clean" air for flying. It's a park facility with convenient parking and equipment for picnicking and playgrounds. So if you get the chance, come on down and visit the wide-open spaces.
The contest was marked with hot, windy weather—great practice for the Nats! But the contest is not really what I want to talk about.
Watching the other contestants fly, I was struck by the improvement in many of the up-and-coming fliers and also by the excellent performances of three profile models. The engines ran very well, and the fliers were able to handle the wind as easily as anybody with full-bodied Stunt ships. All this prompted me to think about some phone calls requesting more information from those fliers just getting into our event (or should I say into our way of life).
First, foremost, and bottom line: You simply will not get any better on the ground! Flying is the only way to find out how to improve your technology and piloting skills. Looking back on more than 38 years of flying CLPA, I've pondered on what to recommend as an approach to the many hours of reliable flying that you need to make significant improvement in your skills. Generally speaking, at the entering flier's stage the best approach is to use the KISS principle (keep it simple, stupid!).
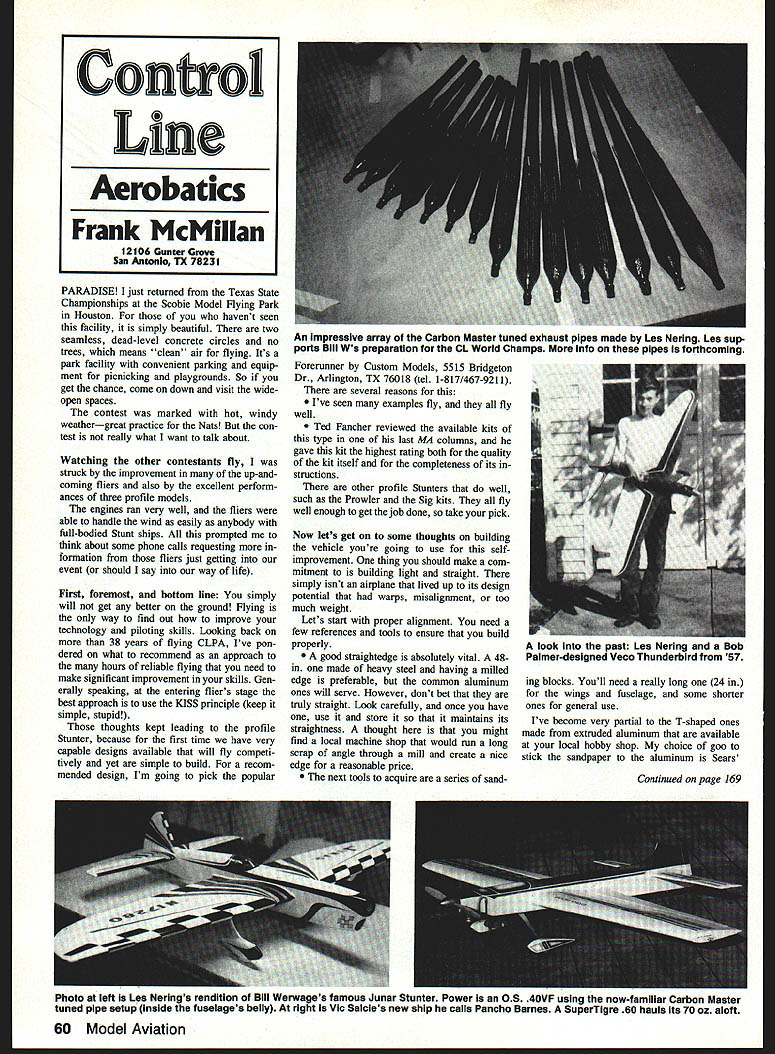
Those thoughts kept leading to the profile Stunter, because for the first time we have very capable designs available that will fly competitively and yet are simple to build. For a recommended design, I'm going to pick the popular Forerunner by Custom Models, 5515 Bridgeton Dr., Arlington, TX 76018 (tel. 1-817/467-9211).
There are several reasons for this:
- I've seen many examples fly, and they all fly well.
- Ted Fancher reviewed the available kits of this type in one of his last MA columns, and he gave this kit the highest rating both for the quality of the kit itself and for the completeness of its instructions.
There are other profile Stunters that do well, such as the Prowler and the Sig kits. They all fly well enough to get the job done, so take your pick.
Building: alignment and tools
Now let's get on to some thoughts on building the vehicle you're going to use for this self-improvement. One thing you should make a commitment to is building light and straight. There simply isn't an airplane that lived up to its design potential that had warps, misalignment, or too much weight.
Let's start with proper alignment. You need a few references and tools to ensure that you build properly.
A good straightedge is absolutely vital. A 48-in. one made of heavy steel and having a milled edge is preferable, but the common aluminum ones will serve. However, don't bet that they are truly straight. Look carefully, and once you have one, use it and store it so that it maintains its straightness. A thought here is that you might find a local machine shop that would run a long scrap of angle through a mill and create a nice edge for a reasonable price.
The next tools to acquire are a series of sanding blocks. You'll need a really long one (24 in.) for the wings and fuselage, and some shorter ones for general use. I've become very partial to the T-shaped ones made from extruded aluminum that are available at your local hobby shop. My choice of goo to stick the sandpaper to the aluminum is Sears' sanding-disk adhesive. Lacquer thinner works well to clean up and to remove worn-out sheets.
Use coarser paper than you would normally consider to shape major pieces. I do a lot of work with 80-grit sandpaper. Also, let the paper do the cutting, not the pressure you use. This is especially true on unsupported, sheeted surfaces. Restrict all hand sanding to an absolute minimum, and you'll have more professional-looking surfaces.
My point on using the sanding blocks is that they give you the straight lines on the airplane that produce the true flying surfaces and hinge lines necessary to provide accurate alignment.
Making a light airplane
Making a light airplane is not an accident. It takes patience and discipline, but it is not difficult. You just have to get it in your mind that if a part or section is not serving a purpose—get rid of it! Remember that you are building an airplane to fly—not to survive crashes! If the structure is strong enough to support flight and landing loads, then that's sufficient.
Look at the plywood in the plane, and think about what's mounted on it (landing gear wire, bellcrank, etc.). Put the part to be mounted in place for a trial mounting, and see what you can cut away to save weight. Drill holes, and use a sanding drum to carve away and round off various sections. It's all the little pieces that add up to the reason why some people consistently build light planes.
Be especially careful in the tail, and consider replacing heavy wood in that area.
Adhesives
Modern adhesives are really a joy to use! Gone are the days when the choice was Ambroid and white glue. But along with the joy comes a point of concern. You have to be careful that you use only enough of any type adhesive (CYA, epoxy, or aliphatic resin) to do the job. Epoxy fillets and globs in the wing don't make the airplane fly any better!
Make all your joints as snug as you can without crushing the wood, and this will make the minimum amount of glue much more effective.
Next month I'll continue on with this series, but now I'd like to share another procedure for finishing wood props.
Prop finishing technique (Windy "U" method)
Windy "U" developed his prop-finishing technique around acrylic lacquer, and it looks good. If you use wooden props you may want to try this as a custom look and increase in efficiency over the stock propeller:
- Take a pie plate filled with acetone, and soak the new prop in it for three to five minutes. All of the factory finish will fall off with no sanding required.
- Let the prop dry thoroughly, then sand it smooth with 320–400 paper. Balance the prop at this point.
- Recurve any pitch changes, Phillips entry, thinning, etc. After that's done, equalize the blades using a Prather pitch gauge. The last three stations out toward the tip do 95% of the work, so pay special attention to the further-out sections from the hub. When you're done with this, rebalance the prop.
- Use acrylic lacquer thinned with DuPont 3608S thinner, and brush on two coats of finish three to five minutes apart. Wait 15 minutes, and sand with 600 paper used wet. Spray on the last coat of acrylic, and wait 15 minutes before sanding with 1200 paper. Buff with silver polish only.
The total time to do all this is under an hour, including buffing. Now is the time to buff the heavy blade for a final balancing. Make sure to record the prop balance after every flying session, as it can be affected by stone chips, etc.
You can also paint the prop tips, add Letraset personalizing to the blades, or do whatever else fits your style. Acrylic lacquer will make you an instant expert. This type of lacquer needs the addition of flex-a-lac and fish-eye killer to all mixtures for absolute world-class results.
Good luck!
I need all kinds of input from my readers: photos (especially!), building/flying/finishing tips, opinions, questions, observations. If you think your contribution will improve the hobby, send it to me! Also please consider sharing your pet techniques with the community. We all enjoy expanding our capabilities.
When you send things, please send them to me at the address given in this column's header—and not to the Model Aviation editorial offices. If you send stuff there, they just have to forward it to me here in Texas (and that'll take more time).
Transcribed from original scans by AI. Minor OCR errors may remain.

