
Control Line: Aerobatics
Frank McMillan 12106 Gunter Grove San Antonio, TX 78231
Introduction
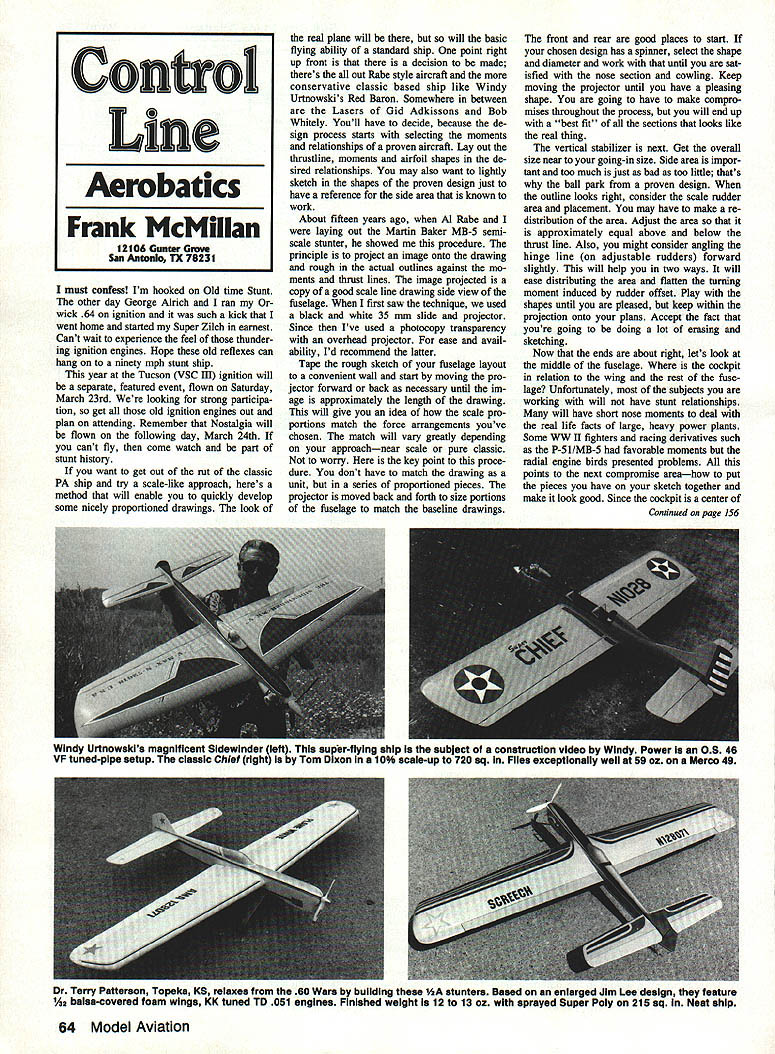
I must confess I'm hooked on old-time stunt. The other day George Alrich ran an Orwick .64 ignition and it was such a kick that I went home and started my Super Zilch in earnest. I can't wait to experience the feel of those thundering ignition engines. Hope these old reflexes can hang on to a ninety-mph stunt ship.
This year at the Tucson (VSC III) meet ignition will be a separate, featured event, flown on Saturday, March 23rd. We're looking for strong participation, so get all those old ignition engines out and plan on attending. Remember that Nostalgia will be flown on the following day, March 24th. If you can't fly, then come watch and be part of stunt history.
Scale-like approach to designing a PA ship
If you want to get out of the rut of the classic PA ship and try a scale-like approach, here's a method that will enable you to quickly develop some nicely proportioned drawings. The look of the real plane will be there, but so will the basic flying ability of a standard ship.
One point up front: decide the character you want. There is the all-out Rabe-style aircraft, the more conservative classic-based ship like Windy Urtnowski's Red Baron, and designs somewhere in between such as the Lasers of Gid Adkisson and Bob Whitely. The design process starts with selecting the moments and relationships of a proven aircraft. Lay out the thrust line, moments and airfoil shapes in the desired relationships. You may also want to lightly sketch the shapes of a proven design for reference of side area that is known to work.
The projector tracing technique
About fifteen years ago Al Rabe and I were laying out the Martin Baker MB-5 semi-scale stunter; he showed me this procedure. The principle is to project an image onto the drawing and rough in the actual outlines against the moments and thrust lines.
Procedure:
- Use a good scale line drawing side view of the fuselage on a transparency. An overhead projector and a photocopy transparency work well.
- Tape the rough sketch of your fuselage layout to a convenient wall.
- Move the projector forward or back as necessary until the projected image is approximately the length of the drawing.
- Work in sections rather than trying to match the entire drawing at once. Move the projector to size portions (front, rear, canopy, etc.) and fit those pieces to your baseline moments and thrust line.
- Make compromises and iterate—your goal is a best-fit that looks like the real thing while retaining proven flying relationships.
Nose, spinner and cowling
If your chosen design has a spinner, select the shape and diameter and work with that until you are satisfied with the nose section and cowling. Keep moving the projector until you have a pleasing shape. Expect to make compromises, but aim for a harmonious blend of sections.
Vertical stabilizer and rudder
Get the overall size of the vertical stabilizer near to your intended size. Side area is important—too much is just as bad as too little. Consider these points:
- Evaluate scale rudder area and placement; you may need to redistribute area.
- Adjust area approximately equal above and below the thrust line.
- Consider angling the hinge line: an adjustable rudder hinged slightly forward can help with area distribution and will flatten the turning moment induced by rudder offset.
- Play with shapes within the projected outline until satisfied.
Cockpit and mid-fuselage
Place the cockpit in proper relation to the wing and the rest of the fuselage. Remember we are not trying to get everything to the same scale; the goal is correct shapes and relationships within the bounds set early with good moments and proportions.
If the projected method doesn't seem to work at first, break the job into smaller pieces. For example:
- Start with the front edge of the canopy only.
- Stretch or shorten individual pieces, change heights, and test how they look against the longer fuselage.
- Connect the pieces and make small adjustments to produce the overall impression of the real plane.
Once the basic shape is right, add details to make the drawing come alive: cockpit framing and shading, cowling inlet shapes, exhaust detailing, and the look of the plane as it will sit on the ground. One pitfall to avoid is making the gear too short when the full-size plane had long struts—compromises are necessary, and you can still achieve a convincing appearance.
Wings, tips and finish
On flying surfaces, the main adjustment I'd recommend is reshaping the tips; proceed carefully with unusual wings (for example, the P-51 cuffs). For finishing:
- Put effort into a really good paint scheme.
- If you've gone minimal styling, select markings with recognition value and pleasing colors.
- You may combine parts of several examples to get a pleasing effect—adjust sizes of numbers and insignia to the aircraft location.
- Use the projection method again to rough-in sizes and shapes for markings, then clean them up. Avoid relying on generic commercial insignia unless they truly fit the model.
Engine options (1/2A and glow)
If you're working 1/2A, here are some practical engine options and tips:
- Cox .049/.051
- Use a 5 × 3 Cox propeller and Cox racing fuel if available (Tower Hobbies is a source).
- Be aware Cox engines can be sensitive to mixture and may "go over the hill" if lean.
- Shuriken (newer 1/2A)
- The Shuriken out-turns the Cox and is remarkably durable.
- It will fit into a modified Foursport mount; use the smallest venturi option available.
- The Cox 5 × 3 prop works, but a thinned-blade 5 × 3 often performs even better in high-rpm engines.
- Source: BV Competition Engines, 1163 Country Club Rd., Indianapolis, IN 46234.
- Chinese CS
- Heavier than the Cox or Shuriken and develops optimal power at higher rpm.
- Requires a cut-down Cox 5 × 3 prop (perhaps to 4½-inch diameter) and a pressure backplate.
- Use the sport version unless you want to experiment with a tuned pipe.
Flying and trimming
- Use a 2-oz. fuel tank for long flights; if you're new, start with the tank half full.
- Position the model so it will break ground on the downwind side of the circle.
- Keep the model low until you have built up enough speed to be certain the engine won't sag.
- Correct any tendency to bank in or out and check that the wings remain level in inverted flight.
- Once fully trimmed, try the AMA Precision Aerobatics routine to hone your flying skills.
Tech Tip: sanding the rounded nose
A simple shim-based sanding trick produces a uniformly rounded nose arc:
- Secure the fuselage (third-hand fixture or between your knees) so both hands are free.
- Cut a sheet of coarse sandpaper (120–180 grit) to about 3–4 inches wide and 8–12 inches long. This will be your buffer.
- Lay the paper over the block, holding a hand at each end, and move the paper over the block while the block is held against the fuselage contour.
- Use gradual pressure to obtain a symmetrical, rounded arc—don't press too hard or you will remove material too quickly.
Closing
If ignition stunt is your interest, get those old engines out and come to Tucson. If you're designing a scale-like PA ship, the projection method is a practical way to get pleasing proportions and retain good flying characteristics. Above all, enjoy the building and flying—there's nothing like seeing a clean job admired on the line.
Transcribed from original scans by AI. Minor OCR errors may remain.

