

Control Line: Aerobatics
Frank McMillan 12106 Gunter Grove San Antonio, TX 78231
Starters, Props and Safety
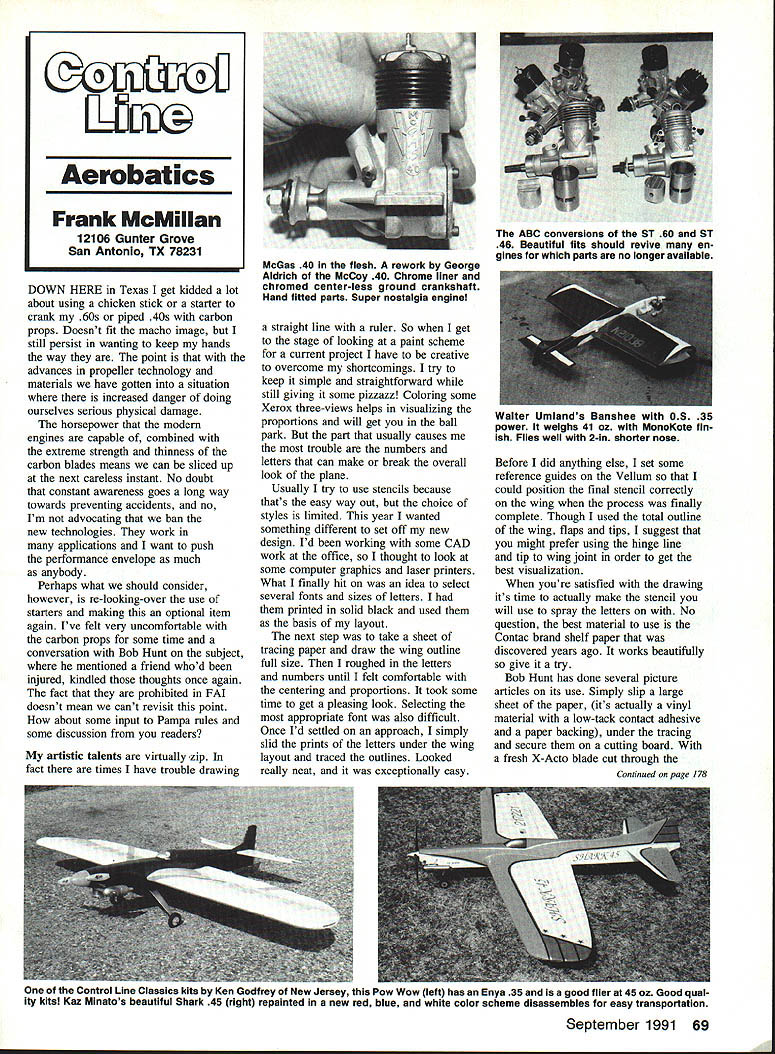
Down here in Texas I get kidded a lot about using a chicken stick or a starter to crank my .60s or piped .40s with carbon props. It doesn't fit the macho image, but I still persist in wanting to keep my hands the way they are. The point is that with advances in propeller technology and materials we have a situation where there is increased danger of doing ourselves serious physical damage.
The horsepower modern engines are capable of, combined with the extreme strength and thinness of carbon blades, means we can be sliced up in the next careless instant. Constant awareness goes a long way toward preventing accidents, and no, I'm not advocating banning the new technologies. They work in many applications and I want to push the performance envelope as much as anybody.
Perhaps we should re-evaluate the use of starters and make them optional again. I've felt uncomfortable with carbon props for some time; a conversation with Bob Hunt, who mentioned a friend who'd been injured, rekindled those thoughts. The fact that starters are prohibited in FAI doesn't mean we can't revisit this point. I'd welcome input to the Pampa rules and discussion from you readers.
Lettering and Stencils
My artistic talents are virtually nil. I have trouble drawing a straight line with a ruler, so when I get to the stage of designing a paint scheme I have to be creative to overcome my shortcomings. I try to keep it simple and straightforward while still giving it some pizzazz. Coloring some Xerox three-views helps visualize proportions and gets you in the ballpark. The part that usually causes me the most trouble is the lettering—numbers and letters can make or break the overall look of the plane.
Usually I use stencils because that's the easy way out, but the choice of styles is limited. This year I wanted something different to set off a new design. I had been doing some CAD work at the office, so I looked at computer fonts and laser printing. I selected several fonts and sizes, had them printed in solid black, and used those prints as the basis of my layout.
The next step was to take a sheet of tracing paper and draw the wing outline full size. I roughed in the letters and numbers until I was comfortable with the centering and proportions. It took time to get a pleasing look and to select the most appropriate font. Once settled, I slid the prints of the letters under the wing layout and traced the outlines. It looked neat and was exceptionally easy.
Before doing anything else, I set reference guides on the vellum so I could position the final stencil correctly on the wing when the process was complete. Though I used the total outline of the wing, flaps and tips, you might prefer using the hinge line and tip-to-wing joint to get the best visualization.
Making the stencil
When you're satisfied with the drawing, it's time to make the stencil you will use to spray the letters on with. The best material I've found is Con-Tact brand shelf paper. It's a vinyl material with a low-tack contact adhesive and a paper backing.
- Slip a large sheet of Con-Tact under the tracing paper and secure it on a cutting board.
- With a fresh X-Acto blade, cut through the tracing and the vinyl to create your stencil.
- Use a cutting surface such as cork or a self-healing drafting mat to protect the blade and your work surface.
- Allow for bridges in the letters (islands) to facilitate positioning the stencil without distortion.
- Remove the letters from the stencil once everything is in place.
- Cut the long reference lines you will use to position the mask on the wing.
You must exercise considerable care while cutting—the final result directly depends on how well you perform this step. I won't go into the details of transfer and application here because they've been covered in other articles.
Problems and workarounds
- Use fresh materials. The adhesive on vinyl tends to get gummy and sticky if it has been warm or stored a long time.
- Don't leave tape or masking on the plane any longer than necessary; it can deposit adhesive on the surface.
- If, after applying the stencil, you decide a letter's shape is wrong, you can remove the offending bit, use filler to reshape the letter, sand, mask and repaint. If you haven't applied the stencil yet, redraft and cut a new one—patience now saves grief later.
- If painted letter edges bleed, go over the edges with a very thin coat of clear dope or clear lacquer to seal them; then reapply the colored paint for a clean, crisp edge.
- Bleeding can also be caused by dust or dirt under the sticky stencil—keep the work area clean.
Transfer letters
There are two basic types of transfer letters:
- Pressure-sensitive: Easy to use but limited in how much they can be repositioned.
- Water-slide: Gives more working time and is easier for larger items, but handling is more awkward.
Don't be afraid to experiment with different fonts, colors, and placements. Show restraint, but be brave—the plane is your canvas.
Removing adhesive residue
If adhesive remains on masked areas, a degreaser such as Prep-Sol or Acryl-Kleen is convenient. Test on a small piece (a rudder or scrap) to ensure it won't harm the paint. I use these on Sig dopes to remove body oils. You will often have to rub and reapply—be patient.
If that doesn't remove stubborn adhesive, try isopropyl alcohol—lightly and quickly. Some alcohol brands will soften certain paints, so test first. Prep-Sol will not dissolve Monaldo ink; you can clean the entire plane with it prior to shooting clear. Alcohol, judiciously applied, can erase ink slips some of us find unavoidable. Again, experiment on scrap to ensure safety.
Anecdote: Fuselage Lettering
One reason I chose the "Millie P" as an example is that it's a plane I built over 30 years ago from a Jetco kit. While preparing this column I discovered I had applied the CY-G lettering wrong on the right side of the model. Interestingly, the model placed in many contests, even the old Mirror Meets, and not a single judge pointed out the error. Thanks to Sam Abdow and my good friend Pete Bianchini, a wartime pilot, for their thoughts and ideas on this month's subject.
Product News: Coverite 21st Century Line
Coverite announces three new products:
- 21st Century Space Age Paint™
- Initially offered in 13 oz. cans.
- Claimed to be absolutely fuelproof overnight.
- Can be recoated within 30 seconds, or at any later time.
- Totally dry in less than 15 minutes.
- Virtually run-proof due to a patented spraygun nozzle.
- Extremely flexible; will not chip, crack or separate; insensitive to weather.
- 21st Century Space Age Film™
- A mechanically advanced polyester film coated with a Multi-Temp Adhesive™.
- Can be applied with heat over a range of 200°F to 400°F and can be repositioned without losing its adhesive.
- Adheres tenaciously to wood and to itself and is unaffected by glow, diesel or gasoline fuels.
- 21st Century Space Age Fabric™
- Lightweight, tough and pre-painted with a factory finish that looks like hand-rubbed lacquer.
- Exceptional adhesion to wood and to itself.
- Can be trimmed with itself, paint or decals without surface preparation.
- Glow, diesel and gasoline fuelproof; no protective coating required.
Look to your local hobby outlet for these Coverite products, or write to Coverite, 420 Babylon Road, Horsham, Pennsylvania 19044-1265 for full product details, prices and availability.
Kits: Aero Products (Randy Smith)
Last month I mentioned the upcoming arrival of some kits from Randy Smith's Aero Products line. I'd wanted to build a Juno for some time, having seen the original fly a few years ago, and I wasn't disappointed.
- The kits are limited production runs; all parts are bandsawn to shape.
- Smaller parts are sorted by assembly and sealed in plastic bags.
- Plans are as the design was originally published or released.
- Many hard-to-find items, such as carbon pushrods, are provided.
- The woodwork and overall finish are superior—outstanding wood in weight and selection, nicely done and accurate.
These are first-rate kits equal to any I've seen. If you have any inclination to build models in this line, acquire the kit and put it on the shelf—limited production items of this quality are not available long. Contact Randy at Aero Products, 1880 Scenic Hwy., Snellville, Georgia 30278.
Closing / Requests
Please send letters, notice of upcoming CL Scale events, contest reports, and especially photos of CL Scale activity to me at the address at the top of this column.
Transcribed from original scans by AI. Minor OCR errors may remain.

