
Control Line: Aerobatics
Frank McMillan 12106 Gunter Grove San Antonio, TX 78231
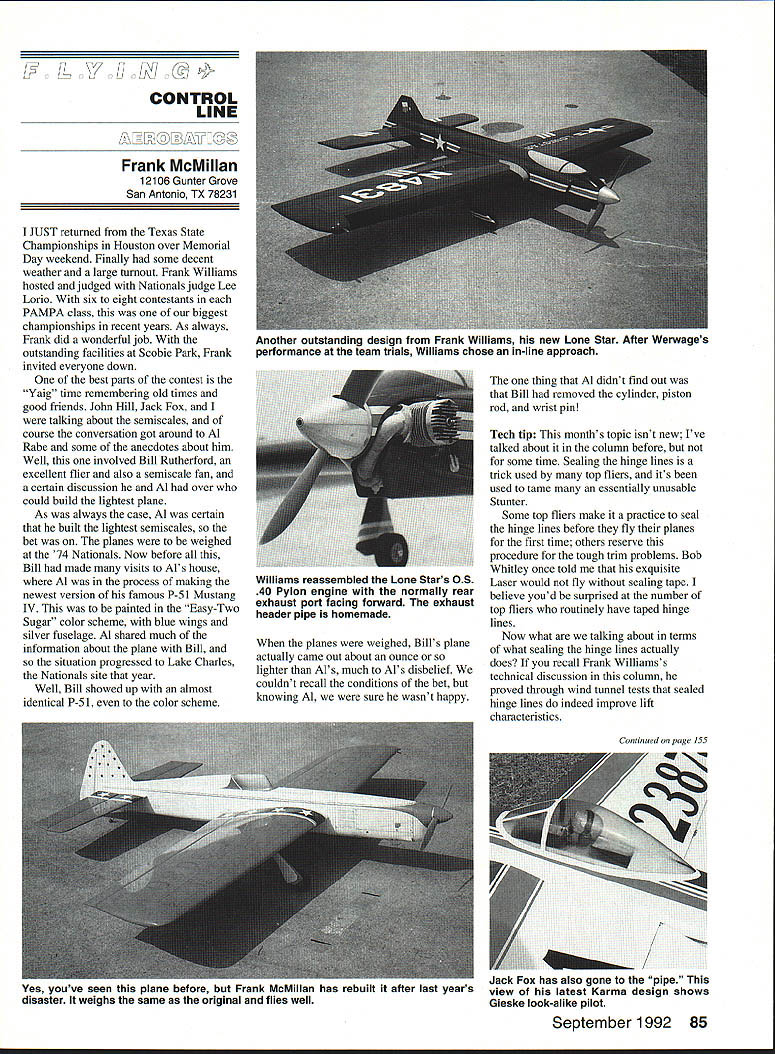
I just returned from the Texas State Championships in Houston over Memorial Day weekend. We finally had some decent weather and a large turnout. Frank Williams hosted and judged with Nationals judge Lee Lorio. With six to eight contestants in each PAMPA class, this was one of our biggest championships in recent years. As always, Frank did a wonderful job. With the outstanding facilities at Scobie Park, Frank invited everyone down.
One of the best parts of the contest is the yak time—remembering old times and good friends. John Hill, Jack Fox, and I were talking about the semiscales, and of course the conversation got around to Al Rabe and some of the anecdotes about him. Well, this one involved Bill Rutherford, an excellent flier and also a semiscale fan, and a certain discussion he and Al had over who could build the lightest plane.
As was always the case, Al was certain that he built the lightest semiscales, so the bet was on. The planes were to be weighed at the '74 Nationals. Before all this, Bill had made many visits to Al's house, where Al was in the process of making the newest version of his famous P-51 Mustang IV. This was to be painted in the "Easy-Two Sugar" color scheme, with blue wings and a silver fuselage. Al shared much of the information about the plane with Bill, and so the situation progressed to Lake Charles, the Nationals site that year.
Well, Bill showed up with an almost identical P-51, even to the color scheme. The one thing that Al didn't find out was that Bill had removed the cylinder, piston rod, and wrist pin!
When the planes were weighed, Bill's plane actually came out about an ounce or so lighter than Al's, much to Al's disbelief. We couldn't recall the conditions of the bet, but knowing Al, we were sure he wasn't happy.
Tech tip
This month's topic isn't new; I've talked about it in the column before, but not for some time. Sealing the hinge lines is a trick used by many top fliers, and it's been used to tame many an essentially unusable stunter.
Some top fliers make it a practice to seal the hinge lines before they fly their planes for the first time; others reserve this procedure for the tough trim problems. Bob Whitley once told me that his exquisite Laser would not fly without sealing tape. I believe you'd be surprised at the number of top fliers who routinely have taped hinge lines.
What does sealing the hinge lines actually do? If you recall Frank Williams's technical discussion in this column, he proved through wind-tunnel tests that sealed hinge lines do indeed improve lift characteristics.
That still doesn't conclusively say what it means to us regarding trim problems. From experience with four airplanes, the planes turned quicker—I suppose that demonstrates improved lift. The plane's basic problem of falling out in hard corners didn't cure; for that, add flap area. I have experienced consistent characteristics that are really significant.
Let's digress a bit to give the reason. On modern planes, the mating stationary edges have a flat, square forward edge (i.e., wing or stab forward edge). The movable surface usually has a triangular forward edge; that's the problem. Sometimes, when hinges are set too far back from the flap edge, the flap will rotate away from the stationary flat surface, creating a gap which can bleed air and thereby destroy lift. Bad can get worse; airflow disruption can be uneven depending on how uniformly hinges are set. With controls deflected, this can produce severe rolling or wing banging and the plane can simply refuse to groove. Sometimes, inverted flying experience shows flaps seem affected. The sealing procedure would be my first choice to start if problems persist.
Of course, check elevators and fly the ship; you can hope negative characteristics will simply go away. However, some characteristics will be evident and will need adjustments. The resulting labors will improve performance. You'll find it helpful to understand some of the effects the adjustments will make.
Since controls are now more effective, the plane will naturally turn quicker. If you want to get the locked-in feeling back, you will have to consider either adding nose weight or increasing the distance between the control lines and the control handle. Adding nose weight will result in line tension improvement in tracking through maneuvers. Too much nose weight will make the plane want to "push" out of the round loops and not turn through cleanly.
The approach I've settled on is to carry enough additional nose weight (approximately 1/2 oz.) to feel the start of solid stability, then adjust the line-spread at the handle. My handle posts can be lengthened, and I add about 1/8 in. This slightly desensitizes the controls around neutral while still retaining the same control authority.
You will have your own preferences, and your plane's characteristics may be different, but at least now you know some of your options. From the foregoing discussion, you would expect that the airplane will act friendlier and more predictably—and it will.
How to seal hinge lines
The material I used is 3M clear plastic tape (Decorate and Repair tape 23-8085), and the best place to find it is at True Value hardware stores. The 1/2-in.-wide size is the most convenient to use.
When you first experiment with it, take it to the field, and after you've flown the plane, clean the surfaces with either methanol or Prepsol degreaser. Then just pull a full-length strip, and apply it.
- Start with the movable surface, and eyeball about half the width.
- Stick the material down with a thin, stiff tool; a credit card or a piece of 1/32-in. ply will work.
- Apply the tape to the bottom of the plane.
- Deflect the surface to full travel, and use your tool to roll the tape to the hinge, then up onto the stationary surface.
This procedure, which has been well known for years in RC circles, allows you to maintain full control. This will hold for a lengthy flying session, but I don't recommend it as a permanent approach. The surfaces aren't quite as free, as the tape tends to stick to the hinges.
The final configuration bridges the gaps between the hinges and permits the hinges to work normally. Simply follow the procedure outlined above, but cut the strips to fit the spaces between the hinges.
That's all there is to it. This is a real weapon to have in your trimming arsenal, so give it a try next time your latest machine needs a little help.
Speaking of a little help, it's time for an appeal for some written input and pictures. This is your column, so if you want to see your words and planes in print, you'll just have to send them in.
Transcribed from original scans by AI. Minor OCR errors may remain.

