
CONTROL LINE AEROBATICS
Frank McMillan, 12106 Gunter Grove, San Antonio TX 78231
Introduction
Each year at this time, I make a pitch for you to get ready to enjoy your flying season by doing a little physical preparation.
As I get older, and hopefully a little better, the old bones and muscles creak a bit more. That's telling me that if I want to go out, fly, and enjoy it, I better get to work.
While you're young, you can generally push your body and not think about it. However, as you grow older, it's no different from any sport; you have to prepare.
Physical preparation for Stunt flying
Consider the ingredients for flying Stunt. You have to have well-timed fine motor skills, which means strength in your hands and arms. It doesn't take a bodybuilder's regimen to do this—only a periodic light program.
- For fine motor skills: use a hand-grip exerciser that works individual fingers. A music store would have one for guitar players or other string-instrument players.
- For arms and shoulders: some light weight work. I use gallon milk jugs with progressively increasing quantities of water; lifting and holding the weight at arms' length approximates the requirements.
Start slowly with weight and repetitions—aches, pains, and strained muscles can stop you at the beginning.
Another main factor in flying Precision Aerobatics is a solid foundation: your legs and endurance. Some type of aerobic activity—jogging, biking, etc.—will do it, as long as you work yourself. You are after the flexibility and endurance to make yourself part of the performance package—not the weak link.
Doing a great deal of flying maximizes enjoyment and competitive improvement. Mental focus—sustained and intense—is required to get the most from the available time.
As the heat and humidity of the summer builds, the better you will probably feel, and the longer and more productive your flying sessions will be. How many times is a contest won in the last round, late on a hot, windy day?
The difference might be how focused and aggressive you are; physical conditioning can make the mental difference. Do something and stick with it!
Control system installation
Installing control systems is important if you are striving to do your best to create your latest beauty. However, there are some pitfalls that you may run into as you go through the construction process.
The basic goal that I espouse for control systems is to get them as tight and true as possible. Some advocate building in play in the elevators to aid in groove. I don't, but that's a personal choice. By "true," I mean alignment in the mechanism of the control system and the surfaces.
For the purpose of this discussion, I'll deal more with the installation of the heart of the system and refrain from bringing in other preferences, such as backward-installed bellcranks and leadout setup.
Bellcrank geometry
Geometry is important with the bellcrank. The four-inch has become the norm, as has the longer arm horns. A popular setup is:
- 8- to 9-inch bellcrank
- 1-1/4-inch horn holes on the bellcrank
- then one-inch to one-inch flap to elevator
It is critical that the pushrod be set up centered on the flap horn. To do this, you must move the bellcrank to the inside of the model (up-line rear), or in the reversed setup to the outside of the airplane (up-line front).
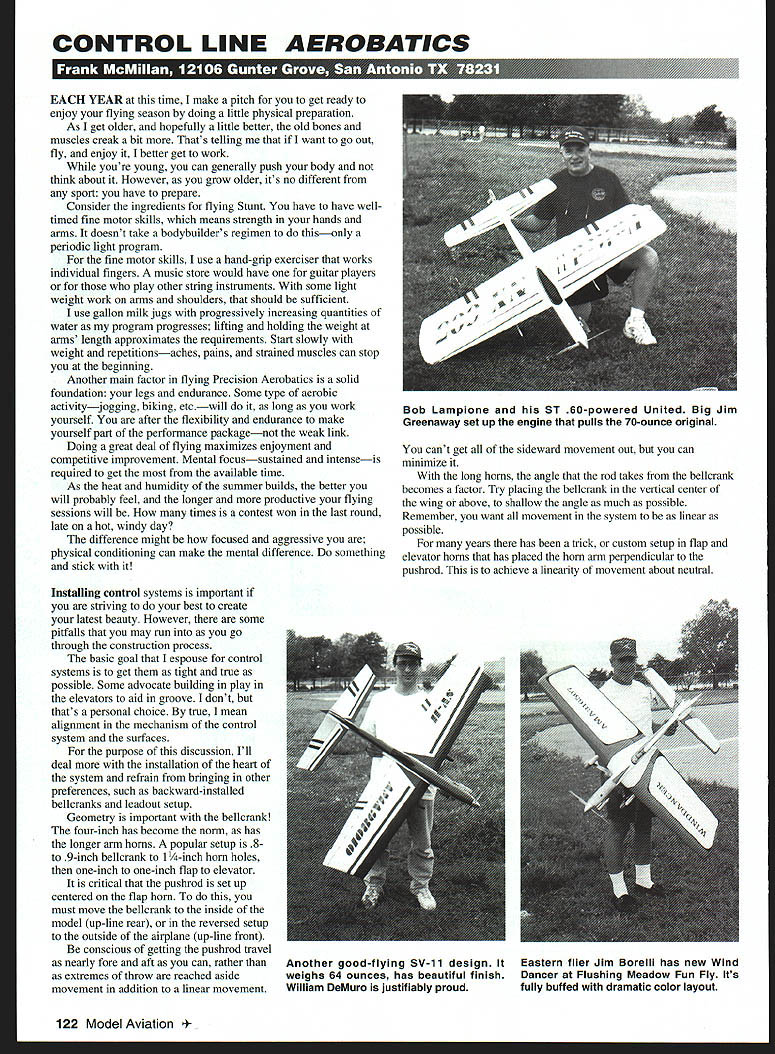
Be conscious of getting the pushrod travel as nearly fore-and-aft as you can, rather than having significant sideward movement as extremes of throw are reached. Sideward movement in addition to linear movement becomes a factor as the rod takes the bellcrank. Try placing the bellcrank in the vertical center of the wing or above it to shallow the angle as much as possible. Remember, you want all movement in the system to be as linear as possible.
For many years there has been a custom setup in flap and elevator horns that places the horn arm perpendicular to the pushrod. This is to achieve linear movement about neutral. This requires custom horns with the angle plotted to the angle of the pushrod. I've never used custom horns, so I can't fully comment, but it does address the linearity question.
Bearings, alignment, and longevity
A really important area is alignment and bearing fit. Recall that I try to get everything tight. Even with this approach, there are times when the controls will loosen up after a number of flights.
In the old days, we used 3/32-inch ID (inside diameter) brass tubing as bearings, which served acceptably with the smaller models, plus the wire fit. With the music wire commonly available, the fit can be sloppy to start (say .004 inches).
That may not sound like much, but throw in vibration and flight loads and the thin wire-brass will "egg out" rapidly. Try for a fit about .001 inches—just enough for lubrication.
Also consider the length of the bearing. It helps if you use the brass tubing to get as much bearing area as possible—say 1/4 inch long. My preference is button bearings turned from 1/4-inch phosphor bronze. Some suppliers use brass eyelets, which seem to be satisfactory.
Pushrods and centered fit
Another point that affects longevity and smoothness goes back to how you do the pushrods. I hope that you have been using arrow-shaft carbon tubes, but even if you are still using brazed wire, you will have wire ends (3/32).
When making up pushrods, be careful that the rod enters the bearing centered down the bore of the bearing. This is not always where you think it is, and much fitting is sometimes required.
If it's not right, you are asking for a portion of the bearing to take the major wear until the high points wear and you have a sloppy fit.
As you assemble the stabilizer/elevators in the fuselage, you must consider the previous point: a properly fit bearing may be placed in stress as you align the stabilizer. Trial-fit until any movement allowed by play in the bearing is centered around the perfect stabilizer alignment.
Although you have placed the bearings in the horns as best you can, it is possible that they are not true in the horn. Likewise, the angle that the pushrods are set at may not be in line with the horns.
If you are conscious of this, take note of the fits and adjust to get it just so. The reward is an initial silkiness in the control feel and super longevity in the system by minimizing the wear.
Mating flaps and elevators
Have you ever made perfect flaps, cut your hinge slots dead-on, and when you installed the flaps, they were bowed? If they are bowed, you have only three choices:
- Rework them dead straight.
- Live with them.
- Make the gaps uniform and adjust so that they fly properly.
Rarely can they be made perfect without major surgery.
The hinge slot's position can bow the flaps and bind the movement of the surface. But how can this happen if you did the slots perfectly? You are dealing with a few thousandths, where the wing trailing edge, the flap slots, or both are slightly off, with the errors cumulative.
The problem is that this type of situation must be fixed to avoid bowed flaps, stiff controls that wear out, and spring in the controls.
Fixing the slots is not a difficult thing, but it can be very time-consuming. The basic approach is cut-and-try by doing all the slots, checking alignment, then filling the appropriate slots and recutting.
A method to check alignment
After a complete trim-fit that shows some problems, take the flap off and reinstall it using only the flat horn point and the outer hinge.
Before you proceed, make sure that at the tip the flap is centered on the wing trailing edge. This should place the flap centered from tip to root.
Now proceed to install one hinge at a time. As each hinge is trial-fit, check for bow in the flaps. Check also that as the flaps' movement is explored, they do not bow at full travel.
Listen carefully for any noise with the hinges. Don't hesitate to fill up a hinge slot, CA (cyanoacrylate) glue it, and cut it in (I use a Dremel tool with a fresh cutting disc). From now on, it's not magic—just time.
The elevators are worked in the same way. Be patient; this area contributes significantly to an honest-flying airplane. After all of the surfaces are fitted, finish-sand to the wing and stabilizer. This process took me four hours, so if it goes slowly for you, put it away and come back to it when you are fresh. "Good enough" doesn't serve; it has to be right!
Transcribed from original scans by AI. Minor OCR errors may remain.

