

Control Line: Combat
By Charlie Johnson
There are a lot of ways to go competing in combat events and two of the feature models this month are at opposite ends of the sophistication spectrum. The Monoboom FAI is probably the most complicated of all the combat designs, while the Tantrum FAI is about the simplest thing around.
The Monoboom family of models designed by Mike Hoffelt compromises nothing in the pursuit of maximum performance. To use one of these models with anything less than the most potent motor available and with conservative flying style is an exercise in missing the point.
The Tantrum design by Phil Cartier isn't the ultimate performer like the Monoboom, although it's no slouch in the turns and wound-out level. It is the practical combat model and is happy cruising around at 75 mph or 100 mph. It is forgiving, and it allows almost "mind off" flight control. The Tantrum comes to your door in a box and is ready to fly in about an hour. The motor mounts and tail need to be epoxied on and the controls hooked up. All parts are either painted or covered.
The Monoboom also comes in a box, but there are a lot more pieces. Take a look at the picture of the kit resting on the building board. About 20 hours later you'll be looking at a ready-to-fly model and that's where the fun begins.
First flights and performance
Since the Tantrum was almost ready to go out of the box, it was the first to be in the air. The stock Fox 15 (10% nitro fuel and a Taipan 7-4 prop) pulls it along at a leisurely 75 mph for 10–12 minutes on 3-1/2 ounces of fuel. A nice, relaxing way to spend an afternoon cruising around the sky, buzzing the ground and feeding in just the precise amount of control to weave out the intricate patterns you had in mind.
Put in your ear plugs for the Monoboom! The motor (Rossi, of course) should be run on 60% nitro with a clipped 7-4 (Taipan or reworked wood). The noise is unreal, and your pitman will be happy to release the model since the exhaust duct gives him the full benefit of the 25,000 rpm. Flying the model is a full-time job if you do more than eights and loops. Violent switchbacks, wiggles and U-turns are a way of life with this model and become addicting.
Now the Monoboom isn't that much faster or tighter than the Tantrum with equal power. The Tantrum is competitive against anything in the world, while the Monoboom is really an exhibition plane designed to dazzle your friends and competitors. The 13-ounce weight of the Monoboom versus the 15-1/4 ounces of the Tantrum is the biggest difference in the violence level of the two models.
My comparison of the two planes is given in the table elsewhere in this column.
Building and kit notes
There's no problem in assembling the Tantrum or the other models marketed by Cartier since they're almost-ready-to-go, genuine plug models. To properly build a Monoboom requires a building board. I bought a table from a local restaurant and covered it with Cellotex. I thought the table was flatter than it turned out, so I shimmed up the Cellotex with scrap sheets of balsa, just kept moving and adding until everything was perfectly flat. The kit instruction book shows you how to construct the angle block used to support the trailing edge during construction. I used some wood screws to hold the board, block and Cellotex together.
The instruction booklet for the Monoboom is really loaded with lots of good ideas and building techniques. An example of something so simple but often overlooked is the recommendation for pins. My wedge-headed pins made great chisels but split the balsa sheeting from end to end. I went and found the appropriate type pins and, thanks to the gentle taper and sharp point, I no longer have the problem.
Back to the flying impressions. The Tantrum never becomes a full-time job flying even with a lot of power in the nose. I'd say it is about the best low-altitude model I've flown whether at 100 mph or backed off to 75 mph. The model gives you the confidence to go a little lower. The Monoboom (once it breaks you in) gives you the incentive to get a little crazier.
MONOBOOM FAI
- Price: $26.00, you furnish covering & adhesive.
- Weight: 13–14 oz.; a heavy-duty model like mine weighed almost 14 oz. ready-to-fly.
- Top Speed: 112 mph with a high-pitch prop; 103 mph with a prop for normal flying. Recommended: 7-4 Taipan cut to 6½".
- Crash Resistance: A little. Best advice is to protect your investment.
- Manufacturer: Mike Hoffelt, 1021 Sapphire St., San Diego, CA 92109
TANTRUM FAI
- Price: $35.00, you furnish adhesive.
- Weight: 15¼ oz. ready-to-fly.
- Top Speed: Fully adjustable from 75–100 mph, depending on nitro content. Approximately 5 mph slower than the Monoboom with the same power plant and prop; not over 100 mph regardless of prop/motor.
- Crash Resistance: A lot more than a Monoboom, but less than a Voodoo.
- Manufacturer: Phil Cartier, Box 300A, RD #2, Palmyra, PA 17078
Cartier slow-combat (almost-ready-to-fly) model
A third model marketed by Cartier appeared at my doorstep recently. Probably the most practical innovation so far. As the picture shows, it is an almost-ready-to-fly Slow Combat. It'll remind you of the old 10¢ gliders where you stick the wing and tail through slots in the body. That's all there is to this model too! The MonoKote should be cut away and the tail epoxied in place. The wing can be taped in place since the controls are hooked to the body and the wing doesn't take the pull.
Assembly still takes an hour or two because you have to epoxy the tail, tape the wing, and add things like motor, tank and put loops in the leadouts and bolt on the elevator horn. Flying weight is a very respectable 24 ounces with Fox 36 and metal outboard tank. Reinforcing tape or something very strong is best used to secure the wing to the body (the two-inch-wide plywood shoulder gives a lot of support area). Time will tell how reliable the set is. It may take a dowel or key to hold things in alignment. Not only would the removable wing be great for transporting the model but the wing could be shifted slightly in the body for different trim (possibly more inboard wing for windy days, etc.).
As mentioned, the controls are on the outside of the wing which saves a lot of time building one of these models. The wing is usually the part that gets torn up first in a combat match, so there's a real plus in being able to replace the wing right on the flying field.
Control line hookup tips
- The best way I've found to hook up the lines is to use Monoline buttons on the bellcrank or eyelets bolted to the bellcrank.
- Make loops in the end of your flying lines. If you're really paranoid about breaking a line, you can double up the loop by using some .018 music wire as the inside loop.
- Bend the music wire around a 3/32" drill and the braided flying line around a 1/8" bit.
- Be sure to wrap with copper wire rather than solder.
- The control line speed section in the AMA rule book has some methods of making up the loops.
Venturi note
Mark Smith sent a couple of venturis he makes for the Fox 36 to improve fuel draw. The brass tube restricts venturi size about 1/16". The spray bar holds the venturi in place and places enough tension on the unit to seal the gasket. I haven't tried the setup yet, but Mark claims it really helps steady the run with a very slight loss of power.
Charlie Johnson 3716 Ingraham St., San Diego, CA 92109.
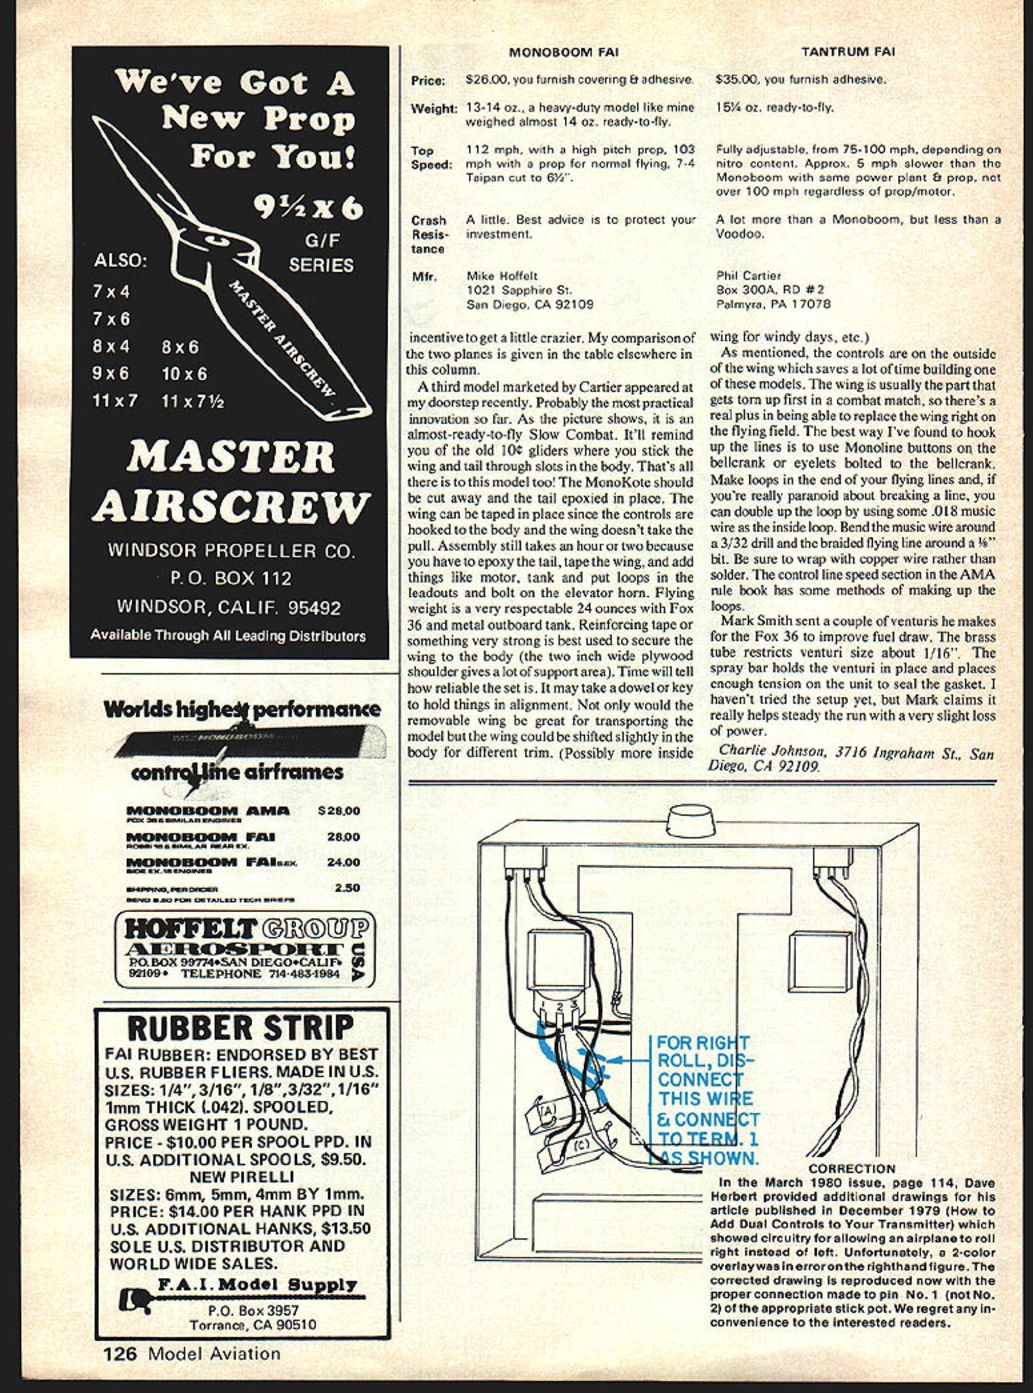
Transcribed from original scans by AI. Minor OCR errors may remain.

