
Control Line
COMBAT
Charlie Johnson
USUALLY, the last thing said in Combat construction articles is: "install fuel system and test-fly model." Enough people have trouble getting simple suction tanks to work, much less a pressure tank or bladder/pacifier system.
Pacifiers have been around a long time — maybe 25 years or more. Riley Wooten gets a lot of credit for development work or at least popularizing the system. Pen bladders are in the same group but have lost popularity because they’ve become scarce and the remaining ones have deteriorated. Actually, pacifiers are getting hard to find in a form usable for Combat. Many are filled with jellies or molded around the plastic ring. Some people buy substitutes from scientific suppliers. Surgical tubing has largely taken over where pen bladders once ruled: it’s cheaper, lasts longer, and is available in many sizes. Nowadays the term "bladder" often includes surgical-tubing tanks.
If you have a choice of fuel systems, quickly eliminate metal tanks — they weigh more and never really work as well as a bladder/pacifier system. The choice between bladder and pacifier is sometimes dictated by the model design. The pacifier needs a large roundish compartment that requires a bulge in the airframe. The bladder rides inside a tube and can be hidden within the wing entirely. The pacifier concentrates the fuel mass closer to the center of the model, whereas a bladder tube generally runs outboard and gives the effect of more outboard weight. If the compartment type is considered in the design, there shouldn't be much difference in handling or drag caused by the bulge.
It used to be common practice to place the pacifier compartment at the highest point of the wing to minimize visible bulge and preserve sheeting. That weakened the leading edge sheeting and put fuel mass ahead of the center of gravity. Many flyers now put the compartment behind the high point or spar line. With a full tank the model might be slightly tail-heavy or balanced correctly; as fuel is burned off the model becomes more nose-heavy, which makes landing easier.
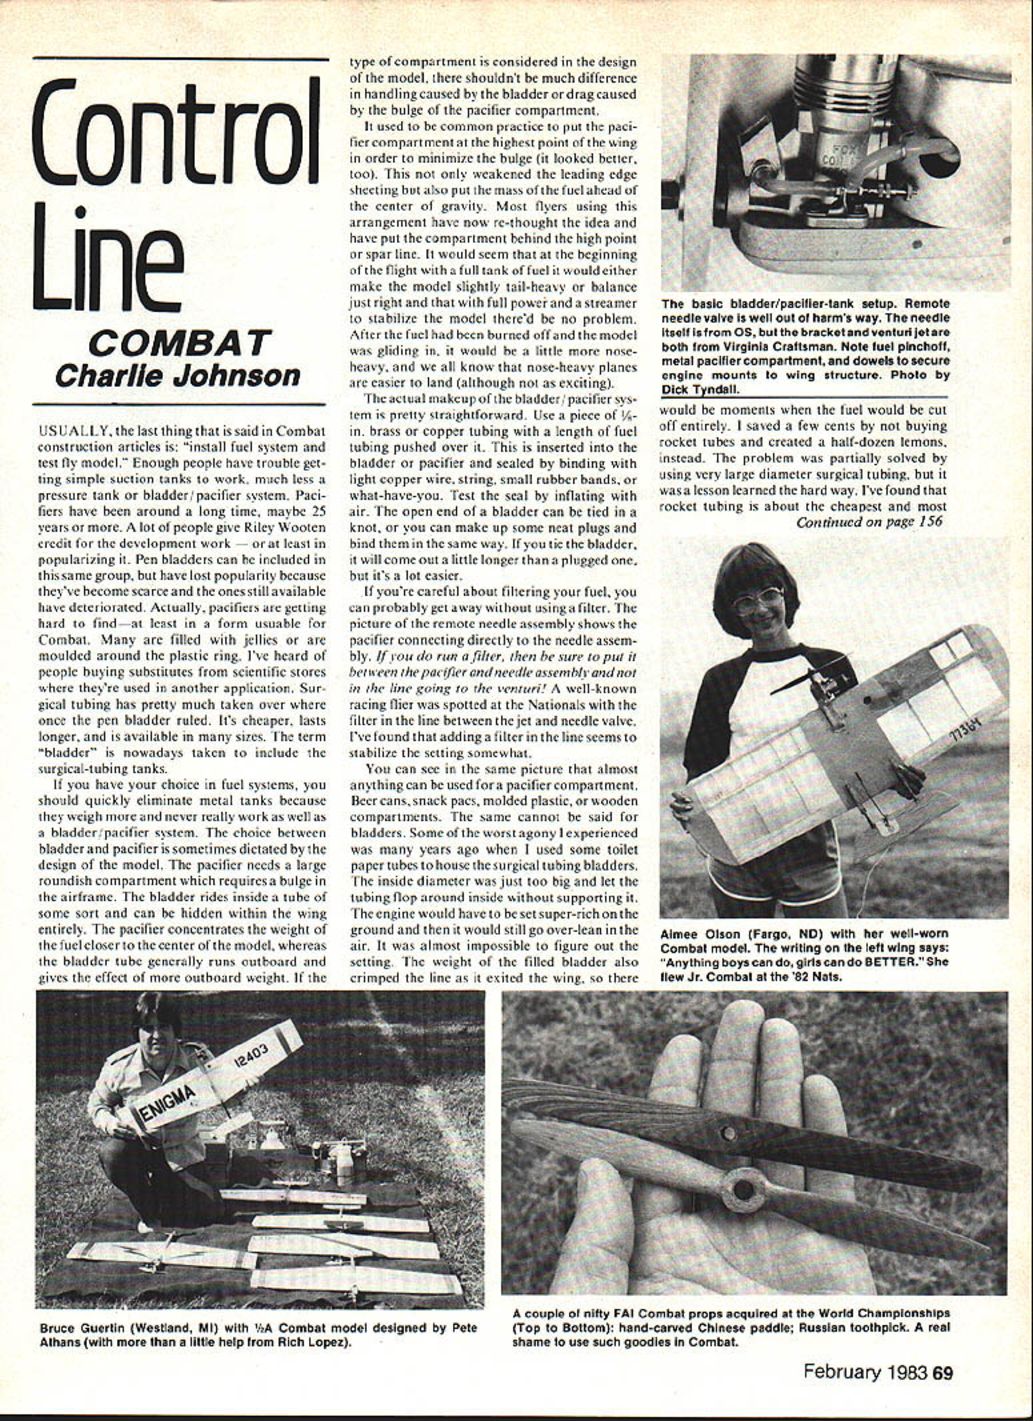
The basic bladder/pacifier hookup is straightforward. Use a short piece of 5/16-in. brass or copper tubing as a tank nipple, push a length of fuel tubing over it, insert this into the bladder or pacifier, and seal by binding with light copper wire, string, small rubber bands, or similar. Test the seal by inflating with air. The open end of a bladder can be tied in a knot or fitted with a plug and bound in the same way. A tied bladder will come out a little longer than a plugged one but is easier.
Filtering fuel is important. If you are careful about filtering, you may get away without an inline filter; some pacifiers are connected directly to the needle assembly. If you do use a filter, put it between the pacifier and the needle assembly — not in the line to the venturi. A well-known racing flier was once spotted with the filter between the jet and needle valve (not ideal). Adding a filter in the line often stabilizes needle settings.
Almost anything can serve as a pacifier compartment: beer cans, snack packs, molded plastic, or wooden compartments. Improvised bladders are less reliable. One of the worst experiences I had was using toilet-paper tubes to house surgical-tubing bladders: the inside diameter was too big, allowing the tubing to flop and crimp. The engine had to be set super-rich on the ground and still ran over-lean in the air; settings became nearly impossible to figure out. The weight of a filled bladder also crimped the line at the exit. I saved a few cents by not buying proper rocket tubes and ended up with several lemons. The problem was partially solved by using very large-diameter surgical tubing, and I’ve found rocket tubing to be the cheapest and most readily available material. I use 1/8-in. inside diameter tubing, but match tubing size to the rocket tube and the particular surgical tubing you are using.
Filling techniques differ: you can fill a pacifier with an ordinary fuel bulb, but surgical tubing usually requires a syringe (no electrical fuel pumps allowed). Cheap plastic syringes from a veterinarian’s supply store work as well as more expensive metal ones and are cheaper to replace if lost or broken. Watch for rubber-plunger deterioration — black flakes will mark the syringe barrel.
The surgical tubing develops higher pressure than a pacifier, so needle settings become more critical. If you haven’t run your engine on a high-pressure system, use this procedure to get close to the correct setting:
- Close the needle all the way.
- Fill the bladder/pacifier and connect it to the needle assembly.
- Point the venturi down and slowly open the needle until a very light stream of fuel comes out.
- Pinch off the tubing with your fingers, a hemostat, or another device to hold pressure while you make the final adjustment.
- Open the needle a small amount (trial and error will show how much for your particular engine), start the engine, and adjust for best running.
A remote needle valve, kept out of harm’s way, is a convenient feature. If you use a pacifier with the needle assembly, run a filter between the pacifier and the needle/venturi line; it often stabilizes the setting.
Secure the pacifier compartment so the weight of a filled bladder won't crimp the line at the exit. Placement of the compartment (ahead of or behind the spar) will affect balance as fuel is burned — be aware of that when designing the model.
All of this assumes your engine is well broken in. A new engine will only complicate fuel-system problems. For that reason, I suggest not using a bladder when breaking in engines — at least until you’ve mastered their use.
Charlie Johnson 3716 Ingraham St. San Diego, CA 92109
Transcribed from original scans by AI. Minor OCR errors may remain.

