

Control Line: Combat
Charlie Johnson
FOR SALE: Combat planes that handle like camels. Being the bargain-hunter that I am, I couldn't pass up eight pretty decent-looking models at bargain-basement prices. They're nice looking, light, and well-built—but they don't handle very well. I remember their former owner had pretty fair luck with them, but I decide he must have been putting a lot of "arm" in as he was flying. They won't wiggle, and they turn about like a stock Voodoo. There is about 1½ in. difference between inboard and outboard wings, plus a huge cutout for plug clearance and gorilla-sized hands to extract same. The extra 1½ in. on the inboard side is about one inch too much and makes the model yaw way out in the turns and flop around. Some of the effective outboard lift is also being destroyed by the large cutout around the cylinder head.
Fixing the cylinder cutout and airflow
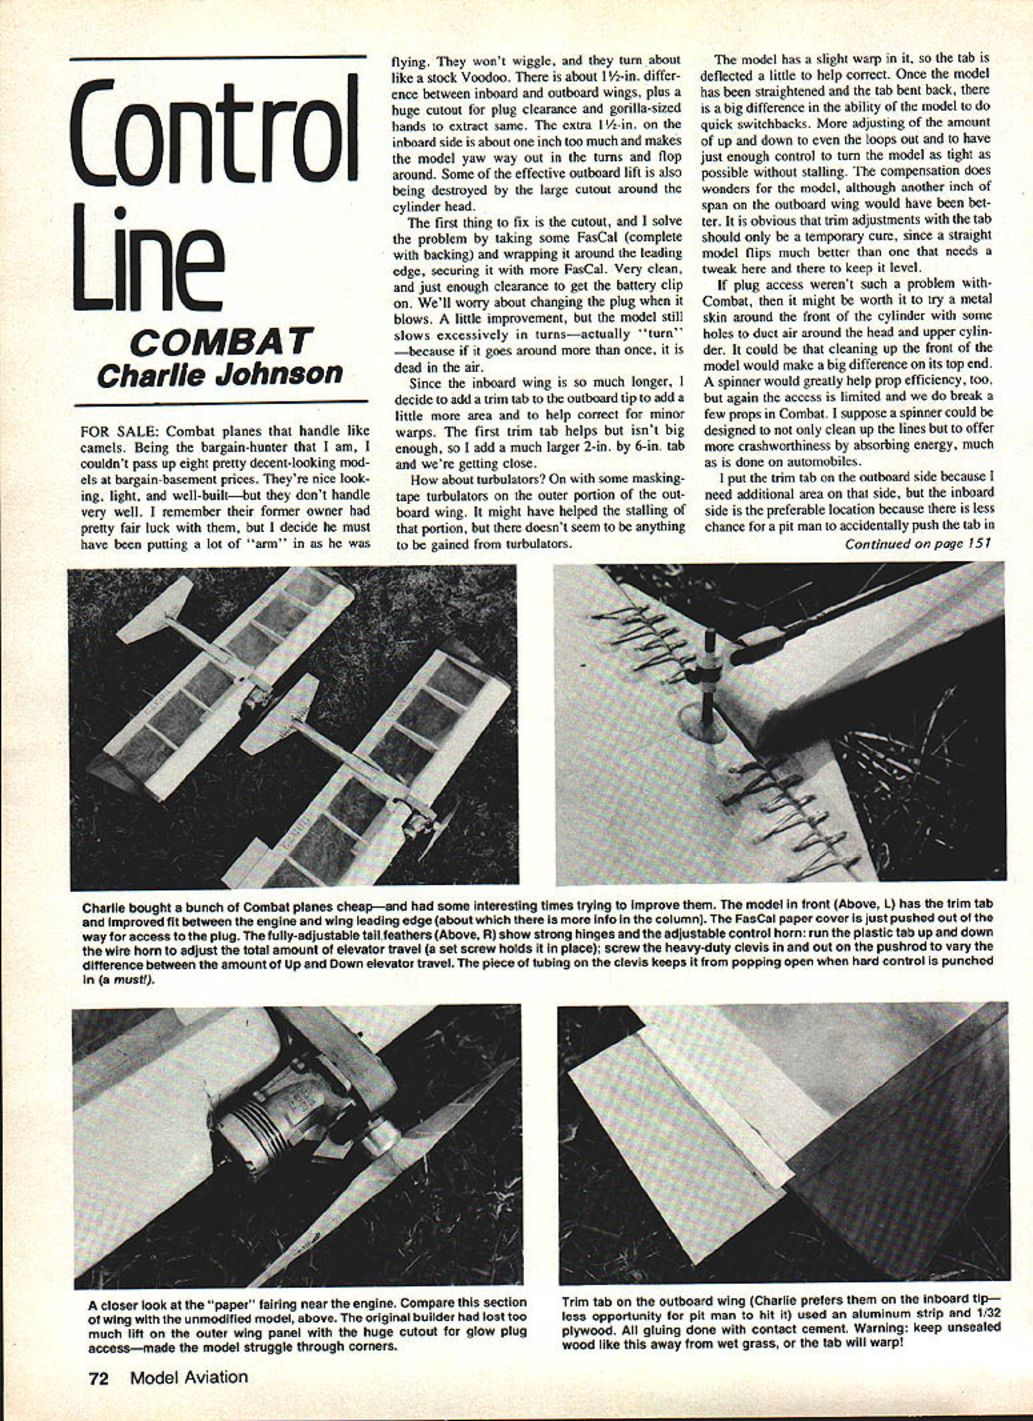
The first thing to fix is the cutout, and I solve the problem by taking some FasCal (complete with backing) and wrapping it around the leading edge, securing it with more FasCal. Very clean, and just enough clearance to get the battery clip on. We'll worry about changing the plug when it blows. A little improvement, but the model still slows excessively in turns—actually "turns"—because if it goes around more than once, it is dead in the air.
If plug access weren't such a problem with Combat, then it might be worth it to try a metal skin around the front of the cylinder with some holes to duct air around the head and upper cylinder. It could be that cleaning up the front of the model would make a big difference on its top end. A spinner would greatly help prop efficiency, too, but again the access is limited and we do break a few props in Combat. I suppose a spinner could be designed to not only clean up the lines but to offer more crashworthiness by absorbing energy, much as is done on automobiles.
Trim tabs and wing-area corrections
Since the inboard wing is so much longer, I decide to add a trim tab to the outboard tip to add a little more area and to help correct for minor warps. The first trim tab helps but isn't big enough, so I add a much larger 2 in. by 6 in. tab and we're getting close.
How about turbulators? On with some masking-tape turbulators on the outer portion of the outboard wing. It might have helped the stalling of that portion, but there doesn't seem to be anything to be gained from turbulators. The model has a slight warp in it, so the tab is deflected a little to help correct. Once the model has been straightened and the tab bent back, there is a big difference in the ability of the model to do quick switchbacks. More adjusting of the amount of up and down to even the loops out and to have just enough control to turn the model as tight as possible without stalling. The compensation does wonders for the model, although another inch of span on the outboard wing would have been better. It is obvious that trim adjustments with the tab should only be a temporary cure, since a straight model flies much better than one that needs a tweak here and there to keep it level.
I put the trim tab on the outboard side because I need additional area on that side, but the inboard side is the preferable location because there is less chance for a pit man to accidentally push the tab in one direction or another. A fully deflected tab would probably make for an interesting flight that would amuse your opponent, at least.
Materials and hinge construction
I use 1/32 in. plywood for the actual tabs. This is plenty heavy and can be cut by scissors or knife. Fuel-proofing is optional, but keep unsealed wood away from wet grass, because your neat trim tab will warp and then you'll need a tab on the tab. Contact cement works very well for securing the wood to the aluminum and then to the wing. It's about the best thing I've found for hooking tabs to plastic-covered wings. If you're going to put a thin coat on both surfaces and allow it to dry, you can read the instructions on the bottle while you wait, but aluminum works real well for the hinge material, probably about .010 in. is right. If you use thinner material, it will bend more easily, but thicker seems to hold the setting better.
You can cut the aluminum with scissors easily, but you'll notice that the strips like to curl up after they've been cut — which is going to make it hard to attach them. Take a piece of hardwood, like a motor mount, and run it back and forth across the strip while holding it on a hard surface like a table or bench. You may have to flip it over a couple times but pretty soon the aluminum will give up and stay straight so that you can attach it with no problems. Be sure to leave a little room between the trim tab and the trailing edge to allow for movement. This is something that can be done in a few minutes at the field, and even if your models are always built straight, it can be used for that one too late in the heat of a duel. Get to know your 190 intimately, then con your flying buddy into building a Spitfire and enjoy the match.
Setup and trimming procedure
There is a certain sequence I'd go through when trying to sort out a new model.
- First, don't try to tune an engine and trim a plane at the same time.
- Don't overlook the very basics like balance and the correct thrust line. You can usually "eyeball" the thrust line, but if you have a model that darts up or down when the engine shuts off, it might be that you had a lot of opposite control cranked in to keep the model flying level. Minor adjustments can be made by either loosening the mounting bolts and tweaking the engine the correct way or by enlarging the holes in the crankcase slightly.
- After the basics, fire up and fly level. Note if the outboard wing is high, low or level. Black tape on the outboard wing helps to see if it is a very small amount.
If there is no problem or only a small droop, then turn the model over and see if the wing hangs. If the wing hangs the opposite way from level flight, you have a warp. Either use a trim adjustment if the warp is minor, or straighten the wing (use heat on plastic coverings, boiling water or steam on doped finishes).
If the model hangs down both upright and inverted, then the most likely cause is too much inboard wing or way too much outboard weight. If the outboard wing is only slightly high in both directions and tends to "pickup" during maneuvers, then you probably need more outboard weight. Clean off the surface of the wingtip and FasCal a quarter-ounce (a 25-cent coin will do) on and refly. Asymmetry between inboard and outboard wings should run 1/2–1 inch, and the tip weight should be around 1/2 oz.
Compromises and line rake
There are lots of compromises designed into even the best and most competitive models. One happens to be line rake. The exit position of the lines from the inboard wing has a lot to do with the way the model tracks. In order to have the model stay out on the lines during upwind maneuvers, it is necessary to have a little more line rake than needed during the downwind portion. That's the story with these toys on a string. Compromises or not, they sure are more fun to fly when they're trimmed properly.
Charlie Johnson, 3716 Ingraham St., San Diego, CA 92109.
Transcribed from original scans by AI. Minor OCR errors may remain.

