
Control Line Float-Flying
Fred Cronenwett
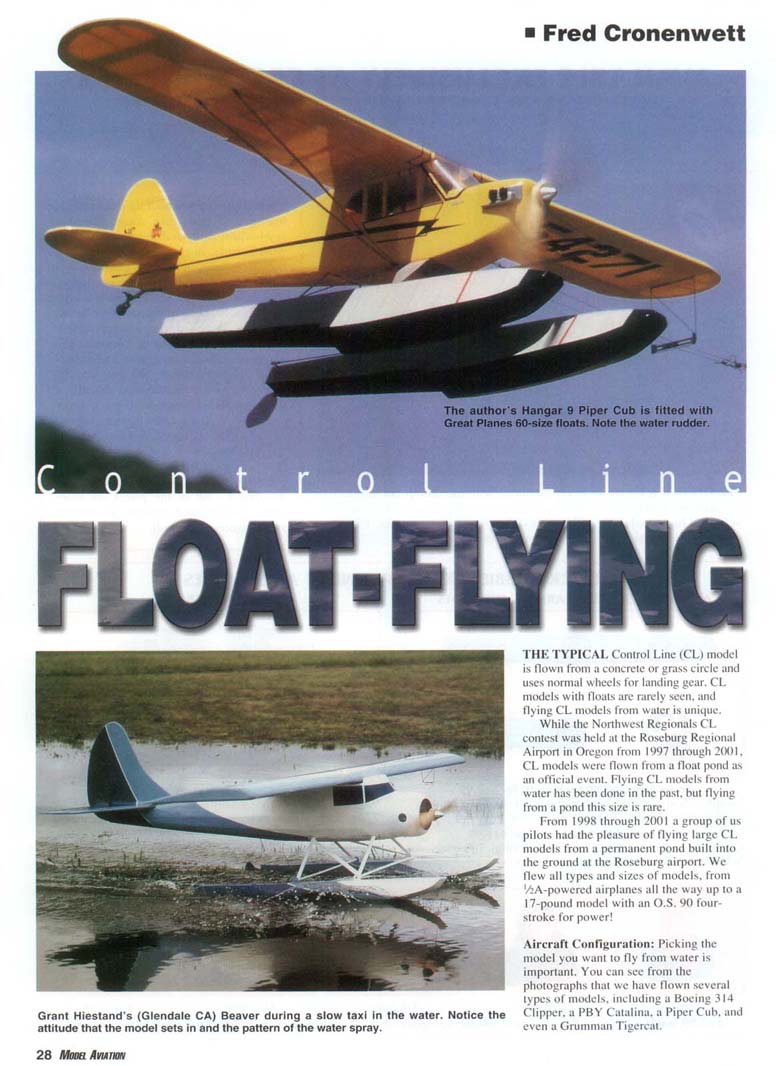
THE TYPICAL control line (CL) model is flown from a concrete or grass circle and uses conventional wheels for landing gear. CL models with floats are rarely seen, and flying CL models from water is unique. While the Northwest Regionals CL contest was held at the Roseburg Regional Airport in Oregon from 1997 through 2001, CL models were flown from a float pond as an official event. Flying CL models from water has been done in the past, but flying from a pond this size is rare.
From 1998 through 2001 a group of us pilots had the pleasure of flying large CL models from a permanent pond built into the ground at the Roseburg airport. We flew all types and sizes of models, from .049-powered airplanes all the way up to a 17-pound model with an O.S. 90 four-stroke for power!
Aircraft Configuration
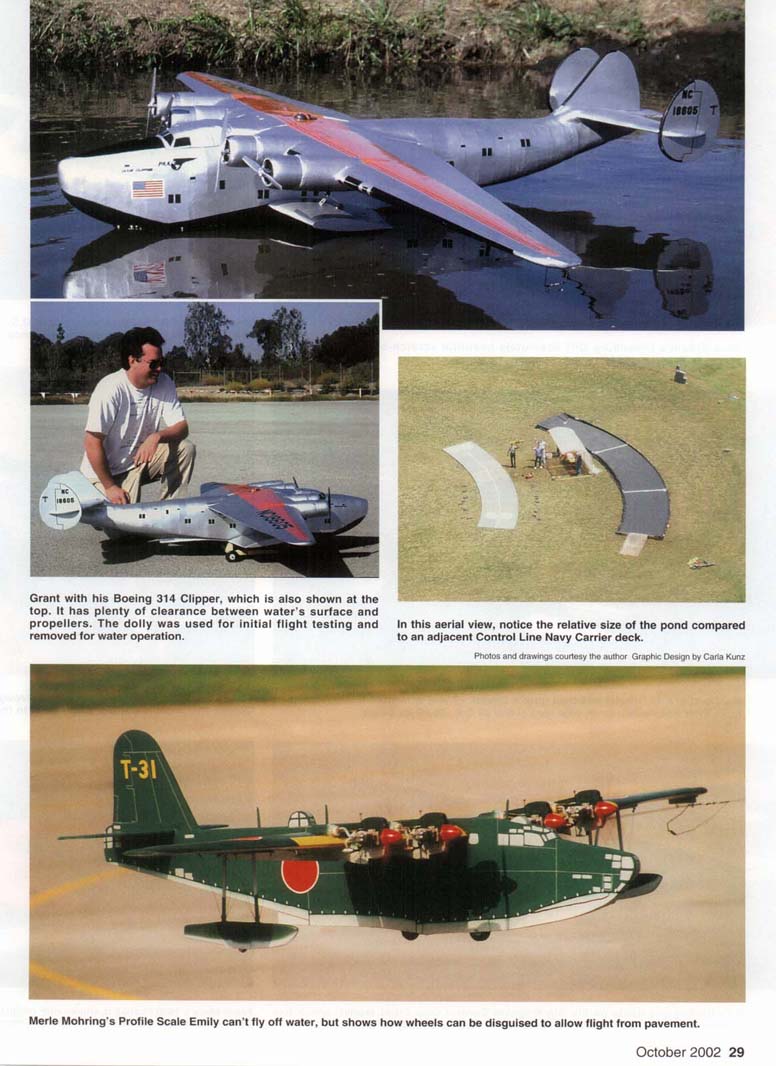
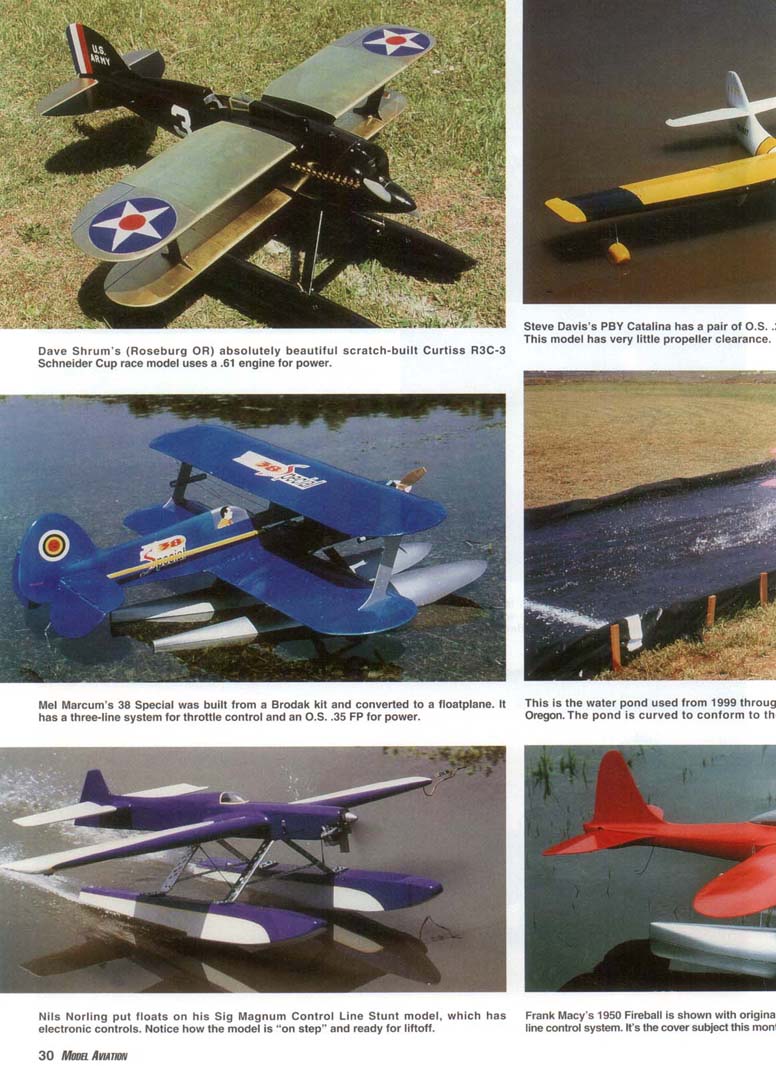
Picking the model you want to fly from water is important. We flew several types of models, including a Boeing 314 Clipper, a PBY Catalina, a Piper Cub, and even a Grumman Tigercat. The Clipper and the PBY are flying boats, and their fuselages are used for flotation. The Cub and the Tigercat each used a pair of floats. The Cub was by far the easiest to set up and fly from the pond, and the PBY was the most difficult.
A flying boat typically has tip floats mounted on the wings. The relative size of the fuselage will determine how easily the aircraft will take off. The Kyosho PBY that we flew from the Roseburg pond had a relatively small nose and tended to plow the water on takeoff; sometimes the nose section would want to dive under the surface. The Clipper had a relatively tall fuselage and did not exhibit those problems.
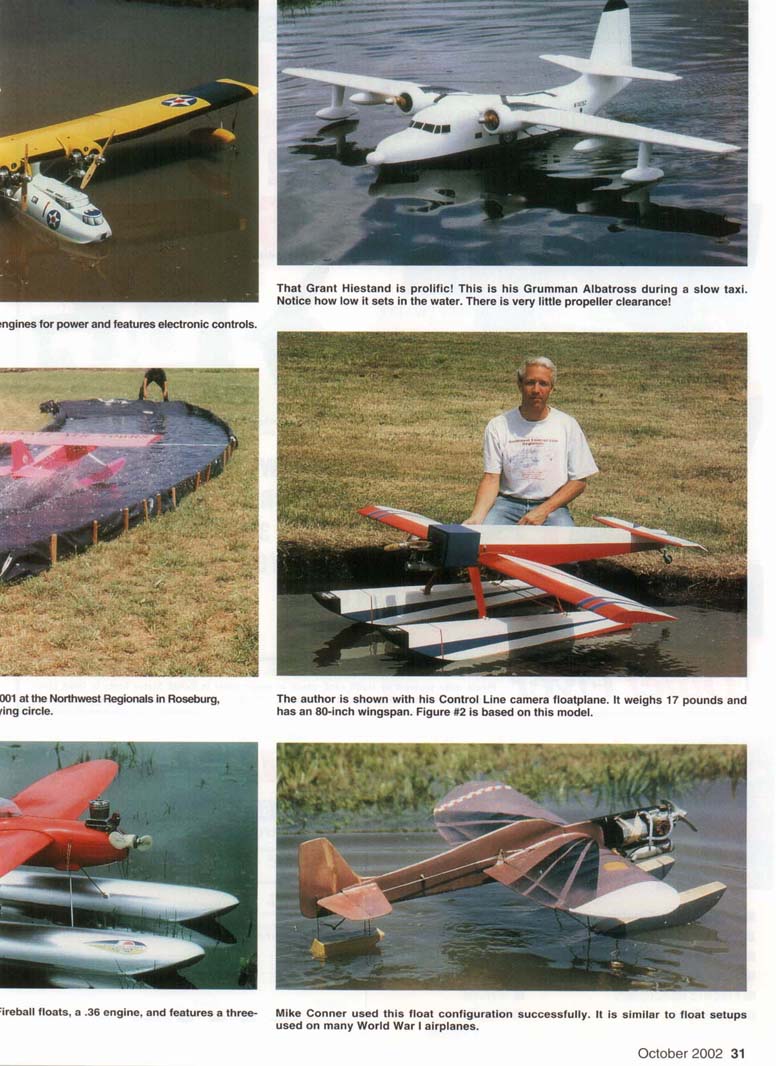
Weight plays a crucial part. If the model is too heavy and the fuselage hull is insufficient to hold the weight, the model may sit too deep and be hard to get on step. This was the case with the Grumman Albatross shown in the photographs. The PBY and the Albatross were more difficult to get airborne than the Clipper because of fuselage configuration, weight, and the relative size of the nose section.
The Cub was easy to set up and had few problems. I fly the Hangar 9 Piper Cub, which has an 81-inch wingspan and an Astro geared 40 electric motor. At first glance the 60-size floats look too big for this airplane, but you appreciate their size the first time you put the Cub in the water. The Tigercat is a 41-inch-span, scratchbuilt model that I fitted with floats for the fun of it; the full-scale Tigercat did not have floats. This model proved very heavy and flew very fast, making it a challenge to operate from the pond. Takeoff was no problem, but landing was the most difficult because of the high stall speed.
Floats
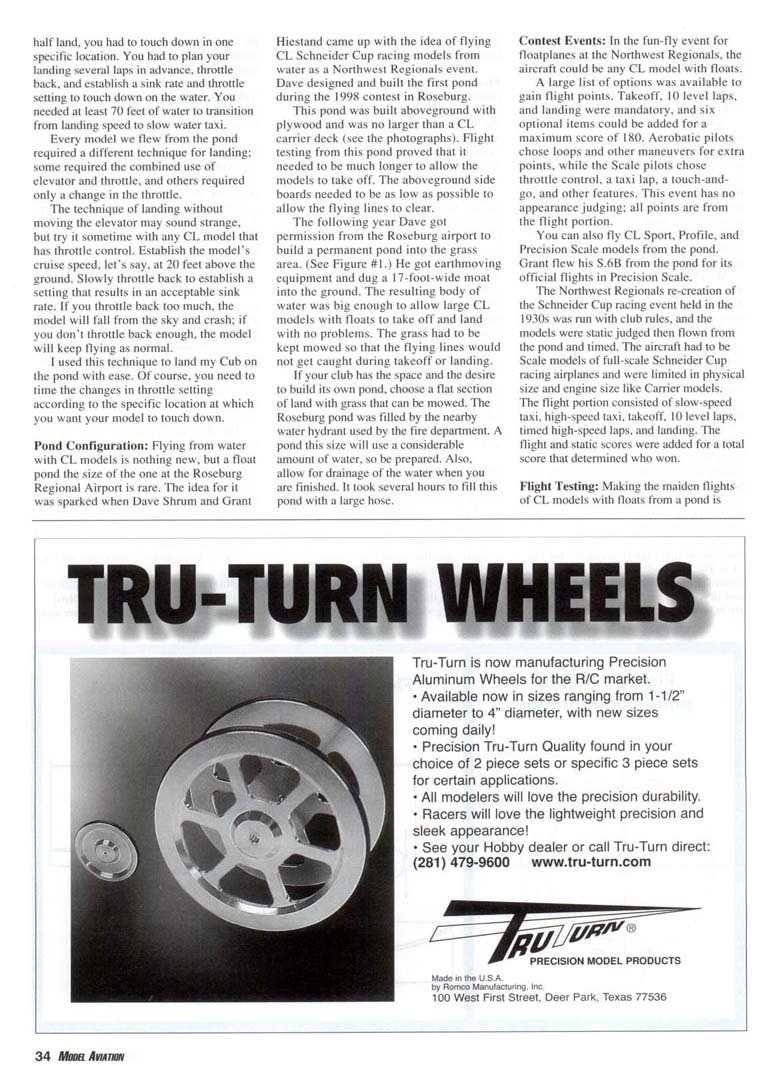
Floats must be properly positioned on the model for correct lift-off from the pond. If the floats are too small, the model will sink and be difficult to get on step. If the floats are too large, weight and drag become issues. Use floats that are durable and light.
The Cub I fly uses the Great Planes 60-size balsa-wood floats built from a kit. This kit is worth the money and builds up easily. My only modifications were to replace the plywood behind the step with balsa and cover the entire float with 3/4-ounce fiberglass. The bottom of the float received two layers of fiberglass for durability since models occasionally hit the ramp at the end of the pond or land in the grass.
My red-white-and-blue camera model had scratch-built floats (48 inches long) cut from one-pound foam, sheeted with balsa, then fiberglassed. Grant Hiestand's Supermarine S.6B had fiberglass floats made from his own molds, which proved to be the lightest and best approach.
Water Rudder
A water rudder is not required on all models, but be prepared to install one if needed. You may not find out that your model needs a water rudder until you attempt to taxi in a crosswind or when the water is rough. A water rudder helps steer the model while in the water; it is usually mounted on the aft end of a float and linked to the rudder control or a dedicated control so it can be used for taxiing and then neutralized for takeoff and landing to avoid added drag.
The water rudder needs to be adjustable to ensure the model tracks properly through the water during takeoff and landing. The line guide does not affect how well the model tracks through the water during slow-speed operation. After the model gets enough speed, the water rudder is less important and the line guide takes over to maintain line tension.
Takeoff
Takeoff from the Roseburg pond required power and proper technique because the water runway was only 190 feet long.
For the Cub I set the elevator neutral (no up or down initially) and applied power slowly at first to get the model moving through the water. Once the Cub was tracking correctly (this took no more than five feet) I applied full power, and within 100 feet the model was on step and quickly approaching takeoff speed. By about the 150-foot mark I applied up-elevator and it lifted off with no trouble. The first attempt to fly this model from the pond was done with some down-elevator during the initial takeoff run, and results were not good.
The Albatross sat so deep in the water because of its overall weight that it had difficulty getting up on step and thus was hard to get airborne. Additionally, the Albatross's props were close to the water and created extra spray.
The PBY would plow into the water and the nose would try to dive underneath, slowing the takeoff run. That model required a great deal of up-elevator during the takeoff run to keep the nose high enough to get on step; the elevator was then neutralized to allow the model to gain speed and more up-elevator applied for liftoff.
The Clipper took off much like the Cub.
Landing
If you have ever flown a Carrier model, flying from a pond is no problem. Since the Roseburg site was half water and half land, you had to touch down in a specific location. You had to plan your landing several laps in advance, throttle back, and establish a sink rate and throttle setting to touch down on the water. You needed at least 70 feet of water to transition from landing speed to slow water taxiing.
Every model we flew from the pond required a different landing technique; some required the combined use of elevator and throttle, others required only throttle changes.
A useful technique is to land without moving the elevator: establish the model's cruise speed (for example, 20 feet above the surface), then slowly throttle back to a setting that results in an acceptable sink rate. If you throttle back too much the model will stall and crash; if you don't throttle back enough the model will remain flying. I used this technique to land my Cub on the pond with ease. Time throttle changes to the specific location where you want the model to touch down.
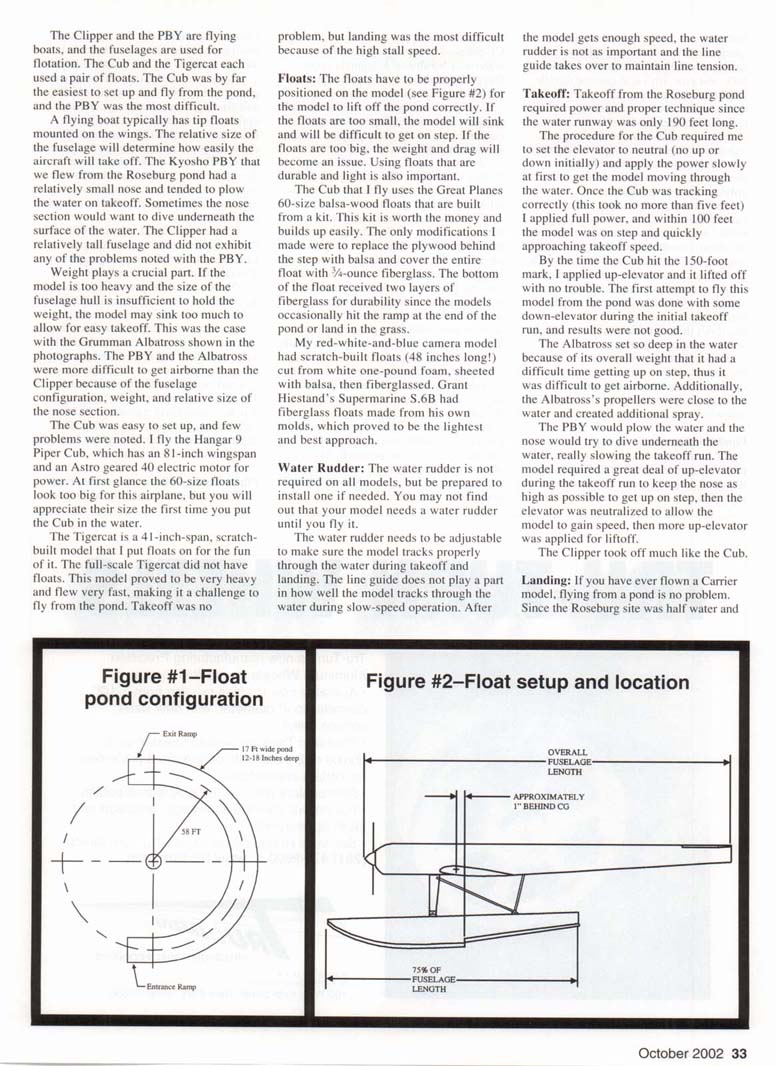
Pond Configuration
Flying from water with CL models is nothing new, but a float pond the size of the one at Roseburg Regional Airport is rare. The idea was sparked when Dave Shrum and Grant Hiestand proposed flying CL Schneider Cup racing models from water as a Northwest Regionals event. Dave designed and built the first pond during the 1998 contest in Roseburg.
That pond was built aboveground with plywood and was no larger than a CL carrier deck. Flight testing from this pond showed it needed to be much longer to allow models to take off. The aboveground side boards needed to be as low as possible to allow the flying lines to clear.
The following year Dave got permission from the Roseburg airport to build a permanent pond into the grass area. He used earthmoving equipment to dig a 17-foot-wide moat into the ground. The resulting body of water was big enough to allow large CL models with floats to take off and land with no problems. The grass had to be kept mowed so the flying lines would not get caught during takeoff or landing.
If your club has the space and desire to build a pond, choose a flat section of land with grass that can be mowed. A pond this size will use a considerable amount of water, so be prepared. Also, provide for drainage when finished — it took several hours to fill the Roseburg pond with a large hose.
Contest Events
In the fun-fly event for floatplanes at the Northwest Regionals, the aircraft could be any CL model with floats.
A large list of options was available to gain flight points. Takeoff, 10 level laps, and landing were mandatory, and six optional items could be added for a maximum score of 180. Aerobatic pilots chose loops and other maneuvers for extra points, while scale pilots chose throttle control, a taxi lap, a touch-and-go, and other features. This event had no appearance judging; all points came from the flight portion.
You can also fly CL Sport, Profile, and Precision Scale models from the pond. Grant flew his S.6B from the pond for its official flights in Precision Scale.
The Northwest Regionals re-creation of the Schneider Cup racing event of the 1930s was run with club rules: models were static judged, then flown from the pond and timed. Aircraft had to be scale models of full-scale Schneider Cup racers and were limited in physical size and engine size like Carrier models. The flight portion consisted of slow-speed taxi, high-speed taxi, takeoff, 10 level laps, timed high-speed laps, and landing. Flight and static scores were added to determine the winner.
Flight Testing
Maiden flights of CL models with floats from a pond are challenging because of interaction with the water and other unknowns. It is easier to test-fly the model from land first, where you can work out bugs and trim the model properly before going to the water. You can adjust the center of gravity (CG), the line guide, and make other changes.
Another reason to test on land first is to select the propeller for the shortest takeoff distance. Remember that you only have 190 feet of water to get airborne; in that distance you must get on step and achieve takeoff speed.
Wheels provide little rolling friction and land-based models can reach takeoff speed with little power, but a floatplane requires a longer takeoff run to overcome water resistance. As a rule of thumb, the takeoff distance on water is about 150% of the takeoff distance on land.
When the Cub still had wheels I added lead weights to simulate float weight and did flight-testing from a concrete circle. (The model can be converted from wheels to floats in less than 10 minutes.) I took several propellers and aimed to get the shortest takeoff distance.
The Cub's AstroFlight geared 40 motor (3.14:1 Super Box) can turn everything from an 18x10 to a 15-inch propeller. From land I like a 16x8, but the 18x10 provides a lot of thrust. The takeoff distance with the 16x8 is approximately 125 feet; that distance was cut almost in half with the 18x10.
We tried to fly this airplane from the pond with a 16x8 but switched to the 18x10 after the attempt. Based on the 125-foot land takeoff distance, it would require roughly 188 feet to get off the water — the full length of the pond. You can never use 100% of the pond during takeoff, and you want the model to lift off before the floats hit the exit ramp. Your floatplane should be able to take off from concrete at approximately 100 feet to comfortably fly from a 190-foot pond.
If you have a flying boat like Giant's Clipper, you can make a dolly that straps to the model so you can trim, adjust CG and line guide, and pick the proper propeller for minimum takeoff distance. Remove the dolly once you get to the pond. Then trim the water rudder so the model tracks properly through the water during slow-speed taxi.
Flying From a Lake
If you have access to a small lake, choose a shoreline without trees, rocks, or other obstacles that could restrict your flight path. Grant and I flew at a local lake one year and stood at the shoreline, giving us roughly 180° of water and 180° of land.
Be sure you have permission to fly from the lake before you set up. The lake we used required special permits.
CL models with floats are fun, but don't let a lack of water stop you from building a floatplane. If you build a scale model you can put wheels into the floats or fuselage so you can fly from a concrete circle. Merle Mohring's Emily flying boat, built to compete in CL Profile Scale, has wheels embedded in the fuselage, allowing it to fly from any hard surface. Many full-scale aircraft have retractable landing gear as part of the floats or fuselage (which can be duplicated), allowing the model to be flown from hard surfaces.
A feature article about the 1998 Northwest Regionals float pond was published in the January 1999 Model Aviation.
Good luck with your next CL scale model with floats, and keep your wings level.
Fred Cronenwett 18375 Ventura Blvd. #173 Tarzana, CA 91356
Transcribed from original scans by AI. Minor OCR errors may remain.

