
John F. Kilsdonk
Control Line Goodyear—An Update: Zipper
Because so little has been published of late on this type of model, this definitive article and plan fill a deep information gap. The author is well known in CL Racing circles.
THE CL GOODYEAR or Scale Racing event has enjoyed seven very popular years as an official AMA event. While the event, at least rule-wise, is basically the same as it was in 1968, some noticeable changes have taken place. It is the intent of this article to attempt to describe the technological changes and to update the so-called state-of-the-art.
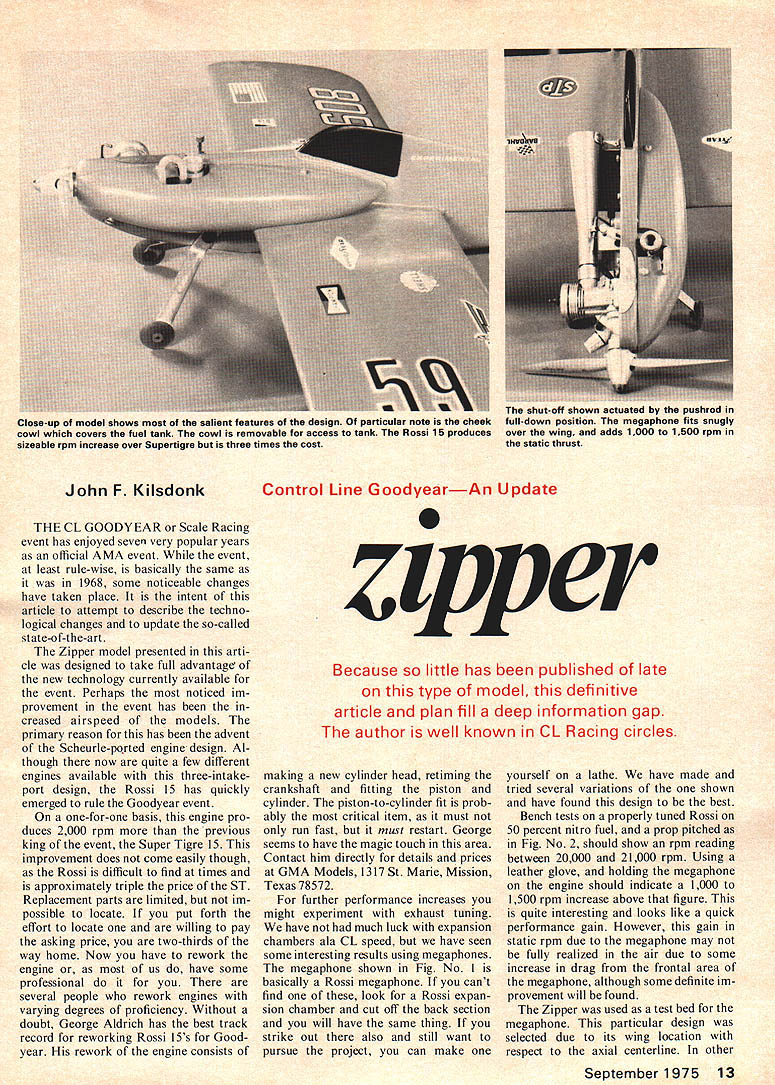
The Zipper model presented in this article was designed to take full advantage of the new technology currently available for the event. Perhaps the most noticed improvement in the event has been the increased airspeed of the models. The primary reason for this has been the advent of the Schnuerle-ported engine design. Although there now are quite a few different engines available with this three-intake-port design, the Rossi 15 has quickly emerged to rule the Goodyear event.
On a one-for-one basis, this engine produces 2,000 rpm more than the previous king of the event, the Super Tigre 15. This improvement does not come easily, though, as the Rossi is difficult to find at times and is approximately triple the price of the ST. Replacement parts are limited, but not impossible to locate. If you put forth the effort to locate one and are willing to pay the asking price, you are two-thirds of the way home. Now you have to rework the engine or, as most of us do, have some professional do it for you. There are several people who rework engines with varying degrees of proficiency. Without a doubt, George Aldrich has the best track record for reworking Rossi 15's for Goodyear. His rework of the engine consists of making a new cylinder head, retiming the crankshaft and fitting the piston and cylinder. The piston-to-cylinder fit is probably the most critical item, as it must not only run fast, but it must restart. George seems to have the magic touch in this area. Contact him directly for details and prices at GMA Models, 1317 St. Marie, Mission, Texas 78572.
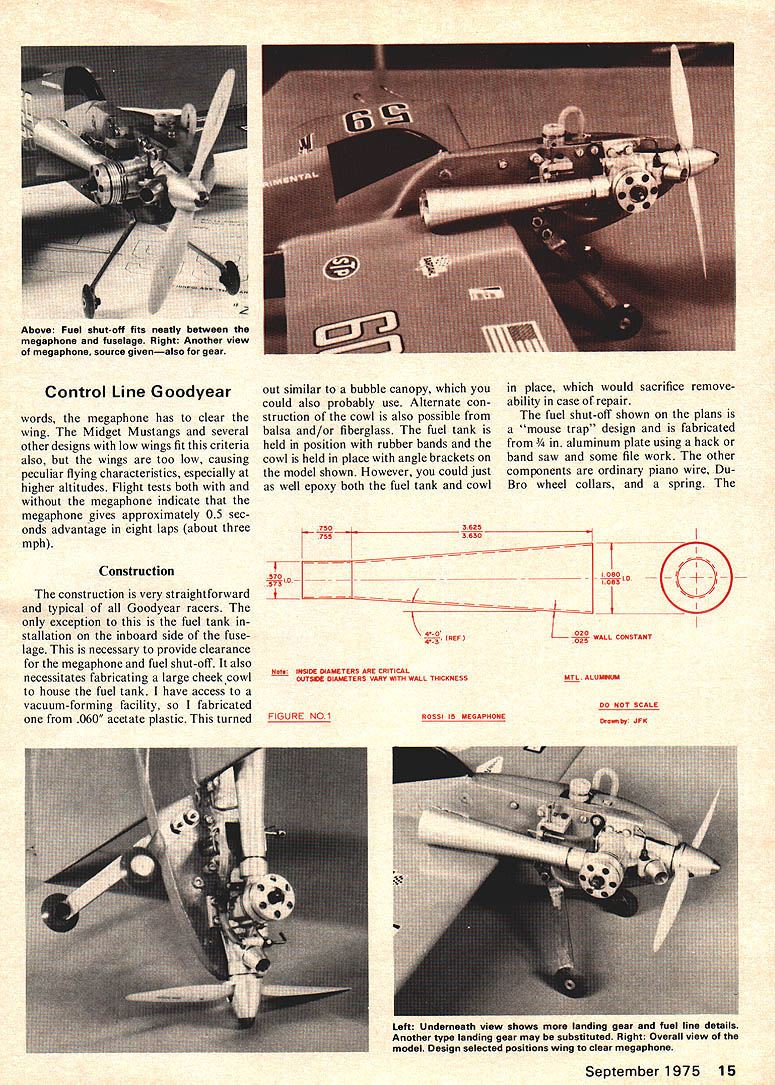
For further performance increases you might experiment with exhaust tuning. We have not had much luck with expansion chambers ala CL speed, but we have seen some interesting results using megaphones. The megaphone shown in Fig. No. 1 is basically a Rossi megaphone. If you can't find one of these, look for a Rossi expansion chamber and cut off the back section and you will have the same thing. If you strike out there also and still want to pursue the project, you can make one yourself on a lathe. We have made and tried several variations of the one shown and have found this design to be the best.
Bench tests on a properly tuned Rossi on 50 percent nitro fuel, and a prop pitched as in Fig. No. 2, should show an rpm reading between 20,000 and 21,000 rpm. Using a leather glove and holding the megaphone on the engine should indicate a 1,000 to 1,500 rpm increase above that figure. This is quite interesting and looks like a quick performance gain. However, this gain in static rpm due to the megaphone may not be fully realized in the air due to some increase in drag from the frontal area of the megaphone, although some definite improvement will be found. The Zipper was used as a test bed for the megaphone. This particular design was selected due to its wing location with respect to the axial centerline. In other words, the megaphone has clearance with Midget Mustangs and several other designs with low wings that fit the criteria. Wings that are too low can cause peculiar flying characteristics, especially at higher altitudes. Flight tests on the megaphone indicate the megaphone gives approximately 0.5 seconds advantage on eight laps — about three mph.
Construction
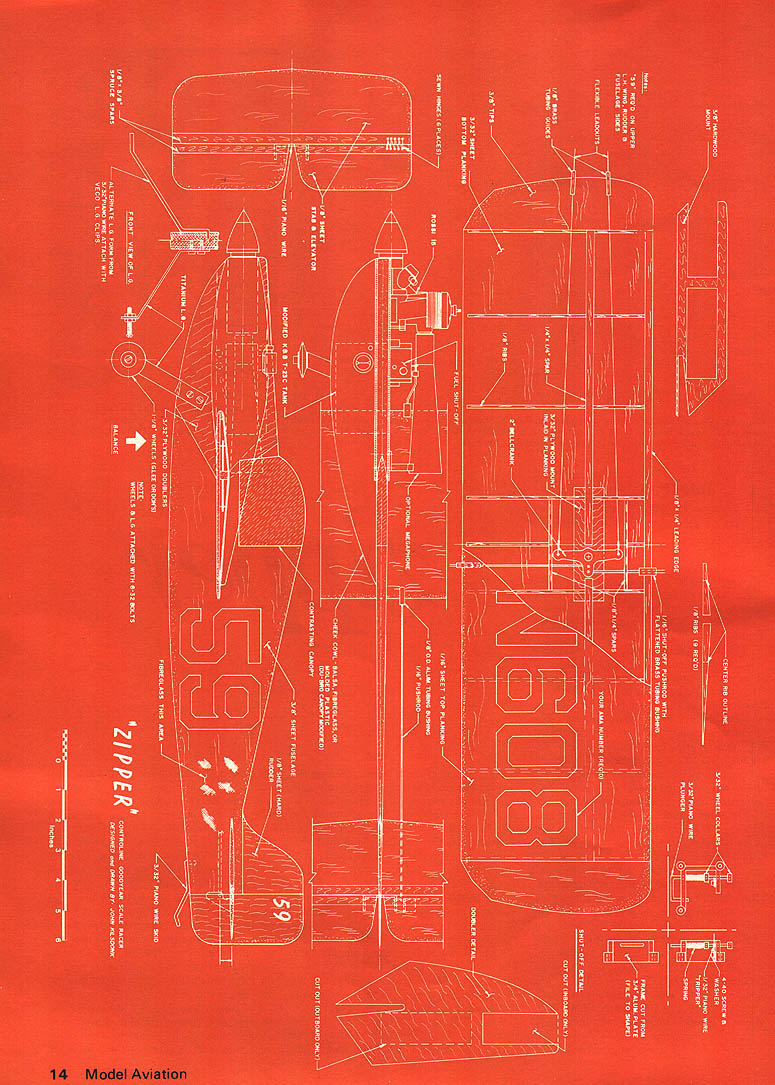
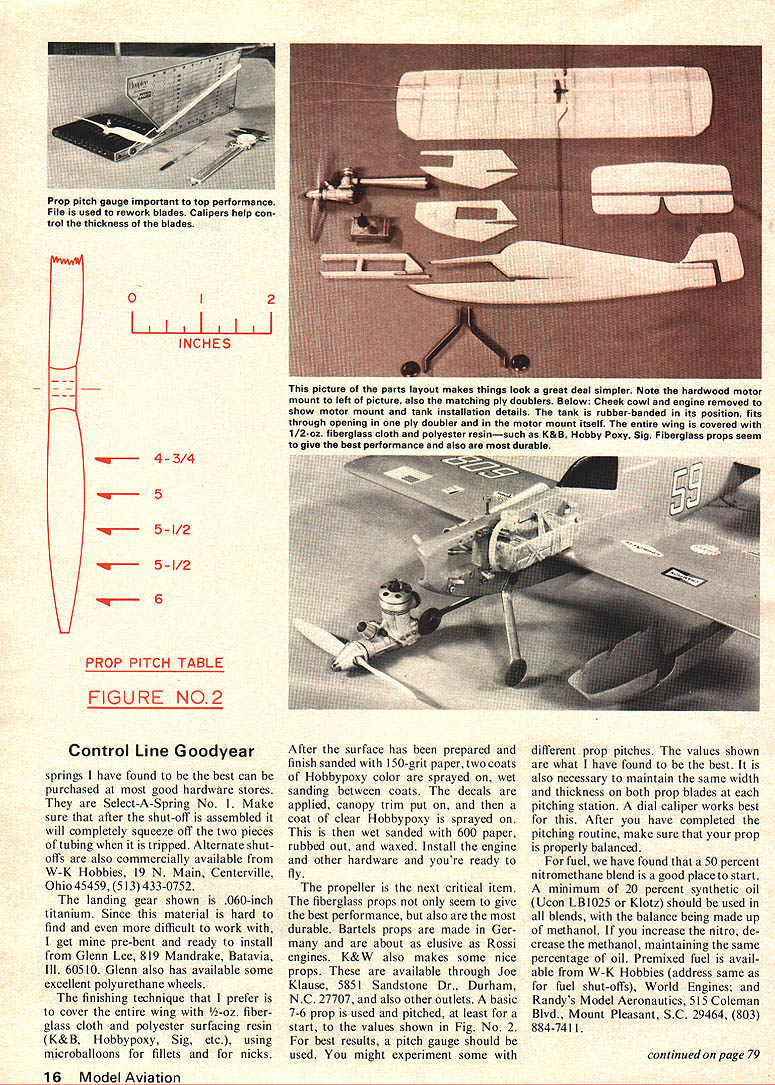
Construction is very straightforward — a typical Goodyear racer with the exception of the fuel tank installation in the inboard side of the fuselage necessary No running article text appears on this scanned page — it contains the full‑size plan/diagram for the "Zipper" (labels and part callouts only). There are no body paragraphs to transcribe that continue the article text from the prior page. out similar to a bubble canopy, which you could also probably use. Alternate construction of the cowl is also possible from balsa and/or fiberglass. The fuel tank is held in position with rubber bands and the cowl is held in place with angle brackets on the model shown. However, you could just as well epoxy both the fuel tank and cowl in place, which would sacrifice removability in case of repair.
The fuel shut-off shown on the plans is a "mouse trap" design and is fabricated from 3/16 in. aluminum plate using a hacksaw or bandsaw and some file work. The other components are ordinary piano wire, DuBro wheel collars, and a spring. The springs I have found to be the best can be purchased at most good hardware stores. They are Select-A-Spring No. 1. Make sure that after the shut-off is assembled it will completely squeeze off the two pieces of tubing when it is tripped. Alternate shutoffs are also commercially available from W-K Hobbies, 19 N. Main, Centerville, Ohio 45459, (513) 433-0752.
The landing gear shown is .060-inch titanium. Since this material is hard to find and even more difficult to work with, I get mine pre-bent and ready to install from Glenn Lee, 819 Mandrake, Batavia, Ill. 60510. Glenn also has available some excellent polyurethane wheels.
The finishing technique that I prefer is to cover the entire wing with 1/2-oz. balsa glass cloth and polyester surfacing resin (K&B, Hobbypoxy, Sig, etc.), using microballoons for fillets and for nicks.
After the surface has been prepared and finish sanded with 150-grit paper, two coats of Hobbypoxy color are sprayed on, wet sanding between coats. The decals are applied, canopy trim put on, and then a coat of clear Hobbypoxy is sprayed on. This is then wet sanded with 600-grit paper, rubbed out, and waxed. Install the engine and other hardware and you're ready to fly.
The propeller is the next critical item. The fiberglass props not only seem to give the best performance, but also are the most durable. Bartels props are made in Germany and are about as elusive as Rossi engines. K&W also makes some nice props. These are available through Joe Kause, 5851 Sandstone Dr., Durham, N.C. 27707, and also other outlets. A basic 7-6 prop is used and pitched, at least for a start, to the values shown in Fig. No. 2.
For best results, a pitch gauge should be used. You might experiment some with different prop pitches. The values shown are what I have found to be the best. It is also necessary to maintain the same width and thickness on both prop blades at each pitching station. A dial caliper works best for this. After you have completed the pitching routine, make sure that your prop is properly balanced.
For fuel we have found that a 50 percent nitromethane blend is a good place to start. A minimum of 20 percent synthetic oil (Lucas or L.B. 0125 or Klotz) should be used in all blends, with the balance being made up of methanol. If you increase the nitro, decrease the methanol, maintaining the same percentage of oil. Premixed fuel is available from W-K Hobbies (address same as for shut-offs), World Engines, and Randy's Model Aeronautics, 515 Coleman Blvd., Mount Pleasant, S.C. 29464, (803) 884-7411.
Transcribed from original scans by AI. Minor OCR errors may remain.

