
CONTROL LINE NAVY CARRIER
Dick Perry
7005 Del Oso Court NE, Albuquerque NM 87109-2930
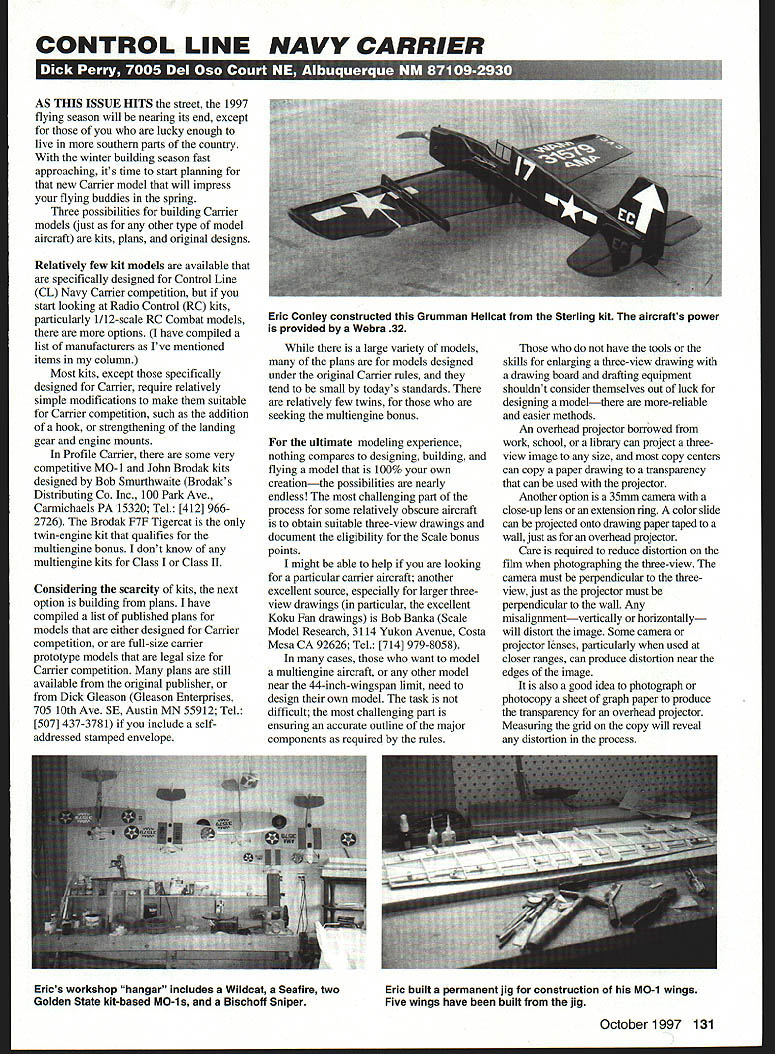
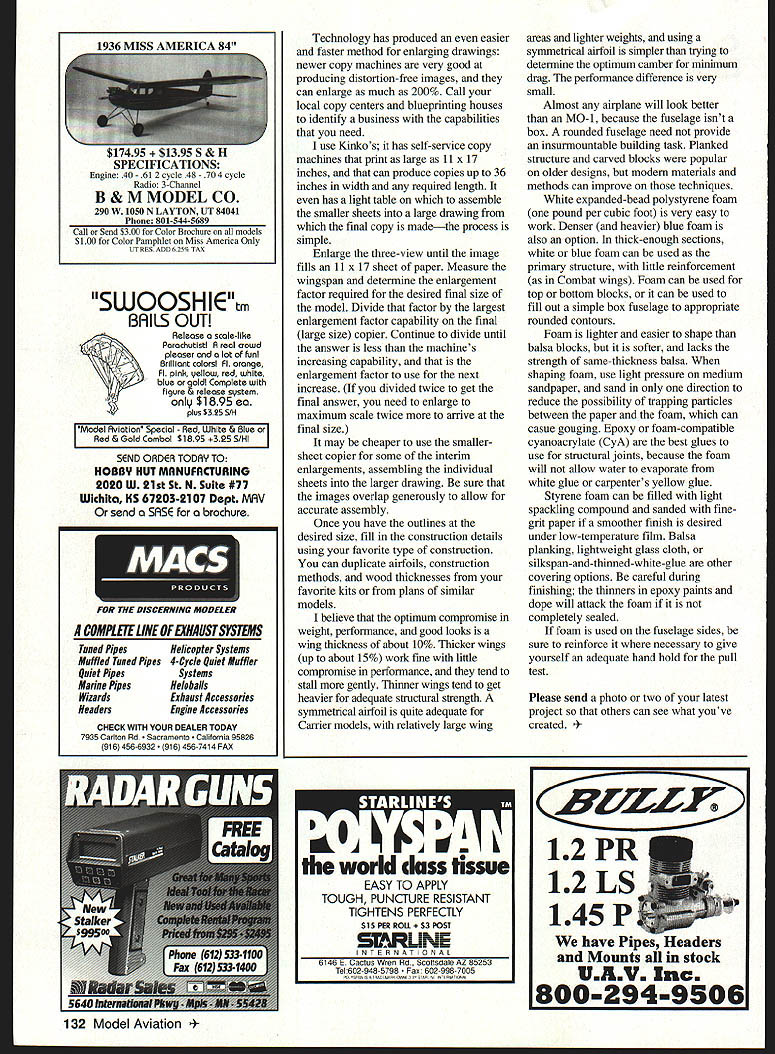
As this issue hits the street, the 1997 flying season will be nearing its end, except for those of you who are lucky enough to live in more southern parts of the country. With the winter building season fast approaching, it's time to start planning for that new Carrier model that will impress your flying buddies in the spring. Three possibilities for building Carrier models (just as for any other type of model aircraft) are:
- Kits
- Plans
- Original designs
Kits
Relatively few kit models are available that are specifically designed for Control Line (CL) Navy Carrier competition, but if you start looking at Radio Control (RC) kits, particularly 1/12-scale RC Combat models, there are more options. (I have compiled a list of manufacturers as I've mentioned items in my column.)
Most kits, except those specifically designed for Carrier, require relatively simple modifications to make them suitable for Carrier competition, such as the addition of a hook, or strengthening of the landing gear and engine mounts.
In Profile Carrier, there are some very competitive MO-1 and John Brodak kits designed by Bob Smurthwaite. Brodak's Distributing Co., Inc., 100 Park Ave., Carmichaels, PA 15320; Tel.: (412) 966-2726. The Brodak F7F Tigercat is the only twin-engine kit that qualifies for the multi-engine bonus. I don't know of any multi-engine kits for Class I or Class II.
Considering the scarcity of kits, the next option is building from plans.
Plans and Sources
I have compiled a list of published plans for models that are either designed for Carrier competition or are full-size carrier prototype models that are legal size for Carrier competition. Many plans are still available from the original publisher, or from Dick Gleason:
- Gleason Enterprises, 705 10th Ave. SE, Austin MN 55912; Tel.: (507) 437-3781 (include a self-addressed stamped envelope).
While there is a large variety of models, many of the plans are for models designed under the original Carrier rules, and they tend to be small by today's standards. There are relatively few twins for those who are seeking the multi-engine bonus.
For the ultimate modeling experience, nothing compares to designing, building, and flying a model that is 100% your own creation—the possibilities are nearly endless! The most challenging part of the process for some relatively obscure aircraft is obtaining suitable three-view drawings and documenting the eligibility for the Scale bonus points.
I might be able to help if you are looking for a particular carrier aircraft; another excellent source, especially for larger three-view drawings (in particular, the excellent Koku Fan drawings) is Bob Banka:
- Scale Model Research, 3114 Yukon Avenue, Costa Mesa CA 92626; Tel.: (714) 979-8058.
In many cases, those who want to model a multi-engine aircraft, or any other model near the 44-inch wingspan limit, need to design their own model. The task is not difficult; the most challenging part is ensuring an accurate outline of the major components as required by the rules.
Enlarging and Reproducing Drawings
Those who do not have the tools or the skills for enlarging a three-view drawing with a drawing board and drafting equipment shouldn't consider themselves out of luck—there are more reliable and easier methods.
Options for enlarging drawings:
- Overhead projector: Borrow one from work, school, or a library to project a three-view image to any size. Most copy centers can copy a paper drawing to a transparency usable with the projector.
- 35mm camera: Use a close-up lens or an extension ring to make a color slide that can be projected onto drawing paper taped to a wall. Care is required to reduce distortion: the camera must be perpendicular to the three-view, just as the projector must be perpendicular to the wall. Any misalignment—vertically or horizontally—will distort the image. Some lenses, particularly at closer ranges, can produce distortion near the edges.
- Graph paper check: Photograph or photocopy a sheet of graph paper to produce the transparency for an overhead projector. Measuring the grid on the copy will reveal any distortion in the process.
- Copy machines and blueprinting houses: Newer copy machines are very good at producing distortion-free images and can enlarge as much as 200%. Call local copy centers and blueprinting houses to identify a business with the capabilities you need.
I use Kinko's; it has self-service copy machines that print as large as 11 x 17 inches and can produce copies up to 36 inches in width and any required length. It even has a light table on which to assemble the smaller sheets into a large drawing from which the final copy is made—the process is simple.
Procedure for incremental enlargement:
- Enlarge the three-view until the image fills an 11 x 17 sheet of paper.
- Measure the wingspan and determine the enlargement factor required for the desired final size of the model.
- Divide that factor by the largest enlargement capability of the final large copier. Continue to divide until the answer is less than the machine's increasing capability; that answer is the enlargement factor to use for the next increase.
- If you divided twice to get the final answer, you need to enlarge to maximum scale twice more to arrive at the final size.
It may be cheaper to use the smaller-sheet copier for some interim enlargements, assembling the individual sheets into the larger drawing. Be sure the images overlap generously to allow for accurate assembly.
Once you have the outlines at the desired size, fill in the construction details using your favorite type of construction. You can duplicate airfoils, construction methods, and wood thicknesses from your favorite kits or from plans of similar models.
Airfoil, Wing Thickness, and General Design
I believe the optimum compromise in weight, performance, and good looks is a wing thickness of about 7%. Thicker wings (up to about 15%) work fine with little compromise in performance, and they tend to stall more gently. Thinner wings tend to get heavier for adequate structural strength.
A symmetrical airfoil is quite adequate for Carrier models, which typically have relatively large wing areas and lighter weights. Using a symmetrical airfoil is simpler than trying to determine the optimum camber for minimum drag; the performance difference is very small.
Almost any airplane will look better than an MO-1, because the fuselage isn't a box. A rounded fuselage need not present an insurmountable building task. Planked structure and carved blocks were popular on older designs, but modern materials and methods can improve on those techniques.
Foam Construction and Finishing
White expanded-bead polystyrene foam (one pound per cubic foot) is very easy to work. Denser (and heavier) blue foam is also an option. In thick-enough sections, white or blue foam can be used as the primary structure, with little reinforcement (as in Combat wings). Foam can be used for top or bottom blocks, or it can be used to fill a balsa box fuselage to achieve rounded contours.
Foam is lighter and easier to shape than balsa blocks, but it is softer and lacks the strength of same-thickness balsa. When shaping foam, use light pressure on medium sandpaper, and sand in only one direction to reduce the possibility of trapping particles between the paper and the foam, which can cause gouging.
Epoxy or foam-compatible cyanoacrylate (CA) are the best glues to use for structural joints, because the foam will not allow water to evaporate from white glue or carpenter's yellow glue.
Styrene foam can be filled with light spackling compound and sanded with fine-grit paper if a smoother finish is desired under low-temperature finish. Balsa planking, lightweight glass cloth, or silkspan and thinned white glue are other covering options. Be careful during finishing; the thinners in epoxy paints and dope will attack the foam if it is not completely sealed.
If foam is used on the fuselage sides, be sure to reinforce it where necessary to give yourself an adequate hand hold for the pull test.
Please send a photo or two of your latest project so that others can see what you've created.
Transcribed from original scans by AI. Minor OCR errors may remain.

