
Control Line: Racing
Bill Lee
The September and October 1978 issues of Model Aviation contained a very interesting two-part article by Tom Hail and Larry Fagan on how to make fiberglass props. I found this a very timely article since I had been wanting to try my hand at this for some time. I have had some interesting experiences with props of other manufacture and was anxious to try some ideas of my own. It seemed best to start with a glass prop as the raw material rather than wood. The problem was that no suitable props were available to "play" with, so I had to make my own. Larry and Tom's article provided the impetus I needed by laying out needed information and techniques.
Shortly after the September issue came out, I attended the '78 Nats in Lake Charles and spent some time talking to several people who have also done glass-prop work. Two notable names who provided information are Les Pardue from Albuquerque, New Mexico, and Walt Perkins from Ocala, Florida. Les is the "Flipper" half of the "Whipper and Flipper" team, Phil Shew being the strong arm on the handle. Walt Perkins is the guy behind Shadow Racing, one of the best sources of FAI Team Race items, among them some of the finest carbon-fiber props you can find. The prop John Ballard used to win Goodyear at the Nats last year was a Shadow prop. Another source of information was Vic Garner of Livermore, California.
Some experiences I have had and some techniques I have developed (stolen?) might be of interest to anybody who wants to try making their own props.
Mold construction
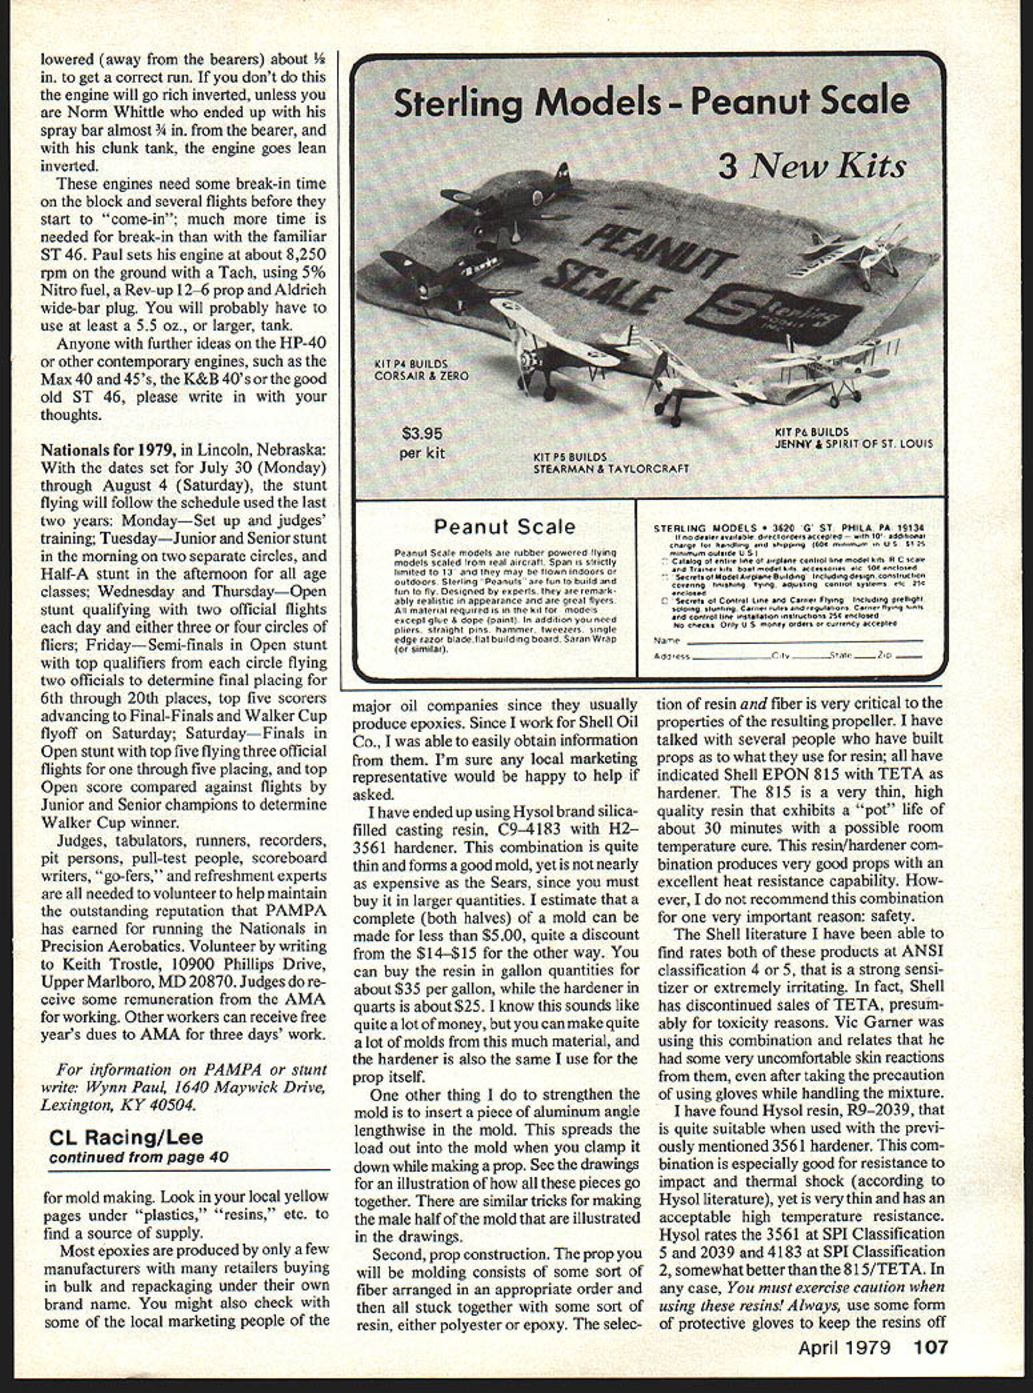
First, mold construction. I use a sheet of Plexiglas as a temporary base to build the clay–prop combination on. I cut a piece slightly larger than the prop I am molding. The use of the Plexiglas isn't terribly critical; it just gives you something smooth and convenient to handle while shaping the clay around the prop. After shaping the clay under the prop, I use several short screws and attach the Plexiglas to a wooden box made from pieces of 1" x 2" pine. The box is designed to be a part of the finished mold and provides a convenient way to contain the resin the mold will be cast from later on. The box also provides additional strength to the mold after it is finished.
Another item I use is a "button" made from a piece of nylon or Teflon rod that is as large, or larger, than the diameter of the hub of the prop. This button is placed on top of the prop before the mold material is added and remains as part of the mold. The button provides a smooth, straight surface for the portion of the mold that will eventually form the front of the hub of the props you make.
I have been using epoxy for the mold material rather than the polyester described in the article. Some sort of filled epoxy is best for this purpose, but many that I found were too thick to use since they were hard to get into the corners of the mold and yet let the air bubbles escape that invariably get trapped. I found that you can add thinner, unfilled epoxy to the thick, filled types and create a suitable casting material of just about any thickness you desire. This turns out to be rather expensive, though, since it takes about 15 ounces of resin to make the female half of the mold and about 12 ounces to make the male half.
I found large tubes of steel-filled epoxy at Sears for about $3.50. I mixed this equally with Hobbypoxy II to get a very good casting material. But this resulted in about $7.50 for only half of the mold. Sears also sells a silica-filled epoxy (that's sand-filled, and it really feels that way) that can also be thinned with Formula II or equivalent. However, if you spend a little time, you can find filled epoxy that is designed expressly for mold making. Look in your local Yellow Pages under "plastics," "resins," etc. to find a source of supply.
Most epoxies are produced by only a few manufacturers with many retailers buying in bulk and repackaging under their own brand name. You might also check with some of the local marketing people of the major oil companies since they usually produce epoxies. Since I work for Shell Oil Co., I was able to easily obtain information from them. I'm sure any local marketing representative would be happy to help if asked.
I have ended up using Hysol brand silica-filled casting resin, CG-4183, with H2-3561 hardener. This combination is quite thin and forms a good mold, yet is not nearly as expensive as the Sears options, since you must buy it in larger quantities. I estimate that a complete mold (both halves) can be made for less than $5.00, quite a discount from the $14–$15 for the other way. You can buy the resin in gallon quantities for about $35 per gallon, while the hardener in quarts is about $25. I know this sounds like quite a lot of money, but you can make quite a lot of molds from this much material, and the hardener is also the same I use for the prop itself.
One other thing I do to strengthen the mold is to insert a piece of aluminum angle lengthwise in the mold. This spreads the load out into the mold when you clamp it down while making a prop. See the drawings for an illustration of how all these pieces go together. There are similar tricks for making the male half of the mold that are illustrated in the drawings.
Prop construction
The prop you will be molding consists of some sort of fiber arranged in an appropriate order and then all stuck together with some sort of resin, either polyester or epoxy. The selection of resin and fiber is very critical to the properties of the resulting propeller. I have talked with several people who have built props as to what they use for resin; all have indicated Shell EPON 815 with TETA as hardener. The 815 is a very thin, high-quality resin that exhibits a pot life of about 30 minutes with a possible room-temperature cure. This resin/hardener combination produces very good props with excellent heat resistance capability. However, I do not recommend this combination for one very important reason: safety.
The Shell literature I have been able to find rates both of these products at an ANSI classification 4 or 5, that is, a strong sensitizer or extremely irritating. In fact, Shell has discontinued sales of TETA, presumably for toxicity reasons. Vic Garner was using this combination and relates that he had some very uncomfortable skin reactions from them, even after taking the precaution of using gloves while handling the mixture.
I have found Hysol resin R9-2039 to be quite suitable when used with the previously mentioned 3561 hardener. This combination is especially good for resistance to impact and thermal shock (according to the Hysol literature), yet is very thin and has acceptable high-temperature resistance. Hysol rates the 3561 at SPI Classification 5 and 2039 at SPI Classification 2, somewhat better than the 815/TETA. In any case, you must exercise caution when using these resins! Always use some form of protective gloves to keep the resins off your hands, and avoid breathing the vapors as much as possible.
The fiber you use in the prop also gives the prop a great deal of its final characteristics. Fiberglass fibers are commonly used and can be easily obtained by cutting and stripping a piece of extra-heavy glass cloth. Another fiber that is commonly used, although harder to obtain, is carbon fiber. This is one of the new "miracle" fibers that are showing up in a lot of exotic places. Carbon (better, graphite) fiber is available in small quantities from Union Carbide, the only company that manufactures the product. Their trade name is Thornel and is priced in the neighborhood of $32–35 per pound. I recommend the WYP-15 grade of yarn for prop making. That is not really very expensive since you will use only about 1/4 ounce of the fiber in a typical 8" prop. By the time you get a pound of the stuff shipped to you, you will end up spending about $40. I'll list some addresses at the end of the column.
When you get ready to start loading the fibers into the mold, it is very important to get them thoroughly saturated with resin. If you attempt to do this in the mold itself, you will risk damaging the PVA release coating and then you may very well destroy the mold after the prop has cured. Get a large sheet of aluminum or other non-porous material. Put all your fibers on the sheet arranged in the order you intend to lay them in the mold.
Now pour some of the mixed resin over the whole mess and use an epoxy brush to work the resin into the fibers that are laying on the aluminum sheet. Once they are saturated, pick them up using the point of a knife and your fingers and lay them gently in the mold, positioning them where you want them to lie. A little liquid resin in the mold will enable you to place the fibers in easily. Get a lot of the fibers in the hub! This is very important since you don't want any voids in this critical area. Once you have all the fibers in place, pour the remainder of the resin into the mold.
When you place the mold together, you should get a fair amount of resin oozing out of the mold, and even a few fibers are possible. Just keep everything covered with wax paper and all the spilled resin will be easy to dispose of when it is hardened. It is also good to put a small piece of light fiberglass cloth in the center of each tip of the prop as you lay in the fibers. This gives the prop increased resistance to splitting at the tips.
Once the resin has set up so that it is no longer runny, the prop can be cured to ultimate strength more quickly by the application of heat. Place the mold and the prop in an oven set at about 150 to 200 degrees F for a couple of hours. While this might not be the optimal cure schedule for the resin you use, all the epoxies I investigated benefited from a cure schedule at elevated temperatures. When you have let the prop heat for this time, remove the mold/prop assembly from the oven. Be careful—the mold is hot and can burn your fingers. If you are very careful, you can get the prop out of the mold while the whole thing is hot. But the mold will break easily when hot, so be cautious. If you have the release agent (PVA) properly applied, the mold will almost pop apart while hot.
Sources
- Puffer Supply Co., 112 Meyerland Plaza, Suite 23, Houston, TX 77096; phone (713) 668-9457. Distributor in Houston for Hysol brand epoxies. My source for epoxy resins for mold and props.
- Union Carbide Corp., Carbon Products Div., c/o David G. Lowery, 120 S. Riverside Plaza, Chicago, IL. Source for Thornel (Thornel/Thornell) carbon fiber.
- Bill Lee, 3522 Tamarisk Lane, Missouri City, TX 77459.
Transcribed from original scans by AI. Minor OCR errors may remain.

