

Control Line: Scale
Bill Boss
Overcoat or Undercoat
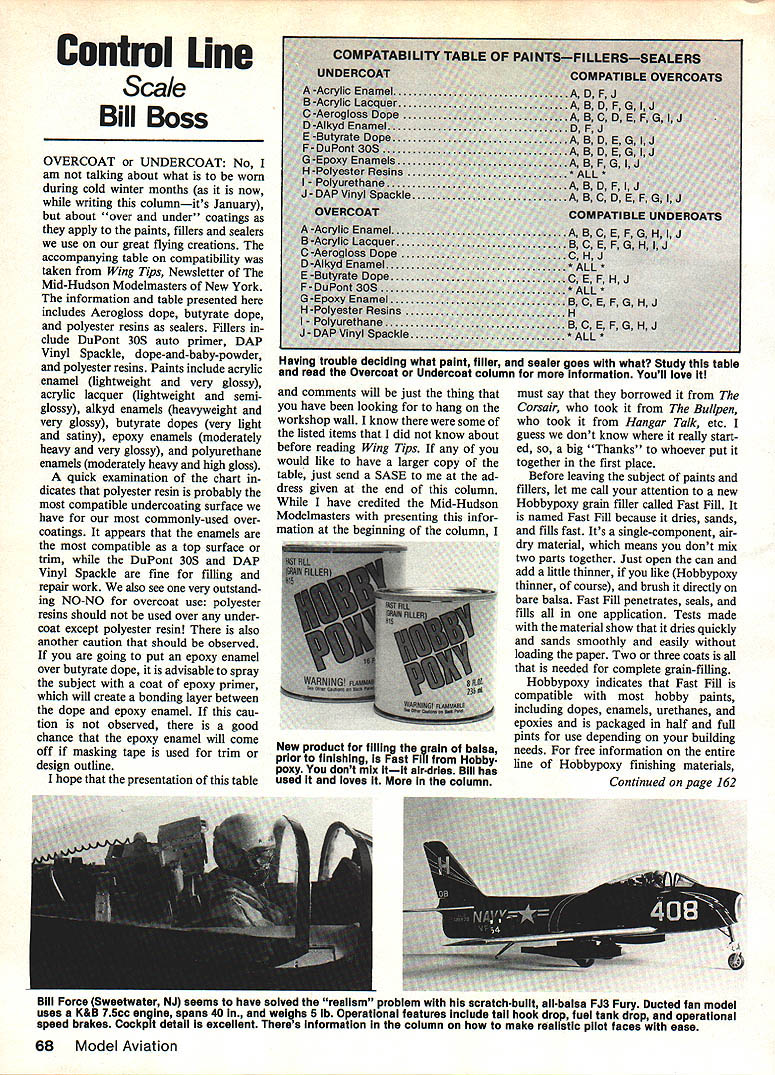
No, I am not talking about what is to be worn during cold winter months (as it is now, while writing this column—it's January), but about "over and under" coatings as they apply to the paints, fillers and sealers we use on our great flying creations. The accompanying table on compatibility was taken from Wing Tips, Newsletter of the Mid‑Hudson Modelmasters of New York. The information presented here includes Aerogloss dope, butyrate dope, and polyester resins as sealers. Fillers include DuPont 30S auto primer, DAP Vinyl Spackle, dope‑and‑baby‑powder, and polyester resins. Paints include acrylic enamel (lightweight and very glossy), acrylic lacquer (lightweight and semi‑glossy), alkyd enamels (heavyweight and very glossy), butyrate dopes (very light and satiny), epoxy enamels (moderately heavy and very glossy), and polyurethane enamels (moderately heavy and high gloss).
A quick examination of the chart indicates that polyester resins are probably the most compatible undercoating surface we have for our most commonly used overcoatings. It appears that enamels are the most compatible as a top surface or trim, while the DuPont 30S and DAP Vinyl Spackle are fine for filling and repair work. We also see one very outstanding NO‑NO for overcoat use: polyester resins should not be used over any undercoat except polyester resin!
There is also another caution that should be observed. If you are going to put an epoxy enamel over butyrate dope, it is advisable to spray the subject with a coat of epoxy primer, which will create a bonding layer between the dope and the epoxy enamel. If this caution is not observed, there is a good chance that the epoxy enamel will come off if masking tape is used for trim or design outline.
I hope that the presentation of this table and comments will be just the thing that you have been looking for to hang on the workshop wall. I know there were some of the listed items that I did not know about before reading Wing Tips. If any of you would like to have a larger copy of the table, just send a SASE to me at the address given at the end of this column. While I have credited the Mid‑Hudson Modelmasters with presenting this information at the beginning of the column, I must say that they borrowed it from The Corsair, who took it from The Bullpen, who took it from Hangar Talk, etc. I guess we don't know where it really started, so, a big "Thanks" to whoever put it together in the first place.
HobbyPoxy Fast Fill
Before leaving the subject of paints and fillers, let me call your attention to a new HobbyPoxy grain filler called Fast Fill. It is named Fast Fill because it dries, sands, and fills fast. It's a single‑component, airdry material, which means you don't mix two parts together. Just open the can and add a little thinner, if you like (HobbyPoxy thinner, of course), and brush it directly on bare balsa. Fast Fill penetrates, seals and fills all in one application. Tests made with the material show that it dries quickly and sands smoothly and easily without loading the paper. Two or three coats is all that is needed for complete grain‑filling.
HobbyPoxy indicates that Fast Fill is compatible with most hobby paints, including dopes, enamels, urethanes and epoxies, and is packaged in half and full pints for use depending on your building needs. For free information on the entire line of HobbyPoxy finishing materials.
Box 378, Rockaway, NJ 07866.
---
Pitch Axis and Fundamental Aerodynamic Terms
pitch axis, on the other hand, is of paramount importance, inasmuch as all of our maneuvers are accomplished through various rates and directions of pitch change. We will, therefore, consider pitch in detail.
So that we are all talking the same language, let's define some terms which will recur throughout the series.
Key definitions
- MAC (Mean Aerodynamic Chord): If the root chord is 13 in. and the tip chord 9 in., the MAC will be that station on the wing span where the chord length is 11 in. While the MAC is technically slightly different from this "average" chord, for our purposes we can assume them equal and colocated. The MAC is important since many parameters will be referenced to their position on the MAC. Also remember that the tail is merely a smaller lifting surface and therefore exhibits the same aerodynamic characteristics as the wing, including a MAC.
- CG (Center of Gravity): The CG is the point about which any outside force will act (thrust, drag, lift, etc.). Any force moments—i.e., tail moments, pitching moments—will be defined by their distance from the CG. (This differs from the historical Stunt practice of measuring "tail moments" hingeline to hingeline, a useless exercise unless you are comparing otherwise identical wing and tail planforms.) Fore and aft CG will be spoken of in terms of its location on the MAC. For example, a CG located 1.5 inches from the leading edge of a 10‑in. MAC is at 15% MAC. While the vertical spanwise location of the CG probably won't be exactly as defined, these divergences are minor and not significant in affecting pitch.
- CL (Center of Lift): The CL is that point on the MAC where the wing's lift is concentrated. For symmetrical airfoils, CL is located at 25% MAC and moves somewhat aft when the airfoil is cambered, as with deflected flaps. Lift generated by the wing and the tail act at their respective CLs and develop a moment about the CG. The system works like a teeter‑totter: a force (lift) is applied a given distance from the fulcrum (the CG) and a turning movement (pitching) results.
- Aspect Ratio (A.R.): A measure of the relationship of a wing's span to its area (or average chord, for simple tapered wings). The wing's planform shape is more than cosmetic: as aspect ratios get larger (longer spans for a given area), the wing becomes more efficient in terms of lift produced compared to drag developed. This can be both good and bad, as we will learn.
- Cl (Coefficient of Lift): A non‑dimensional number that reflects the relative amount of lift an airfoil section generates under a given set of conditions. General statements concerning Cl for any given airfoil:
- Cl will increase with an increase in airspeed or an increase in angle of attack (up to the point of stall, when airflow separates from the wing's surface and lift rapidly drops).
- For a given increase in Cl, high aspect‑ratio wings will show a faster rate of Cl increase than low aspect‑ratio wings.
- Maximum Cl will be roughly the same for both high and low aspect ratios; however, low aspect ratios require higher angles of attack for the same Cl and generate greater drag per unit of lift.
- High aspect‑ratio wings stall at lesser angles of attack than low aspect‑ratio wings.
Whew! I think that sets the stage. Next month, we'll dive right into the design phase and see what sort of options we have in developing a Stunter that'll perform to our expectations.
Ted Fancher 158 Flying Cloud Isle Foster City, CA 94404
---
Control Line: Scale
How to make a face (from Wing Tips, Mid‑Hudson Modelmasters) Jim Kaman
For the Scale buff, the problem of fabricating instrument panels and the like is an ongoing fact of life. Not the least of these headaches is the production of a scale pilot now required in our competition models. Philosophically, the problem of whether or not a "pilot" is necessary or even desirable will be set aside, and we'll assume that the builder is committed to filling the cockpit with something closely resembling an airplane pilot. How does he proceed?
As an art instructor, Jim Kaman reports reasonable success using several methods, including casting Guillow kit pilots in paper mache and carving from wood. But even to those who can sculpt, faces have often presented an almost overwhelming obstacle to creating the illusion of realism. Working in small sizes makes the job even tougher, as fine detail is hard to do.
There are several suppliers of scale figures for the larger models, and the products available are superb. No more need for the G.I. Joe dolls. It is now the smaller figures which are the problem. How, then, can we make small pilot figures with authentic faces without spending hours under the magnifier? Remember, observers will inevitably look to the face and judge the figure by that, no matter how well crafted the rest of the pilot is.
Jim indicates that he has, over the years, done much experimenting and believes that he has finally developed the best answer to the problem for the amateur.
The cheapest and fastest way to begin is to start with a suitable master, usually found in the toy box. There are so many excellent plastic toys on the market today that finding the right "look" in the exact scale is a snap.
Once the body is carved to scale (see Bill Warner's FF Sport/Scale Column in the February 1985 MA for "How to Carve a Pilot," by Jim Kaman), take the face of the master you have chosen and press it carefully into modeling clay. Remove it just as carefully by rocking it slightly as it is removed. Check the impression to see that it is clean and has little or no distortion. A magnifying glass is useful for this. If you're not satisfied with the results, repeat the process until a good, clean impression is obtained.
Once you are satisfied with the impression, drop thick, gap‑filling‑type cyanoacrylate (CA) glue into the impression and "tease" the stuff carefully into cracks and crevices while rotating the mold in your hand. A toothpick or scrap wood splinter will work fine, but be careful not to dig into the mold as you coax the glue where you want it. The idea is to get reasonably good coverage in the mold, especially of the nose and eye detail. Avoid air bubbles caused by simply dumping the glue into the mold.
After the glue has cured, the casting can be removed and cleaned with lighter fluid and a toothbrush. Trim away any excess material and glue the face to the front of your carved pilot's head (which should have been left flat for this purpose). Paint the face and figure with matte railroad colors, and presto! A pilot. Jim has also used this process for making facsimiles of gears and other small objects that might be used in the cockpit or elsewhere on our scale planes.
Send building tips, ideas and photos on CL Scale to: Bill Boss 77‑06 269th St. New Hyde Park, NY 11040
Transcribed from original scans by AI. Minor OCR errors may remain.

