

Control Line: Scale
Bill Boss
Overview
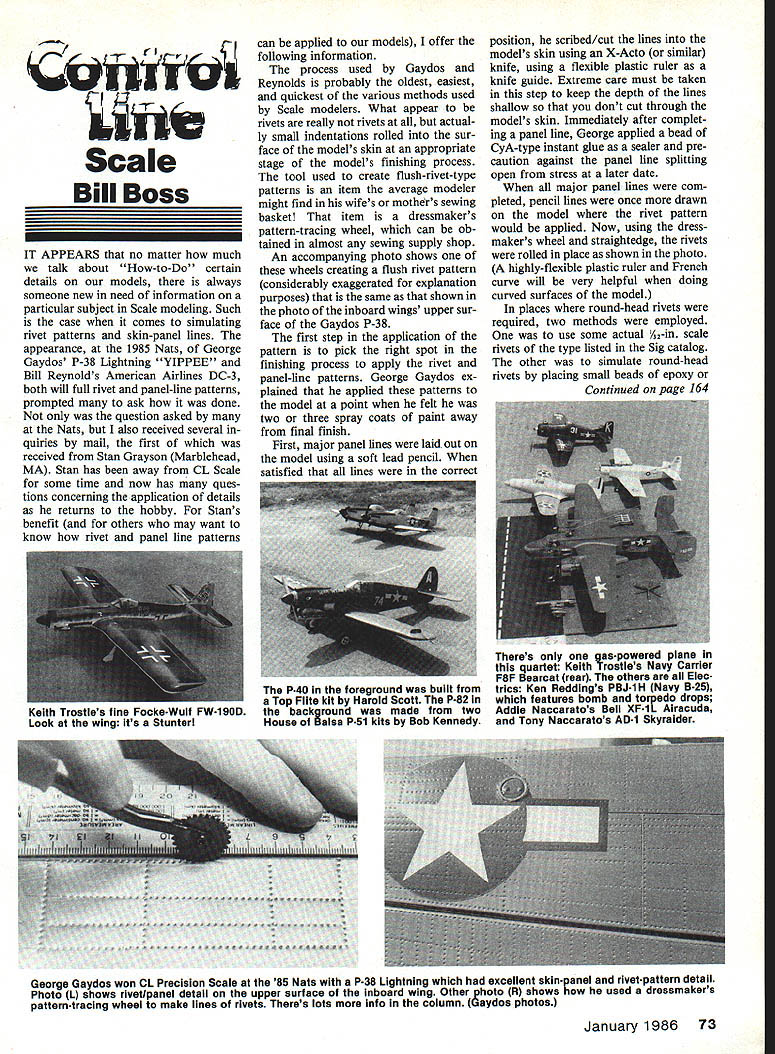
If you want realistic rivet patterns and skin-panel lines on CL scale models, one of the oldest, easiest, and quickest methods is to roll small indentations into the model surface rather than add raised rivets. A dressmaker's pattern-tracing wheel (available at sewing-supply shops) is an ideal tool for creating flush-rivet patterns.
Tools & materials
- Dressmaker's pattern-tracing wheel (various diameters/thicknesses available)
- Soft lead pencil
- X-Acto (or similar) knife
- Flexible plastic ruler and/or French curve
- Straightedge
- CyA-type instant glue (for sealing scribed lines)
- 1/32-in. scale rivets (optional; Sig catalog)
- Epoxy (for simulated round-head rivets, if desired)
- 500–600 grit wet‑dry sandpaper
- Slightly damp cloth
When to apply
Apply rivet and panel-line patterns when the model is near final finish — George Gaydos recommended about two or three spray coats of paint away from the final finish.
Step-by-step procedure
- Lay out major panel lines on the model with a soft lead pencil until the positions are correct.
- Scribe the panel lines into the model skin with an X-Acto and a flexible plastic ruler as a guide. Keep the cuts shallow to avoid cutting through the skin.
- Immediately after completing a panel line, apply a bead of CyA-type instant glue along the cut to seal it and help prevent splitting later.
- Draw pencil guide lines where the rivet pattern will go.
- Using the dressmaker's tracing wheel and a straightedge, roll the rivet indentations into the surface. Use a highly flexible ruler or French curve for curved surfaces.
- For round-head rivets, either install small 1/32‑in. scale rivets or simulate them with small beads of epoxy.
- Remove pencil marks by very light dry-sanding with 500–600 grit wet‑dry paper, then wipe down with a very slightly damp cloth.
- Apply the final coats of paint. These last coats help subdue the sharpness of the indentations for a more realistic appearance.
Tips & cautions
- Practice on scrap or practice structures before attempting this on a good model.
- Keep scribed lines shallow — do not cut through balsa or the model skin.
- Seal scribed lines immediately with CyA to reduce the chance of later splitting from stress.
- Tracing wheels come in different diameters, thicknesses, and tooth counts; shop around to find wheels best suited to the scale and surface you are modeling.
- A flexible ruler and French curve make working on curved surfaces much easier.
Further reading
- Bob Wischer's RC Scale column, Model Aviation, October 1985 (page 133), contains a good write-up on alternate methods for making panel lines.
Transcribed from original scans by AI. Minor OCR errors may remain.

