
Control Line: Scale
By Bill Boss
Tail Wheel Struts — again
In my March 1986 column I presented a method of making scalelike tail wheel struts. To illustrate the difference between a dressed-up tail wheel structure and a simple piano-wire strut, I used a sketch and photos—one of which showed Richard Schneider’s Curtiss Gulfhawk equipped with a piano-wire strut.
After Richard received his March issue of MA he wrote to me. He was pleased the Gulfhawk was featured, but not happy with the caption and column material that showed a bare-wire tail wheel strut. Rather than cut into the model to replace the existing strut, Richard developed the solution shown in the accompanying photo and sketch. The following steps describe that method.
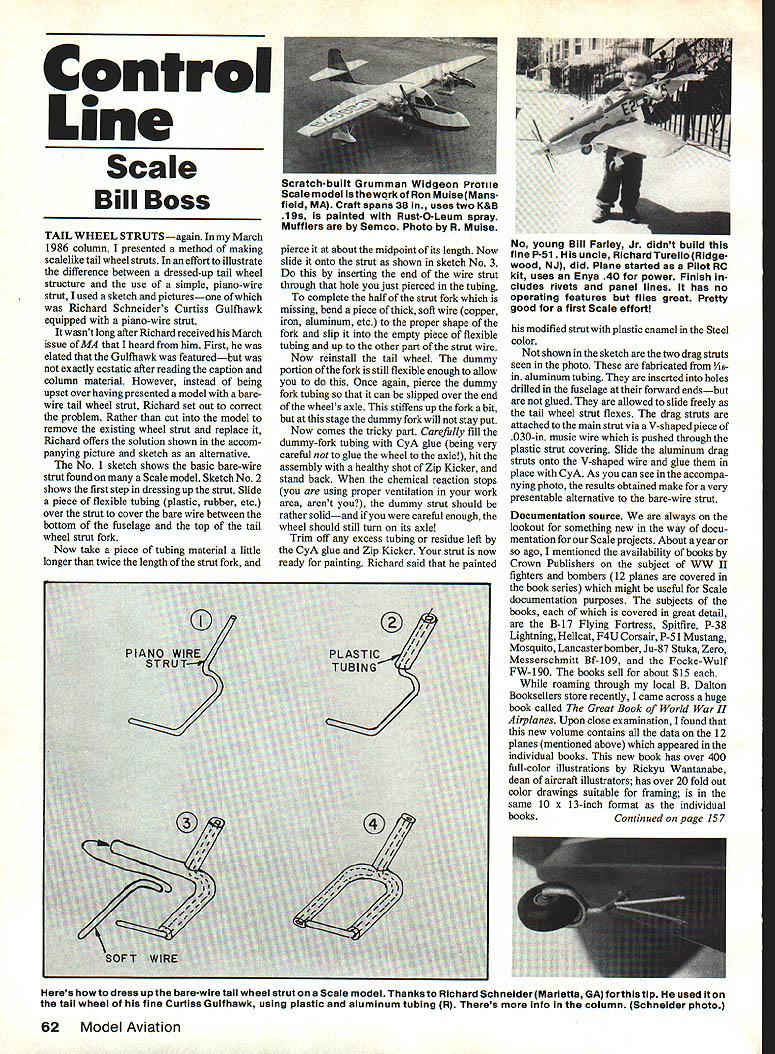
- Slide a piece of flexible tubing (plastic, rubber, etc.) over the bare wire strut to cover the exposed wire between the bottom of the fuselage and the top of the tail wheel fork (see sketch No. 2).
- Take a piece of tubing a little longer than twice the length of the strut fork and pierce it about at its midpoint. Slide this piece onto the strut by inserting the end of the wire through the hole (see sketch No. 3).
- To complete the missing half of the fork, bend a piece of thick, soft wire (copper, iron, aluminum, etc.) to the proper fork shape and slip it into the empty piece of flexible tubing, up to the other part of the strut wire.
- Reinstall the tail wheel. The dummy portion of the fork is flexible enough to allow this. Pierce the dummy tubing so it can be slipped over the end of the wheel axle. This will stiffen the fork somewhat, but the dummy fork will still be loose at this point.
- Carefully fill the dummy-fork tubing with CyA (cyanoacrylate) glue—being very careful not to glue the wheel to the axle. Apply a shot of Zip Kicker to accelerate curing. Ensure good ventilation while the adhesive reacts.
- When the reaction is complete the dummy fork should be solid; if you were careful, the wheel will still turn on its axle.
- Trim any excess tubing or adhesive residue. The strut is now ready for painting. Richard painted his modified strut with plastic enamel in a steel color.
Notes on drag struts:
- The two drag struts seen in the photos are made from 1/16-inch aluminum tubing.
- Their forward ends are inserted into holes drilled in the fuselage but are not glued; they are allowed to slide as the tail wheel strut flexes.
- The drag struts attach to the main strut via a V-shaped piece of .030-inch music wire pushed through the plastic strut covering. Slide the aluminum drag struts onto the V-wire and glue them in place with CyA.
- The result is a very presentable alternative to a bare-wire strut.
Documentation source
We are always on the lookout for good documentation for Scale projects. About a year ago I mentioned a series of books published by Crown Publishers covering WWII fighters and bombers (12 planes in the series). Each book treats a subject in detail: B-17 Flying Fortress, Spitfire, P-38 Lightning, Hellcat, F4U Corsair, P-51 Mustang, Mosquito, Lancaster, Ju-87 Stuka, Zero, Messerschmitt Bf 109, and Focke-Wulf FW-190. The individual books sell for about $15 each.
Recently I found a large volume titled The Great Book of World War II Airplanes, which contains all the data on those 12 planes. This single volume includes over 400 full-color illustrations by Rikuo Watanabe, more than 20 fold-out color drawings suitable for framing, and is in the same 10 x 13-inch format as the individual books.
The big difference is price: I collected the individual books at a cost of about $180. The single volume can be obtained on sale for about $50—saving roughly $130. If you haven’t collected the individual books, this new single volume is a great addition to your aeronautical library.
Something new
A sample of a new lubricant arrived recently that may be useful on bearings and linkages in our models. The lubricant is suspended in a medium that penetrates minute openings and then evaporates, leaving a very fine lubricating coating on the applied surface. The product is called Slip-It and works on plastics, metals, and composite materials.
By the time you read this, Slip-It should be available at hobby shops. If not, write to Micro Research, Inc., P.O. Box 2777, Danbury, CT 06813 for information and availability.
Aviation nostalgia
If you’re looking for information on classic and rare aircraft of yesteryear, contact The Little Hangar, run by Jack Little:
- Address: Jack Little, 1414 Brewster Ave., Redwood City, CA 94062.
Jack, former publisher of Littlecraft aircraft engine profiles, has again compiled a catalog listing three-view drawings of vintage aircraft and engine drawings. He also offers a set of 24 professionally drawn black-and-white pencil sketches published during WWII by the Fuller Paint Co. The drawings feature combat planes such as the Spitfire, Hurricane, and Vanguard, and measure 11-1/2 x 8-1/2 inches—suitable for framing. For a complete listing, write to Jack Little at the address above.
Correspondence
Please send all correspondence—and especially photos—relating to CL Scale to: Bill Boss 77-06 269th St. New Hyde Park, NY 11040
Transcribed from original scans by AI. Minor OCR errors may remain.

