
Control Line: Scale
Bill Boss
Working canopy parts
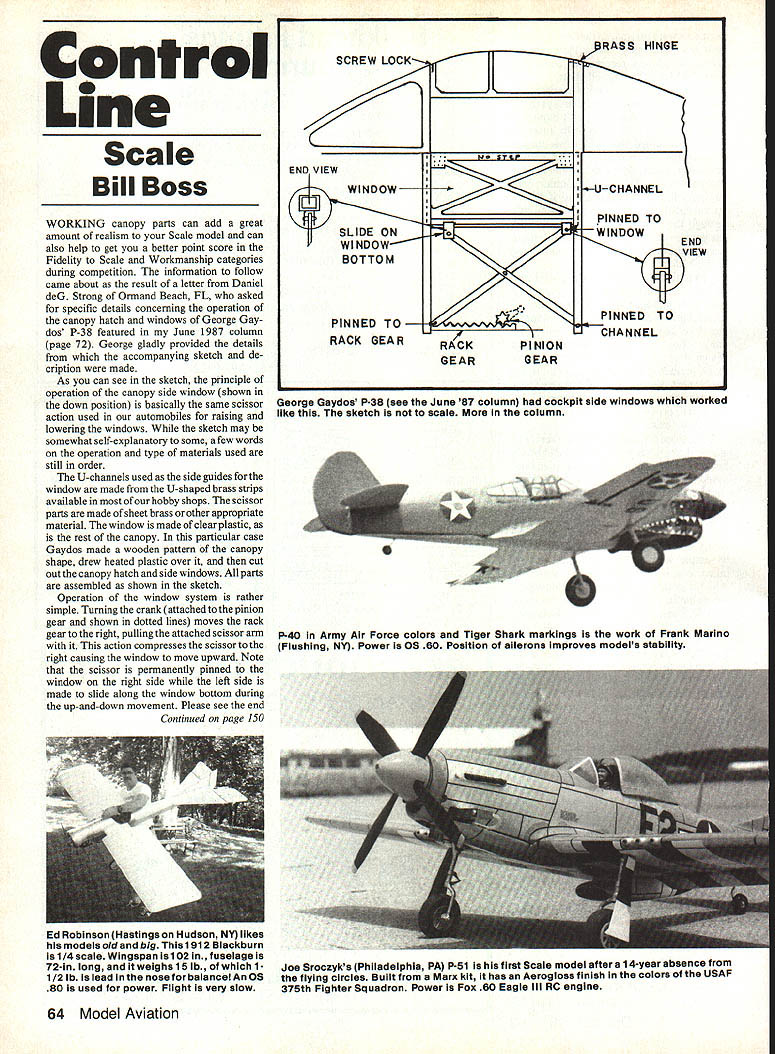
Working canopy parts can add a great amount of realism to your scale model and can also help you score better in the Fidelity to Scale and Workmanship categories during competition. The information below resulted from a letter from Daniel de G. Strong of Ormond Beach, FL, who asked for specific details concerning the operation of the canopy hatch and windows of George Gaydos' P-38 featured in my June 1987 column (page 72). George provided the details from which the accompanying sketch and description were made.
As shown in the sketch, the principle of operation of the canopy side window (shown in the down position) is basically the same scissor action used in automobiles for raising and lowering windows. While the sketch may be somewhat self-explanatory to some, a few words on operation and the materials used are in order.
Construction and materials
- Side guides (U-channels): U-shaped brass strips available from hobby shops.
- Scissor parts: sheet brass (Gaydos used 0.015 in. sheet brass) or other appropriate material.
- Window and canopy: clear plastic (Plexiglas). Gaydos made a wooden pattern of the canopy shape, thermoformed heated plastic over it, then cut out the canopy hatch and side windows.
- Bearing clips: phosphor bronze.
- U-channel thickness (Gaydos): 1/32 in.
One end of the scissor is pinned to the bottom of the Plexiglas window and the other end is pinned to a sliding block that rides in the U-channel. The rack is fastened to the sliding block and the pinion is turned by a crank.
Operation
Turning the crank (attached to the pinion gear and shown in dotted lines on the sketch) moves the rack gear to the right, pulling the attached scissor arm with it. This compresses the scissor to the right, causing the window to move upward. The scissor is permanently pinned to the window on the right side while the left side is free to slide along the window bottom during the up-and-down movement. (See the end views in the sketch for window-attachment details.)
Note that the sketch is not to any particular scale; any attempt to make this type of operating canopy feature must be tailored to the specific model being constructed.
This system is very simple to build and has worked well for Gaydos for a number of years. It might be a good idea to use a small return spring at the upper end of the scissor to hold the window closed when the crank is released.
Alternative methods
Another approach to an opening canopy hatch is to use small brass links and hinges similar to those used on full-scale aircraft. The disadvantage is that these require careful alignment and are somewhat more fragile. In the particular P-38 example the side windows are quite narrow, so the scissor action is practical. For larger windows some other method, such as telescoping channels, might be better.
Bob's hint: Using plastic models for static judging
Bob's hint concerns our ability to build a model and provide proper documentation for static judging in the Sport Scale event when three-views are not available. If you're scratch-building or modifying a kit to represent one model in a series, you may have trouble making formers to the right shape. Bob suggests using plastic models for this purpose — note he said "plastic models," not "plastic model."
The idea: use one assembled plastic model as the substitute for the nonexistent three-views (for static judging) and a second assembled model to provide proper shapes for fuselage formers, etc. The second model will be cut up to produce patterns.
Steps:
- Assemble two copies of the kit. Set one aside intact for static-judging use.
- On the second assembled model, determine and mark the positions where you want bulkheads on your flying model.
- Using an X-Acto razor saw, cut halfway through the fuselage side from top to bottom at the marked points.
- Insert a piece of heavy paper in each slot and trace a half-bulkhead in scale.
- Scale the traced bulkhead up to the full size needed for your flying model and produce the other side of the bulkhead.
- Repeat until all bulkheads are made.
The end result: a small pile of cut-up plastic for the wastebasket and a completed Sport Scale flying model that should match the plastic model presented as proof of scale for static judging.
Profile model kits
While there is an abundance of full-bodied kits on the market for scale modelers (many are RC and not specifically for CL), the profile CL model kit is becoming more scarce. Cam Martin (Virginia Beach, VA) tells us of an effort to bring back, in limited quantities, profile model kits of the Bearcat, F4U-5 Corsair and AD-6 Skyraider originally produced in the late 1970s by J. Robert Smurthwaite under the GS name. Though originally produced as subjects for the Navy Carrier Profile event, their sizes (about 40 in. wingspans) and good flight characteristics make them excellent models for the growing Profile Scale event.
At this point the effort is to determine interest among control-line fliers for possible future production. Cam is gathering data via a questionnaire he is distributing and will forward the results to J. Robert Smurthwaite for consideration. If you are interested in obtaining one of these kits, write to J. Campbell Martin, 1540 Bridle Creek Blvd., Virginia Beach, VA 23464 for a copy of the questionnaire.
Modeler identified
In my August 1987 column I included a picture of a great-looking Fokker DR-1 triplane flown in the 1973 Nats but could not recall the builder's name. Nagio Forbes, Glenview, IL, informs us that the builder/flyer was Calvin Shumate of Dixmoor, IL. Thanks, Nagio, for the update.
Please send all correspondence—especially photos—relating to CL Scale to: Bill Boss 77-05 269th Street New Hyde Park, NY 11040
Transcribed from original scans by AI. Minor OCR errors may remain.

