
Control Line: Scale — Bill Boss
REPLICA, the newsletter of the National Association of Scale Aeromodelers (NASA), is once more being issued to NASA members. Stan Alexander, its new editor, has indicated four issues will be published this year. The May 1987 issue contains a couple of items worth passing on.
NASA — Scale Data Source and Membership
- NASA now provides a Scale Data Source listing to new members, containing names and addresses of government and private organizations from which full-scale aircraft drawings and photos may be obtained.
- Membership in NASA is $6 per year. To join, send a check to:
- Bert Dugan, Secretary/Treasurer
11090 Phyllis Dr., Clio, MI 48420
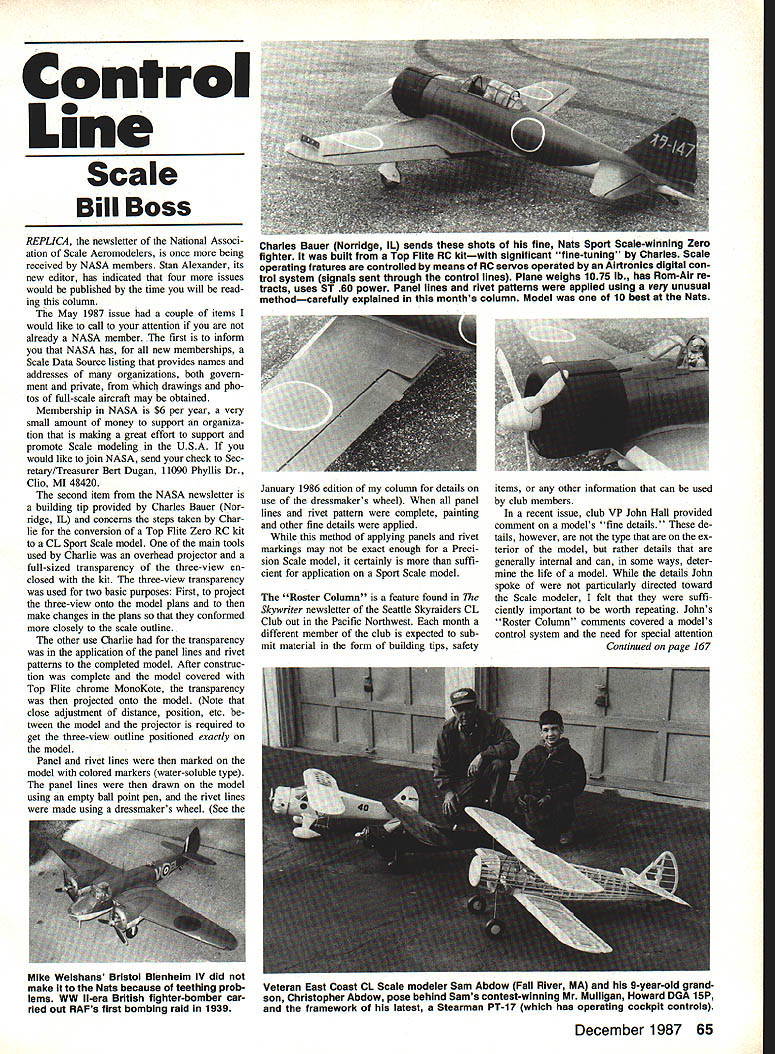
Building tip — Charles Bauer (Top-Flite Zero conversion)
Charles Bauer (Norridge, IL) described his conversion of a Top-Flite Zero RC kit to a CL sport-scale model. His main tool was an overhead projector and a full-size transparency of the kit three-view. The transparency was used for two purposes:
- Project the three-view onto the model plans and modify the plans so they conform more closely to the scale outline.
- Transfer panel lines and rivet patterns onto the completed model.
Procedure summary:
- After construction and covering (Charlie used Top-Flite chrome MonoKote), project the three-view transparency onto the model. Careful adjustment of projector distance and position is required to align the three-view exactly on the model.
- Mark panel and rivet lines on the model with colored water-soluble markers.
- Draw panel lines with an empty ballpoint pen over the marker lines.
- Create rivet lines using a dressmaker’s wheel (see the January 1986 edition of this column for details).
- After panel and rivet work, apply painting and other fine details.
Note: This method may not satisfy Precision Scale standards but is well suited for Sport Scale models.
Roster Column — Seattle Skyraiders (John Hall)
The Skywriter newsletter of the Seattle Skyraiders CL Club runs a "Roster Column" where a different member submits building tips, safety items, or other useful information each month. In a recent issue, club VP John Hall emphasized internal "fine details" that affect the life of a model, particularly the control system. He stressed attention to the bellcrank, lead-outs, control rod, and hinges.
#### Bellcrank
- Sharp edges of the cable-mounting holes on a new metal bellcrank can wear into stainless steel lead-out cable.
- Remove sharp edges by lightly filing or using emery cloth to radius the top and bottom of the holes. A small round jeweler’s file works well.
#### Lead-outs
- For stranded-cable lead-outs, radius-crimp the termination tubes to avoid cutting the cable.
- Use round-nose pliers or special crimping pliers; avoid sharp crimps.
- After crimping, a little cyanoacrylate (Zap) applied to the crimped tube adds security.
- See the 1986–87 AMA rule book (page 10) for proper crimping methods for terminating stranded cable.
#### Control rod
- Ensure control rods are of sufficient size and properly supported to prevent flexing and poor flight control.
- Profile-type models: a properly sized cotter pin can serve as a control rod support.
- Full-bodied models: brass eyelets glued into fuselage formers and aligned make good supports.
- If soldering control rods:
- Clean the rods with light sanding before soldering.
- Use acid-core solder or a flux such as Nokorode.
- Use a good soldering iron or gun; avoid torches to prevent overheating and softening the rod.
- Clean any acid or soldering flux residue after soldering to prevent corrosion.
#### Hinges
- Pin hinges can bind if glue gets into the pin area.
- Apply a very light oil to the hinge-pin area (use a toothpick dipped in oil) until the pin is lubricated. Avoid getting oil on the hinge tongue area.
- Install hinges without glue on the hinge surface initially. Instead:
- Drill a small hole through the balsa at the hinge center.
- Apply cyanoacrylate into the hole so it flows around the hinge tongue, then set with accelerator before it reaches the pin.
- Fill the hole with filler, glue, or a hard-balsa peg.
- For improved appearance, cut a notch in the control surface and recess the pin into this notch.
Thanks and events
- Thanks to all CL Scale modelers, newsletter editors, and contributors who have supplied material for this column.
- If you missed the Nats and want to attend as a spectator, contact Ken Bundess for registration:
- Ken Bundess, 427 Caroline, Janesville, WI 53545 (allow $50 and set aside about 10 hours to enjoy the event).
Correspondence
Please send all correspondence — and especially photos — relating to CL Scale to:
- Bill Boss
77-06 26th Street, New Hyde Park, NY 11040
Additional contact noted:
- Ted Fancher, 158 Flying Cloud Isle, Foster City, CA 94404
Transcribed from original scans by AI. Minor OCR errors may remain.

