
Control Line: Scale
Bill Boss 77-06 269th Street New Hyde Park, NY 11040
Craftsmanship: an update
An update on the NASA president's views on craftsmanship is my main topic this month. In my May 1988 column I presented the views of NASA (National Association of Scale Aeromodelers — Ed.) President John Guenther on the subject of craftsmanship, which had appeared as an editorial in the NASA newsletter Replica. In the April–May issue of that newsletter, John reports that the response to his craftsmanship editorial was good, and that at last he has found a subject to which the Scale modeler has responded well. John's editorial report also included excerpts from the responses received.
While I would like to report all of the responses found in the Replica editorial, limitations on my column space will not permit me to do so. Therefore, I have chosen a couple that pretty much show the different viewpoints of those responding.
Darlene Frederick (Santa Rosa, CA) said: "We found your article on craftsmanship in the last newsletter very interesting. Wayne has always felt that it was a very gray area, and I know he'd like to bend your ear on the subject. It indeed is an area that must be clarified somehow. Judging is such a controversial subject. I hear so many comments pro and con. The one I enjoyed the most was when a flier told me the scoring was entirely too high—except for his scores!"
Clancy Arnold (Indianapolis, IN) responded on the phone: "Being a judge at the Nats was the best thing I have ever done. I would like to see each contestant bring a tape recorder with him when he brings his model up for static judging. By doing this, he'll solve a lot of confusion and misunderstanding on what the judges see and don't see or understand about our models. Everyone will have to be honest with one another and..."
Jeff Troy (Reston, VA) wrote: "Though our conversation at the '87 Scale Masters only dealt with limited concerns, I think NASA members should be privy to a bit more on the craftsmanship judging task. While I appreciate your position on accuracy of outline as saying something about the builder's personality, I don't believe this position has anything to do with the issue. Bad outline should certainly receive a downgrade, provided the outline judge picks up the error, but these errors need not be the result of negligence. They might be the result of misinterpretation of the outline by either the builder or the judge. You cannot guarantee that the incorrect outline is only caused by builder carelessness.
"Let's look at a 'purchased' glass fuselage. The book says a judge may award craftsmanship points equal to the amount of work done by the contestant. In fact, this will lower the total number of points made available to the 'purchased parts contestant' in the craftsmanship category because he did not do the work.
"Let's say a contestant not only bought a fuse, but bought one with a slightly inaccurate outline. Will you downgrade him in craftsmanship again for being careless in achieving an outline he didn't craft? How can you say his craftsmanship was careless? In my opinion (to which judging issues will always be subject) outline is accuracy of the model's outline. Color and markings are the accuracy and placement of color on the model, and the size, color, and placement of its markings.
"Craftsmanship is not what was done (the other categories have already addressed this), but rather the quality of what was done. A judge should not judge a contestant's attitude as a craftsman, but the craftsmanship which the contestant has produced.
"Craftsmanship is the execution, not the accuracy of outline, placement of markings, nor the attitude of the builder. If it's well executed ... say so!"
Jack Sheeks (Indianapolis, IN) said: "...totally agree with you. Craftsmanship covers all aspects of model building.
"...guys should read the rule book (AMA) more often and see what they can/can't get away with!"
It certainly appears from the comments that many put a lot of thought into the craftsmanship subject. It also appears that there is no clear-cut solution to the problems associated with Scale model judging. However, there are a couple of real benefits from all this.
- More Scale modelers are taking pen in hand and are willing to express their views—something badly needed if Scale modeling is to progress, grow, and encourage more participation.
- NASA may be coming into its own as a sounding board and representative of the Scale modeler in this country. An organization is needed if our favorite modeling activity is to obtain and keep the respect it rightfully deserves.
If you are not a member of NASA it is easy to join. Send $6 to Secretary Bert Dugan, 11090 Phyllis Dr., Clio, MI 48420.
Helpful hints from Sam Abdow
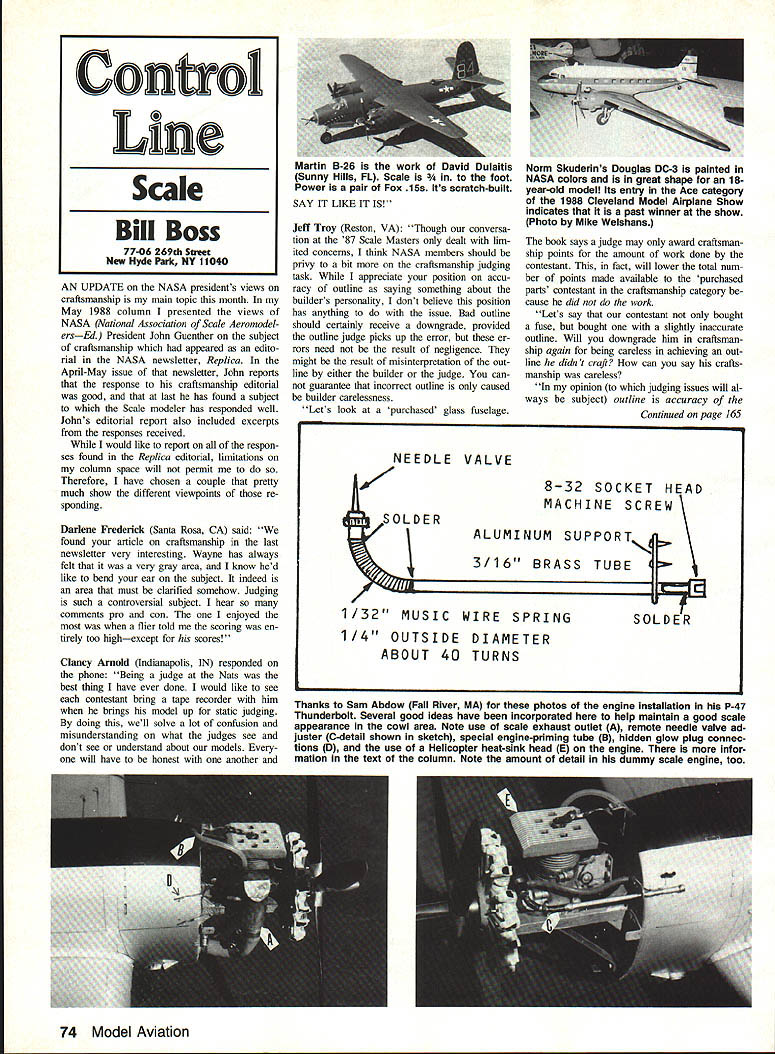
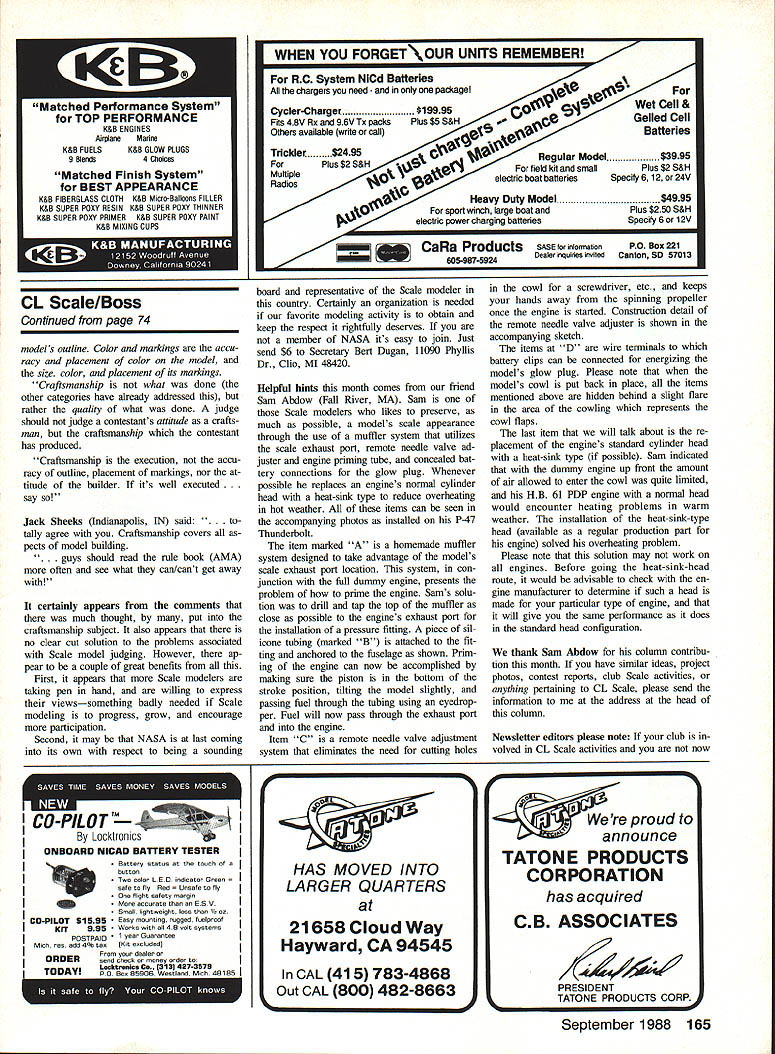
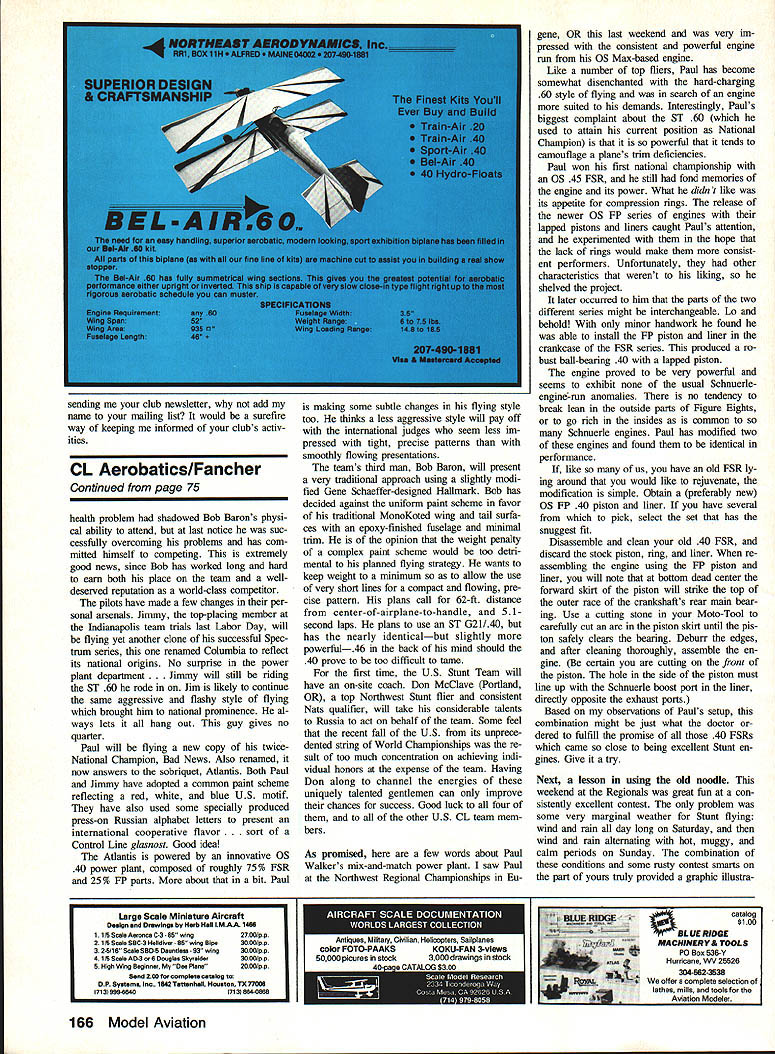
Helpful hints this month come from our friend Sam Abdow (Fall River, MA). Sam likes to preserve, as much as possible, a model's scale appearance through the use of a muffler system that utilizes the scale exhaust port, a remote needle valve and engine priming tube, and concealed battery terminals for the glow plug. Whenever possible the replacements are an engine's normal cylinder head with a heat-sink type to reduce overheating in hot weather. These items are installed on his P-47 Thunderbolt.
- Item A: A homemade muffler system designed to take advantage of the model's scale exhaust port location. In conjunction with a full dummy engine, this presents the problem of how to prime the engine. Sam's solution was to drill and tap the top of the muffler as close as possible to the engine's exhaust port for the installation of a pressure fitting. A piece of silicone tubing (item B) is attached to the fitting and anchored to the fuselage.
To prime the engine:
- Make sure the piston is at bottom dead center.
- Tilt the model slightly.
- Pass fuel through the tubing using an eyedropper. Fuel will pass through the exhaust port and into the engine.
- Item C: A remote needle valve adjustment system that eliminates the need for cutting holes in the cowl for a screwdriver and keeps your hands away from the spinning propeller once the engine is started. Construction details of the remote needle valve adjuster were shown in the original sketch.
- Item D: Wire terminals to which battery clips can be connected to energize the model's glow plug. When the glow plug is put back in place, all the items mentioned above are hidden behind a slight flare in the area of the cowling which represents the cowl flaps.
The last item is replacing the engine's standard cylinder head with a heat-sink type (if available). Sam indicated that with the dummy engine up front the amount of air allowed to enter the cowl is quite limited, and his H.B. 61 DPD engine with a normal head would encounter heating problems in warm weather. The installation of the heat-sink type head (available as a regular production part for this engine) solved his overheating problem.
Please note that this solution may not work on all engines. Before switching to a heat-sink head, check with the engine manufacturer to determine if such a head is made for your particular engine and whether it will give comparable performance to the standard head.
We thank Sam Abdow for his column contribution this month. If you have similar ideas, project photos, contest reports, club Scale activities, or anything pertaining to CL Scale, please send the information to me at the address at the head of this column.
Newsletter editors please note: If your club is involved in CL Scale activities and you are not now sending me your club newsletter, why not add my name to your mailing list? It is a surefire way of keeping me informed of your club's activities.
U.S. Stunt Team and Paul Walker's engine experiment
The Atlantis is powered by an innovative OS .40 power plant, composed of roughly 75% FSR and 25% FP parts. Paul is making some subtle changes in his flying style too. He thinks a less aggressive style will pay off with international judges who seem impressed with tight, precise patterns that are smoothly flowing presentations.
The team's third man, Bob Baron, will present a traditional approach using a slightly modified Gene Schaefer-designed Hallmark. Bob has decided against a uniform paint scheme in favor of his trademark MonoKoted wing and tail surfaces with an epoxy-finished fuselage and minimal trim. He feels the weight penalty of a complex paint scheme would be too detrimental to his planned flying strategy. He wants to keep weight to a minimum to allow the aircraft to fly on very short lines for a compact and flowing, but still precise, pattern. His plans call for 6 ft 2 in distance from center-of-airplane to handle, and 5½ second loops. He plans to use an ST G2/1.40, but has a slightly more powerful .46 in mind should the .40 prove too difficult to tame.
For the first time, the U.S. Stunt Team will have an on-site coach. Don McClave (Portland, OR), a top Northwest stunt flier and consistent Nationals qualifier, will act on behalf of the team in Russia. Some feel that the recent fall of the U.S. from its unprecedented string of World Championships was the result of too much concentration on achieving individual honors at the expense of the team. Having Don along to channel the energies of these talented gentlemen can only improve their chances for success. Good luck to all four of them, and to all of the other U.S. CL team members.
As promised, here are a few words about Paul Walker's mix-and-match power plant. I saw Paul at the Northwest Regional Championships in Eugene, OR this last weekend and was very impressed with the consistent and powerful engine run from his OS Max–based engine.
Like a number of top fliers, Paul had become somewhat disenchanted with the hard-charging .60 style of flying and was in search of an engine more suited to his demands. Interestingly, Paul's biggest complaint about the ST .60 (which he used to attain his current position as National Champion) is that it is so powerful that it tends to camouflage a plane's trim deficiencies.
Paul won his first national championship with an OS .45 FSR, and he still had fond memories of the engine and its power. What he didn't like was its appetite for compression rings. The release of the newer OS FP series of engines with their lapped pistons and liners caught Paul's attention, and he experimented with them in the hope that the lack of rings would make them more consistent performers. Unfortunately, they had other characteristics that weren't to his liking, so he shelved the project.
It later occurred to him that parts of the two series might be interchangeable. With only minor handwork he was able to install the FP piston and liner in the crankcase of the FSR series. This produced a robust ball-bearing .40 with a lapped piston.
The engine proved very powerful and seems to exhibit none of the usual Schenker-type engine anomalies. There is no tendency to break lean in the outside parts of figure eights, or to richen in the insides as is common to many Schenker engines. Paul has modified two of these engines and found them identical in performance.
If you have an old FSR you'd like to rejuvenate, the modification is simple:
- Obtain a (preferably new) OS FP .40 piston and liner. If you have several, select the set with the smoothest fit.
- Disassemble and clean your old .40 FSR, and discard the stock piston, ring, and liner.
- When reassembling using the FP piston and liner, note that at bottom dead center the forward skirt of the piston will strike the top of the outer race of the crankshaft's rear main bearing.
- Use a cutting stone in a Moto-Tool to carefully cut an arc in the piston skirt until the piston safely clears the bearing. Deburr the edges and clean thoroughly.
- Reassemble the engine.
Be certain you are cutting on the front of the piston. The hole in the side of the piston must line up with the Schenkeral boss port in the liner, directly opposite the exhaust ports.
Based on my observations of Paul's setup, this combination might be just what the doctor ordered to fulfill the promise of all those .40 FSRs which came close to being excellent Stunt engines.
Needle valve maintenance
A lesson from the Regionals: we had great fun at a consistently excellent contest, but the conditions were challenging—wind, rain, hot muggy periods, and calm spells. The small margin for error in Stunt flying and some rusty contest smarts on my part provided a graphic illustration of the need to check and clean the outside of the needle valve and the main orifice. A small deposit on the needle tip will cause inconsistent peak RPM and poor mixture control.
- Remove, clean, and inspect the needle and orifice when engines show any sign of hesitation or inconsistency.
I hope these tips help. If you have questions, write to me at the address at the head of this column. Send project photos, contest reports, or anything pertaining to CL Scale to the same address.
Bill Boss
Transcribed from original scans by AI. Minor OCR errors may remain.

