
Control Line: Scale
Mike Stott
UNLESS YOU ARE lucky enough to live in the South for the winter, you have put away your flying equipment and started your winter building project. Minnesota winters give me a lot of time to do some serious building. So with this in mind, I'd like to review some thoughts and techniques of building, finishing and detailing your scale model.
One of the major factors in a good scale model is wing loading. The weight versus the square inches. You want to keep the weight as light as possible per square inch. This is especially true in a small model that would have less wing area. The best way to keep your model light is to just not overbuild. There is often a strong temptation to make your model overly strengthened to withstand any abnormal abuse. I recommend hollowing out all blocks, especially in the aft (rear) section. By reducing the weight in the section it will eliminate having to add a lot of extra nose weight to balance the model later.
Another good place to reduce weight would be to use triangles instead of square stringers in the corner of the fuselage. The use of a triangle provides the same glueing area which gives the same strength to your glue joint as a square stringer. The square stringer that normally runs between the formers can be carved out before installing the formers. Only carve out the sections where the stringers are not attached to the formers. You need a full stringer to attach a former to in order to have it properly aligned.
With the formers, try cutting out the centers. Cut the opening as close to the edge of your former as you can without having it bend or break. Also try this technique on your ribs. But I've found this is not recommended around landing gear mounting blocks or supports. Be sure to cut weight reducing openings in all plywood formers as plywood is very strong, even with the openings cut out. The only exception to this rule is, of course, the firewall.
All the weight you can save during basic construction will allow you to add more detail without sacrificing good flying characteristics.
The finishing of the model is greatly left up to the individual's own techniques. But a basic thing to remember is to have all your cracks and joints filled and sanded smooth before covering.
I like to use silk on my scale models as a covering material. Silk lends more strength than Silkspan. It does take a little more filler, which will add some additional weight, but I think it's worth the difference. If you feel your model is getting too heavy, then you may want to use the quick-filling Silkspan instead.
Any joints or cracks that are not filled properly will more than likely show up at a later date. As a model ages, the paint may shrink and reveal any cracks you may not have filled sufficiently.
It is recommended to use two to three coats of sanding sealer or primers to obtain a smooth surface for your finishing paints and details. Be sure all wood grain is filled before attempting to detail the surface, because very few actual planes have a wood grain showing through. This is one of the points a judge will look for. Having a poor quality finish would enter in on two different judging categories, finishing and workmanship, and fidelity to scale. So this one thing could lose you quite a few points if not done properly. We'll continue to increase engine run in two-second increments until nine seconds is reached. Transition should be good by the five-second run and no later than seven seconds. Three-quarters turn in nine seconds is about right. Climb angle will increase as speed builds. More turn will improve transition. Glide should be just above stalling speed on calm days and slightly faster for rough air.
Make all adjustments one at a time and according to the following four basic rules.
Climb Turn—rudder tab Use 1/16" x 1/2" x 3/4" balsa shaped like trailing edge stock, glue to side of rudder at trailing edge. Pylon models must turn right under power.
Climb Angle—stab incidence Raise trailing edge to increase. Raise leading edge to decrease. Shim with matchbook cover or plywood 1/32" at a time.
Glide Turn—stab tilt Model will turn toward high tip. Right tip high for right turn. Should be about even with right main wing panel.
Glide Angle—shift CG Add lead to tail to slow glide, add lead to nose to increase speed.
The above trim changes will act independently of one another with the exception of the stabilizer tilt. When a shim is placed under one end of the stab rest, it will have the effect of one-half that shim thickness being placed under the stab leading edge center and will reduce climb angle. Removal of stab tilt shims will have the reverse effect and will increase climb angle.
Fly Dixie-Gal often to be thoroughly familiar with her flight characteristics. Enter competition every chance you can. Dixie-Gal has won several trophies for me and can do the same for you. TIMER!
CL Scale/Stott continued from page 30
After the filler has been sanded smooth, it is the time to add all or most of your surface detailing, such as panel markings, rivets and hatches, etc. With a good base of sanding sealer or primers very little finish color paint will be necessary to cover the model. I like to add a tint of my finishing color to the sanding sealer or primer to obtain still better paint covering.
You may think this is an awful amount of work involved in building your model. But it will definitely pay off when you receive your 1st place trophy.
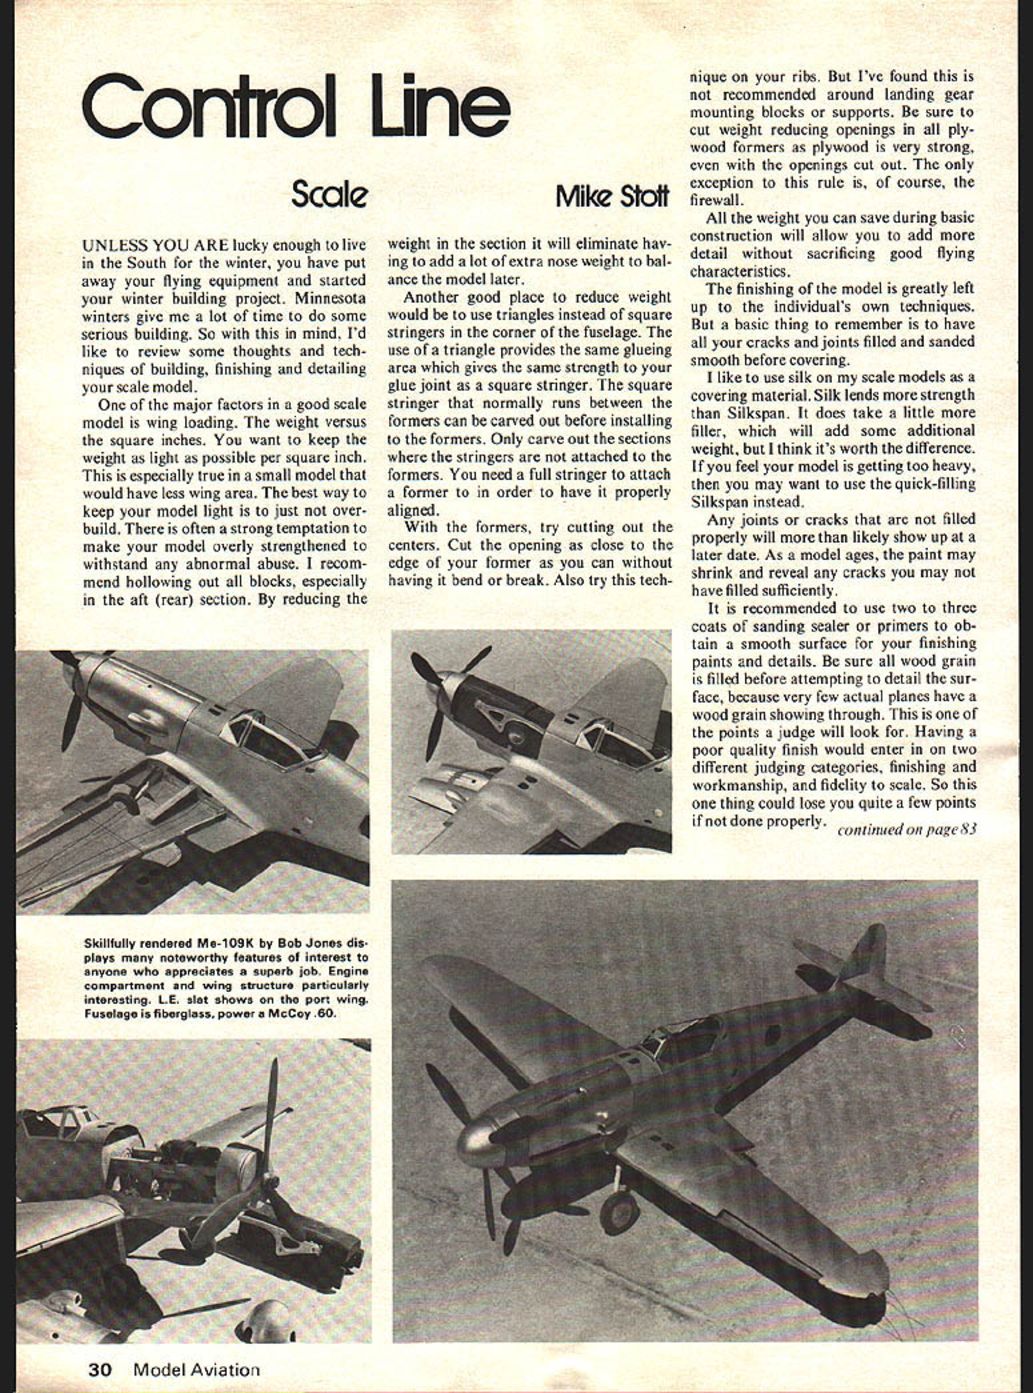
Some time ago I received a letter from Bob Jones of Long Beach, Calif. He sent some pictures of his Me-109K. Bob informed me that his model is all fiberglass, even the wings and control surfaces. He said he really enjoys working with fiberglass. Working with fiberglass requires a different style of building, since a wooden plug is made first, then a female mold, and then the first positive. Bob didn't want any engine parts visible so he spent quite a bit of time and energy at a local machine shop devising a right-angle gear drive for his engine. The engine is a McCoy 60, rigged to run backwards so that, through the two gears, the prop will turn in the correct direction. It also has retracts and shock absorbing and retractable tail wheel. All hatches are spring loaded and hinged. Bob estimates it should weigh 7 to 8 lbs. when finished. He has been working on his Me-109K for two years. A true test of patience!
Mike F. Stott, 118 E. Wheeler St. N., Mankato, MN 56001.
Transcribed from original scans by AI. Minor OCR errors may remain.

