
CONTROL LINE SCALE
Bill Boss, 77-06 269th Street, New Hyde Park NY 11040
Control Line Electric Flight
A recent letter from Grant Heistand (Burbank, CA) prompts me to ask: How many of you have successfully used electric power in your CL Scale models? While I've mentioned electric power in past columns, that information was often based on experimentation and couldn't be used for competition purposes.
Grant, on the other hand, has been experimenting with electric-powered Scale models for some time and has successfully flown an electric-powered Sig Spacewalker in competition. He captured first place in Precision Scale at the 1993 Nats and has also won West Coast meets. I hope that by providing details of Grant's model I will encourage other readers to try electric power and perhaps start a dialog in the column on the how of using electric power in CL Scale.
Grant reproduced the instrument panel and instrument faces, the wing-rib stitching and pinking tape, the instrument panel placards, and other details on his 3/4-scale (104-inch-span) Spacewalker.
Power and performance:
- Motor: AstroFlight 90
- Batteries: 36 SCR sub-C cells
- Radio/speed control: single-channel electronic throttle using an Astro 205 speed control
- Propeller: 16 x 8 turning at approximately 9,000 rpm
- Flight time: about five minutes with fully charged batteries — more than enough for most competitive flights
A photo of the Spacewalker's motor mount appeared in the May 1994 MA.
When building the model, Grant was careful to keep its weight under the 20-pound limit for CL Scale models. He lightened the structure by cutting holes in formers and fuselage sides and by replacing some plywood with balsa. With the motor and batteries in place, the model's overall weight is approximately 18½ pounds.
Grant noted that from now on all of his models will be electric powered, for several reasons:
- Electric power is clean — no fuel residue to clean up.
- No glow plugs to burn out and no engine starting problems.
- Electric-powered models are quiet, allowing you to fly them where regular glow- or gas-powered models can't be flown.
Grant said his next project will be a Northrop N-9M flying wing. We'll likely hear more about this project.
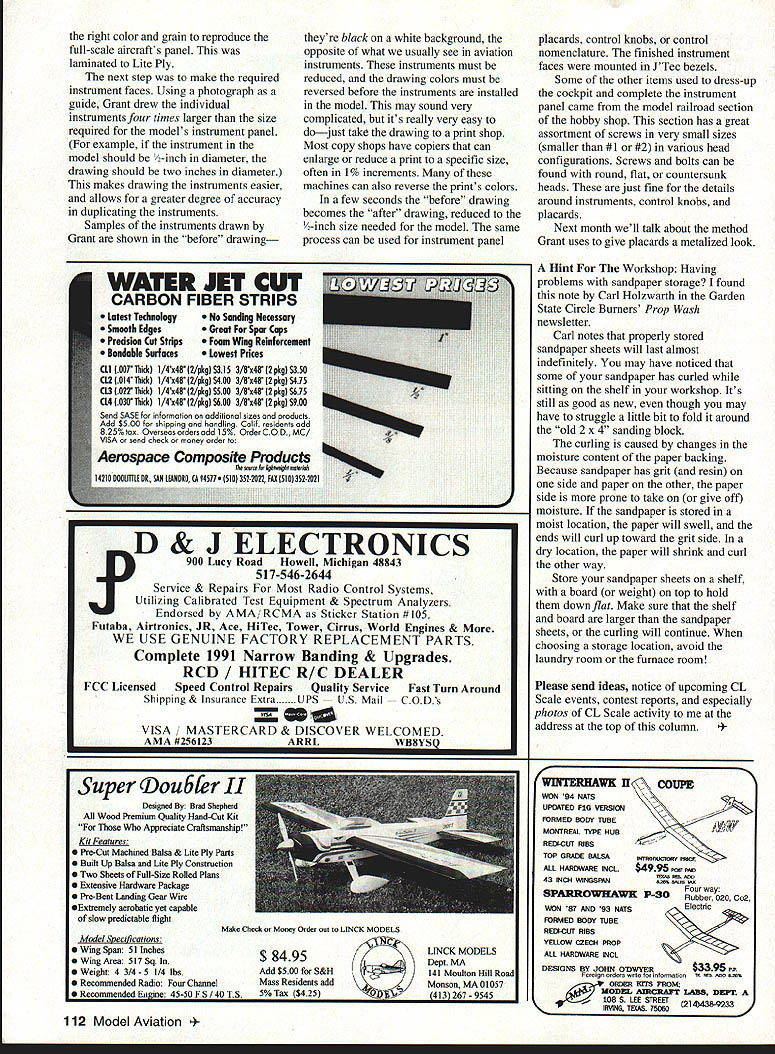
Instruments Made Easy
When choosing a subject like the Spacewalker, it may be difficult to obtain ready-made instrument faces, warning placards, and other cockpit items. To produce a great-looking instrument panel, Grant used 1/8-inch plywood — it had the right color and grain to reproduce a full-scale aircraft's panel. He laminated Lite Ply.
Steps Grant used for instrument faces:
- Using photographs as a guide, draw each instrument at four times the size required for the model. For example, if the model instrument should be 1/2 inch in diameter, draw it 2 inches in diameter. Drawing larger makes them easier to draw and allows greater accuracy.
- Draw the samples as black on white (the opposite of typical aviation instruments).
- Take the drawings to a print shop to be reduced and color-reversed. Most copy shops have copiers that can enlarge or reduce to a specific size (often in 1% increments) and can reverse prints in seconds.
- After reduction to the required size (for example, 1/2 inch), use the same process for instrument panel placards, control knobs, and control nomenclature.
- Mount the finished instrument faces in J-Tec bezels.
Additional cockpit details came from the model-railroad section of the hobby shop. That section has a great assortment of very small screws — smaller than No. 1 and No. 2 — in various head configurations (round, flat, countersunk). These are ideal for details around instruments, control knobs, and placards.
Next month we'll talk about the method Grant uses to give placards a metalized look.
A Hint For The Workshop
Having problems with sandpaper storage? Carl Holzwarth (Garden State Circle Burners' Prop Wash newsletter) offers this tip.
Properly stored sandpaper sheets will last almost indefinitely. You may notice some sandpaper curling while sitting on the shelf — it's still usable, though it may be a little stiff to fold around an "old 2 x 4" sanding block. The curling is caused by changes in the moisture content of the paper backing. Because sandpaper has grit (and resin) on one side and paper on the other, the paper side is more prone to gain or lose moisture:
- If stored in a moist location, the paper will swell and the ends will curl up toward the grit side.
- If stored in a dry location, the paper will shrink and curl toward the paper side.
Storage recommendations:
- Store sandpaper sheets flat on a shelf with a board (or weight) on top to hold them down.
- Make sure the shelf board is larger than the sandpaper sheets, or the curling will continue.
- Avoid storing sandpaper in the laundry room or furnace room.
Please send ideas, notices of upcoming CL Scale events, contest reports, and especially photos of CL Scale activity to me at the address above.
Transcribed from original scans by AI. Minor OCR errors may remain.

