

CONTROL LINE SCALE
Bill Boss, 77-06 269th Street, New Hyde Park, NY 11040
BUILDING LIGHT
BUILDING LIGHT was the main subject of last month's column, in which John Lickley (Napa, CA) explored ways to reduce a Scale model's weight without reducing its overall strength. This month I'll continue with some of John's ideas for finishing that great Scale project.
The finishing system John uses is the traditional dope-and-silkspan method, with talc-and-dope filler as necessary. After the model's construction is completed and it has been planked, the first steps are:
- Seal all surfaces with one or two coats of clear dope. When thoroughly dry, remove roughness with a light sanding — about 200-grit sandpaper is appropriate at this point.
- When sanded, thoroughly dry dope should produce a powderlike residue. If the dope is not dry, sanding will be difficult and the sandpaper will clog with gummy residue.
- Drying times vary with different dopes and paints; follow the manufacturer's instructions and then wait a little longer. Multiple coats increase drying time.
- John uses Sig dope, silkspan, and filler for most of the initial finishing steps.
- To keep weight down, cover all planked surfaces with 00 lightweight silkspan, and cover open-bay areas (elevators, rudder, and other control surfaces) with GM or medium-weight silkspan. Then brush on a couple coats of clear dope.
- After the silkspan and dope are thoroughly dry, perform a very light sanding and apply a filler coat. John suggests thinning the filler appropriately and spraying it on to fill the silkspan weave with a more even overall coating.
- When the filler is dry, sand most of it off with 320–400 grit sandpaper (for example, 3M TRI-M-ITE). If necessary, apply and sand additional filler coats. The goal is the smoothest possible finish with the least amount of filler. When satisfied, seal the filler with a sprayed-on coat of clear.
- Spray the model with silver dope to reveal surface flaws. When dry, sand the silver with 600-grit wet-or-dry paper. Instead of water for wet sanding the silver coat, John uses a product sold in automotive paint stores called Wax & Grease Remover (PPG-DX3).
- This product evaporates quickly, cuts the finish more quickly, and keeps the sandpaper sharp longer with less clogging than water.
When all flaws are removed and details (access hatches, panel lines, etc.) are added, proceed to color application.
- For civilian aircraft, many colors are available from hobby paint suppliers.
- For military types, you can mix your own colors or use ready-mixed military colors from Perfect Paints. Perfect Paints offers an assortment of camouflage colors matched to Federal Standard numbers. Two sprayed-on coats are required for good coverage. Their camouflage paints are commonly used for RAF, RCAF, USN, USAAF, Germany, and Japan schemes.
John hopes these ideas for keeping models light and his finishing approach will yield a lighter model, a finer-looking aircraft, and better craftsmanship — quality you can enjoy flying for years.
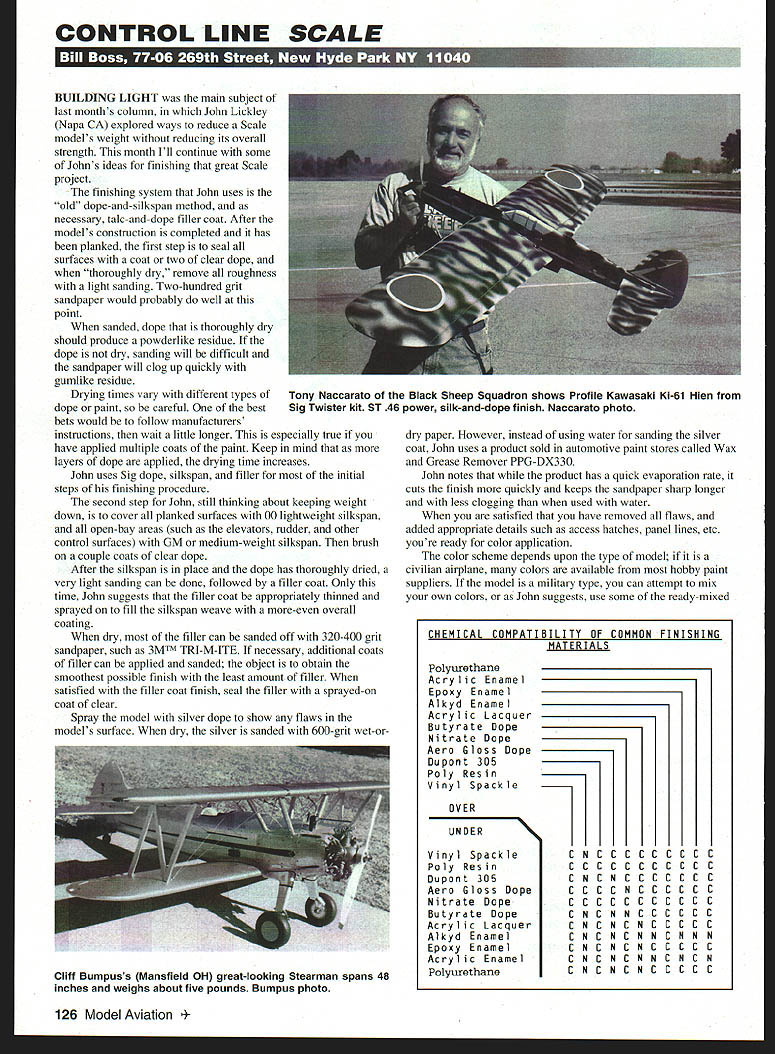
Compatibility
While discussing finishing techniques, it's appropriate to revisit compatibility of finishing materials. You may wonder whether a particular undercoat is compatible with a finishing paint. This column has touched on the subject before (August 1993). New readers may benefit from a compatibility table originally presented in the Probable Cause newsletter (Rocky Mountain Aeromodelers).
- How to use the table: the "C" column indicates combinations that are compatible; an "N" indicates combinations that are not compatible.
- Example: Vinyl spackle is compatible on top of polyester resin. Find vinyl spackle in the "over" section and read down to polyester resin in the "under" section — the intersection shows a "C."
- Conversely, vinyl spackle is not compatible when applied under polyester resin. Find vinyl spackle in the "under" section and read across to polyester resin in the "over" section — the intersection shows an "N."
Take care in choosing finishing materials; a mistake can be costly and difficult to correct. For easy access, make a copy of the compatibility table, paste it on cardboard, and keep it handy in the workshop.
About the Stearman Photo
The model pictured is by 67-year-old Cliff Bumpuss of Mansfield, Ohio. It is scratch-built, has a 48-inch span, weighs about five pounds, and features working struts, lights, and rigging. It also includes hand-formed aluminum cowling and fuselage panels, as did the original Stearman.
A unique feature of this model is that the engine is not a dummy but a Burgess M-5 controlled by a J. Roberts three-line system. The metalwork, attention to detail, and working engine make this an attractive model.
Help Wanted
John Brodak of Brodak's Distributing Co., Inc. (supplier of Control Line models and supplies) would like to produce two or three Scale CL kits in the near future. While many CL Scale modelers scratch-build, there are builders who would prefer kits — especially newcomers or those trying the event for the first time.
John needs help choosing which model subjects to produce. If you have suggestions, drop me a line at the address at the top of this column and let me know which airplane you'd like to see as a CL Scale kit.
Please keep in mind:
- The subject should be a dead-on correct model.
- It should be of a size that will fly well.
- It should be a new model subject (there are already many kits of P-51s, P-40s, P-47s, etc.).
While on the subject of John Brodak, his catalog lists Perfect Paints mentioned above. The new Brodak catalog (70+ pages) can be obtained by sending $3 to: John Brodak 100 Park Ave. Carmichaels, PA 15320
Please send ideas, notices of upcoming CL Scale events, contest reports, and especially photos of CL Scale activity to me at the address at the top of this column.
Transcribed from original scans by AI. Minor OCR errors may remain.

