
CONTROL LINE SCALE
Bill Boss 77-06 269th Street, New Hyde Park NY 11040
BUILDING WITH PAPER
In last month's column I introduced Ken Long's approach to scratch-building a control-line (CL) scale model using readily available corrugated cardboard and card stock material. This month I will provide some ideas on construction.
Tools
- A Stanley knife or box knife is best for cutting straight lines or long sweeping curves.
- An X-Acto™ knife with a #11 blade cuts well on sharp curves.
- Scissors are not good for cutting corrugated material; they squeeze the fluted edges and make for poor alignment and gluing.
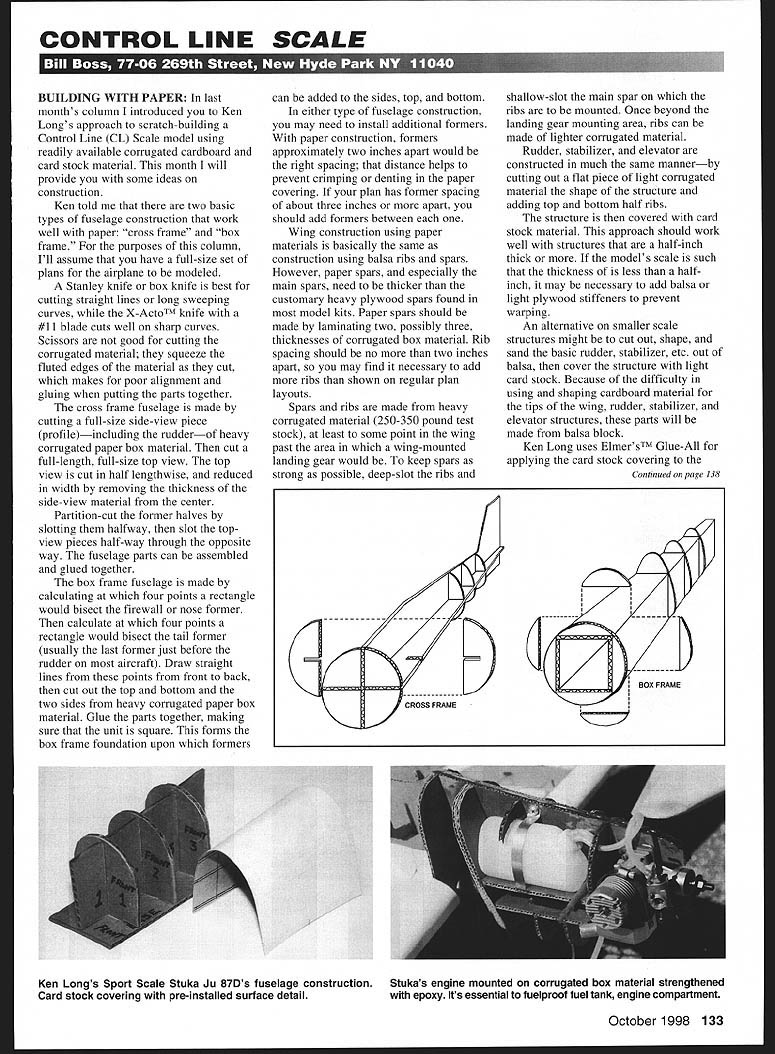
Assume you have a full-size set of plans for the airplane to be modeled. There are two basic types of fuselage construction that work well with paper: cross-frame and box-frame.
Fuselage — Cross-frame
- Cut a full-size side-view piece (profile), including the rudder, from heavy corrugated paper box material.
- Cut a full-length, full-size top view. Cut the top view in half lengthwise and reduce each half in width by removing the thickness of the side-view material from the center.
- Partition-cut the former halves by slotting them halfway through the top-view pieces in the opposite direction.
- Assemble and glue the fuselage parts together.
Fuselage — Box-frame
- Calculate the four points where a rectangle would bisect the firewall or nose former; do the same for the tail former.
- Draw straight lines from these points front to back, then cut out the top, bottom, and two sides from heavy corrugated paper box material.
- Glue the parts together, ensuring the unit is square. This forms the box-frame foundation upon which formers can be added to the sides, top, and bottom.
In either type of fuselage construction, you may need additional formers. With paper construction, formers approximately two inches apart are recommended to prevent crimping or denting of the paper covering. If your plan shows former spacing of about three inches, add formers between each one.
Wing Construction
Wing construction using paper materials is basically the same as using balsa ribs and spars, but with some important differences:
- Paper spars, especially main spars, must be thicker than typical kit plywood spars. Make spars by laminating two or three thicknesses of corrugated box material.
- Rib spacing should be no more than two inches apart; you may need more ribs than shown on regular plans.
- Use heavy corrugated material (250–350 pound test stock) for spars and ribs at least to the point past any wing-mounted landing gear.
- Deep-slot the ribs and shallow-slot the main spar where ribs mount to keep the spars strong.
- Beyond the landing gear area, ribs can be lighter corrugated material.
Tail Surfaces and Tips
Rudder, stabilizer, and elevator are constructed similarly: cut a flat shape from light corrugated material and add top and bottom half ribs. Because tips (wing tips, rudder/stabilizer/elevator tips) are difficult to shape from cardboard, make those parts from balsa block. On smaller-scale structures you might cut, shape, and sand the basic surfaces from balsa and then cover them with light card stock.
Covering
- Cover the structure with card stock material. This works well on structures a half-inch thick or more.
- If the model's scale results in thickness less than a half-inch, add balsa or light plywood stiffeners to prevent warping.
Adhesives and Strengthening
- Ken Long uses Elmer's Glue-All for applying the card stock covering to the airplane. For areas requiring stiffening and additional strength, use 5- and 30-minute epoxy.
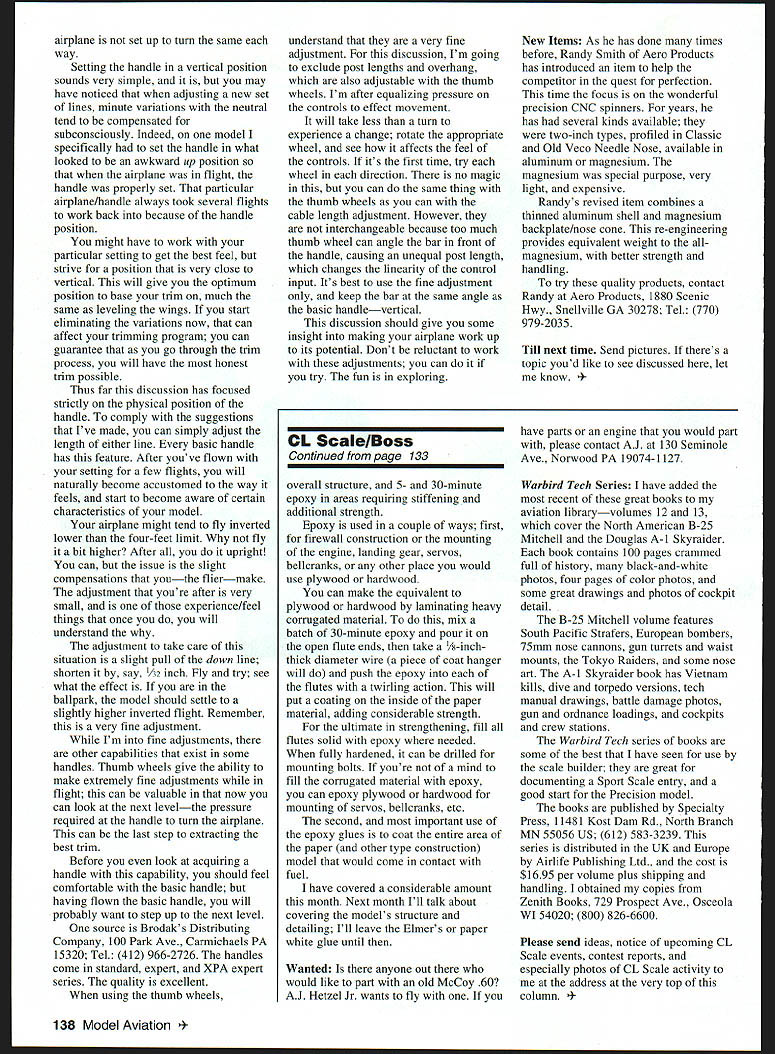
- Epoxy is used for firewall construction and mounting the engine, landing gear, servos, bellcranks, or any place you would normally use plywood or hardwood.
- You can make an equivalent to plywood or hardwood by laminating heavier corrugated material. To strengthen corrugated flutes:
- Mix a batch of 30-minute epoxy and pour it on the open flute ends.
- Use a 1/8-inch-diameter wire (a piece of coat hanger will do) and push the epoxy into each flute with a twirling action to coat the inside surfaces.
- For ultimate strength, fill all flutes solid with epoxy where needed. When fully hardened, the area can be drilled for mounting bolts.
- If you prefer not to fill the corrugated material with epoxy, glue plywood or hardwood patches for mounting servos, bellcranks, etc.
- Epoxy should also be used to coat the entire area of the paper (and other) construction that would come in contact with fuel.
I have covered a considerable amount this month. Next month I'll talk about covering the model's structure and detailing; I'll leave the Elmer's or paper white glue discussion until then.
HANDLE POSITION AND TRIM
Setting the handle in a near-vertical position is important. When adjusting a new set of lines, minute variations in neutral tend to be compensated for subconsciously. You should strive for a handle position very close to vertical to give you the optimum base for trimming, much as you would when leveling the wings. Eliminating variations early gives the most honest trim possible.
Adjusting neutral can be done by changing the length of either line — every basic handle allows this. After flying with a chosen setting for a few flights you'll become accustomed to how it feels and notice model characteristics.
If your airplane tends to fly inverted lower than desired, try flying it a bit higher first. Small compensations by the flier can mask the needed adjustment. To raise inverted flight slightly, shorten the down line by a very small amount (for example, 1/32 inch). Fly and observe the effect; these are very fine adjustments.
Some handles have thumb wheels that permit extremely fine adjustments while in flight. This allows you to refine not only neutral but the pressure required at the handle to turn the airplane. Before acquiring a handle with thumb wheels, be comfortable with the basic handle. One source is Brodak's Distributing Company, 100 Park Ave., Carmichaels PA 15320; Tel.: (412) 966-2726. Brodak offers standard, expert, and XPA expert series handles of excellent quality.
When using thumb wheels:
- Understand they provide very fine adjustments. Rotate the appropriate wheel less than one turn to see a change.
- Try each wheel in each direction the first time to learn their effects.
- Avoid excessive wheel adjustment that changes the angle of the bar in front of the handle, as this can create unequal post length and alter the linearity of control input.
- Keep the bar at the same angle as the basic handle—vertical—using the thumb wheels only for fine trimming.
Work with these adjustments to get your airplane performing to its potential. The fun is in exploring and refining.
Till next time. Send pictures. If there's a topic you'd like discussed here, let me know.
NEW ITEMS
Randy Smith of Aero Products has introduced revised Precision CNC spinners. Previously available two-inch types were profiled in Classic and Old Vee Needle Nose, in aluminum or magnesium (magnesium being special-purpose, very light, and expensive). The revised item combines a thinned aluminum shell with a magnesium backplate/nose cone, providing equivalent weight to all-magnesium spinners with better strength and handling.
To try these spinners, contact: Aero Products 1880 Scenic Hwy., Snellville GA 30278 Tel.: (770) 979-2035
WANTED
Is there anyone who would like to part with an old McCoy 60? A.J. Hetzel Jr. wants to fly with one. If you have parts or an engine to part with, please contact: A.J. Hetzel Jr. 130 Seminole Ave., Norwood PA 19074-1127
WARBIRD TECH SERIES
I recently added Volumes 12 and 13 of the Warbird Tech series to my aviation library. Volume 12 covers the North American B-25 Mitchell and Volume 13 covers the Douglas A-1 Skyraider. Each book contains 100 pages of history, many black-and-white photos, color paint schemes, and detailed drawings and photos of cockpits and other details.
Highlights:
- B-25 Mitchell: South Pacific strafers, European bombers, 75mm nose cannons, gun turrets and waist guns, The Tokyo Raiders, and nose art.
- A-1 Skyraider: Vietnam service, dive and torpedo versions, technical manual drawings, battle damage photos, ordnance loadings, and crew stations.
The Warbird Tech series is an excellent resource for the scale builder and useful for Sport Scale and Precision entries.
Publisher and ordering: Specialty Press 11481 Kost Dam Rd., North Branch MN 55056 USA Tel.: (612) 583-3239 Distributed in the UK and Europe by Airlife Publishing Ltd. Price: $16.95 per volume plus shipping and handling. I obtained my copies from Zenith Books, 729 Prospect Ave., Osceola WI 54020; Tel.: (800) 826-6600.
Please send ideas, notices of upcoming CL Scale events, contest reports, and especially photos of CL Scale activity to me at the address at the very top of this column.
Transcribed from original scans by AI. Minor OCR errors may remain.

