
CONTROL LINE: SCALE
Bill Boss 77-06 269th Street, New Hyde Park, NY 11040
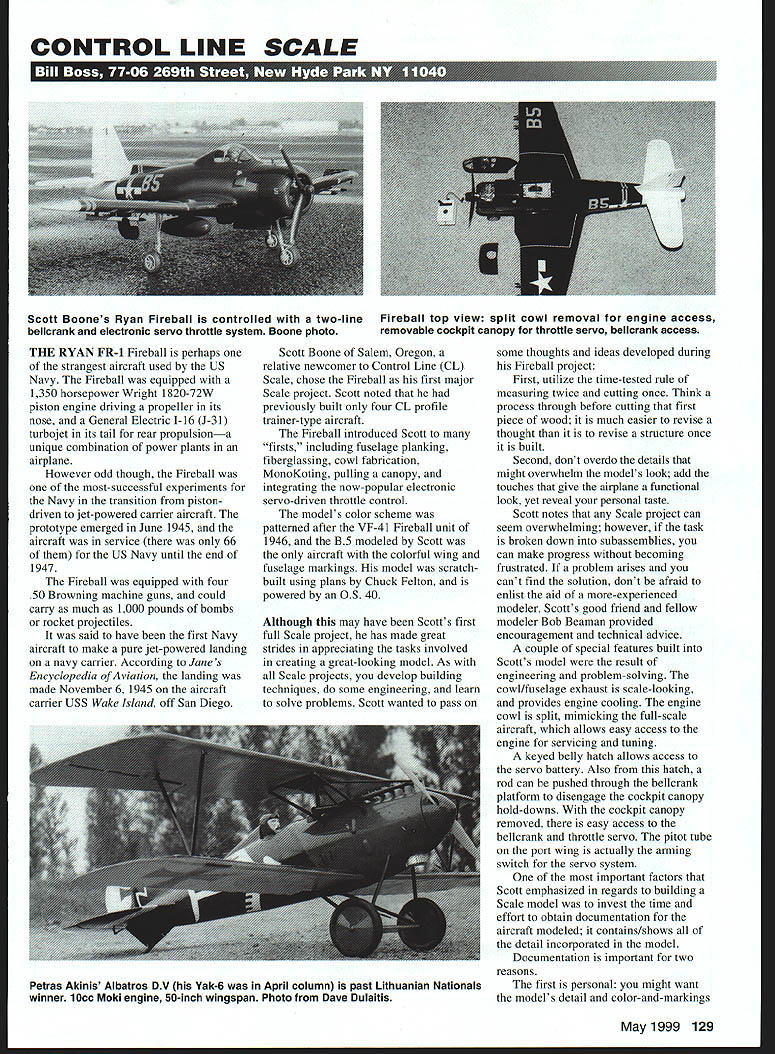
The Ryan FR-1 Fireball is perhaps the strangest aircraft used by the U.S. Navy. The Fireball was equipped with a 1,350-horsepower Wright 1820-72W piston engine driving a propeller in its nose, and a General Electric I-16 (J-31) turbojet in its tail for rear propulsion — a unique combination of power plants in an airplane.
Despite its oddity, the Fireball was one of the most successful Navy experiments in the transition from piston-driven to jet-powered carrier aircraft. The prototype emerged in June 1945, and the aircraft (only 66 were built) served the U.S. Navy until the end of 1947.
The Fireball was equipped with four .50 Browning machine guns and could carry as much as 1,000 pounds of bombs or rocket projectiles. It is said to have been the first Navy aircraft to make a pure jet-powered landing on a carrier. According to Jane’s Encyclopedia of Aviation, that landing was made November 6, 1945, on the aircraft carrier USS Wake Island, off San Diego.
Scott Boone’s Fireball
Scott Boone of Salem, Oregon — a relative newcomer to Control Line (CL) Scale — chose the Fireball as his first major Scale project. Scott noted he had previously built only four CL profile trainer-type aircraft.
The Fireball project introduced Scott to many "firsts," including fuselage planking, fiberglassing, cowl fabrication, MonoKoting, pulling a canopy, and integrating the now-popular electronic servo-driven throttle control.
The model’s color scheme was patterned after the VF-41 Fireball unit of 1946. The B-5 Scott modeled was the only aircraft with the colorful wing and fuselage markings. His model was scratchbuilt using plans by Chuck Felton and is powered by an O.S. 40 engine.
Although this was Scott’s first full Scale project, he made great strides in appreciating the tasks involved in creating a great-looking model.
Building advice and lessons learned
As Scale projects develop, you develop building techniques, do some engineering, and learn to solve problems. Scott wanted to pass on some thoughts and ideas developed during his Fireball project:
- Measure twice, cut once. Think the process through before cutting that first piece of wood; it is much easier to revise a thought than to revise a structure once it is built.
- Don’t overdo the details that might overwhelm the model’s appearance; add touches that give the airplane a functional look, yet reveal your personal taste.
Scott notes that any Scale project can seem overwhelming; however, if the task is broken down into subassemblies, you can make progress without becoming frustrated. If a problem arises and you can’t find the solution, don’t hesitate to enlist the aid of a more experienced modeler. Scott’s good friend Bob Beaman provided encouragement and technical advice.
Special features and problem-solving
A couple of special features built into Scott’s model were the result of engineering and problem-solving:
- The cowl/fuselage exhaust is scale-looking and provides engine cooling.
- The engine cowl is split, mimicking the full-scale aircraft, allowing easy access to the engine for servicing and tuning.
- A keyed belly hatch allows access to the servo battery. From this hatch, a rod can be pushed through the bellcrank platform to disengage the cockpit canopy hold-downs. With the canopy removed there is easy access to the bellcrank and throttle servo.
- The pitot tube on the port wing serves as the arming switch for the servo system.
Documentation: why it matters
One of the most important factors Scott emphasized in building a Scale model is to invest the time and effort to obtain documentation for the airplane being modeled; documentation shows the details incorporated in the model and is essential for accuracy.
Documentation is important for two reasons:
- Personal: you may want the model’s details and color-and-markings to replicate a particular airplane you favor.
- Competition: documentation could be the deciding factor in whether the model makes the winners’ circle. Great models entered in local and national competitions don’t win because of lack of proper documentation. Make sure documentation is present that shows the details you included and that it conforms to the rules and regulations of the AMA Scale event entered.
Scott concluded with this question: If you scratchbuild, might you be able to find a kit to build? His answer: a person who scratch-builds gains valuable knowledge and skills along the way; scratchbuilding teaches something about structure, and the aircraft might be repaired if it’s involved in a flying mishap. Patient rewards will come in time; relax and keep the project fun. Scott learned that haste leads to rushed, imprecise results.
Scott thanks his wife and daughter for their support during the year it took to complete the project.
Recommended publications
Documentation was an important item noted above. One useful source:
- Wind Canyon Publishing has a series of Aero Albums (20 volumes) created by Kern Rust and Paul Matt that cover aircraft in the Pioneer, World War I, Golden Age, and World War II eras. The albums include three views, profiles, and many illustrations useful for Scale documentation.
For those interested in Goodyear and Formula One Air Racing:
- Robert Hirsch has volumes covering 1947–1967 and 1967–1995, containing more than 1,000 photographs and 160 scale drawings. Each volume is priced at $24.95 plus $3 shipping and handling.
For complete details on the Aero and Racing Albums, write to: Wind Canyon Publishing, Box 1445, Niceville, FL 32588-1445.
Hint for the Workshop: How to Clean an Oil‑Soaked Airframe
Reprinted from James Strauss (first published in the Valley Aeromodellers newsletter and reprinted in the Indy Sportsliner CL club newsletter):
It is possible to restore even a severely oil‑soaked structure with a little elbow grease, time, and patience. You’ll need a 12- to 16-ounce bottle of rubbing (isopropyl) alcohol and an 8- to 10-ounce box of cornstarch.
Steps:
- Strip the covering off the affected areas.
- Make a "soupy" slurry of the cornstarch and alcohol mixed together.
- Using a paintbrush, apply the mixture liberally to the oily area. Wait 20 minutes, then apply a second coat (make sure the alcohol is replenished so the mix stays soupy).
- After drying overnight, use a stiff-bristle brush to clean off the now oil-laden cornstarch. Repeat this process until the starch comes off in nearly powder form.
- Wet a cloth with alcohol and wash the wood. When it dries, the wood will be almost as good as new and ready to fly with new vigor.
Please send ideas, notice of upcoming CL Scale events, contest reports, and especially photos of CL Scale activity to Bill Boss at the address at the top of this column.
Transcribed from original scans by AI. Minor OCR errors may remain.

