
Control Line: Scale
Mike Stott
LAST MONTH I mentioned that we would talk more about metal-covered models. Well, I got in touch with Bill Harney of Lexington, Mass., who I consider to be the most qualified on this subject, and had him take time out from building to give us some tips on metal covering. I had to do some fast talking to get him to stop working on his model since he has been putting in 40 to 60 hours a week on it in order to have it finished to perfection in time for the Nats. Bill obtained most of his aluminum used in the covering process from offset photo printing shops. The etchings are only on one side of the plate so that side is used as the cement side on the model. It is .005 thick, fairly hard and yet supple enough to be bent and punched. Another source of aluminum is sold in art supply stores and is also .005 thick. This metal is very soft and excellent for compound curves, deep etchings and small fairings. As it is formed it work hardens. These two metals will give you a good combination to choose from in covering the various parts of your model. The suggested cement is Devcon "Liquid Rubber," since it works the same as contact cement yet only takes about 5 minutes to set up, ready for application. Excess cement can be cleaned up with a lacquer thinner. And it is also fuel-proof. On small pieces Devcon 30 Second Contact Cement can be used with good results. Before you start with the actual covering process, research your subject. Collect as much information on the actual plating of your aircraft as you can. Actual photos of the aircraft from many different angles are very helpful. All your research work and advance planning will really pay off in how realistic your model looks.
To make rivets, punch the aluminum from the inside of the formed sheet using a sewing awl or some other sharp pointed instrument. Also you will need a hacksaw or do-all blade for correct spacing of the rivets. Before you begin to punch the rivets place a sheet of 1/8" plexiglass under the aluminum covering. Plexiglass is the best work surface since it gives just enough for the proper rivet height. Tracing or pounce wheels can be used to speed up the rivet making process, but only if the wheel complies with the rivet spacing scale required for your model. After punching the rivets, burnish the metal lightly with a hardwood dowel which is rounded on one end. Burnish on the same side as the rivets have been punched. If flush rivets are what you need, burnish completely flat. For brazier head rivets, burnish lightly and rivet "heads" on the outside will make a slight dimple in the metal. Dzus fasteners are made by sharpening a small piece of tubing and pressing from the outside of the skin, then scoring the screw slot with a sharp knife and burnishing from the inside. The screwhead will bulge slightly from the burnishing and give the effect of a screw set into the covering.
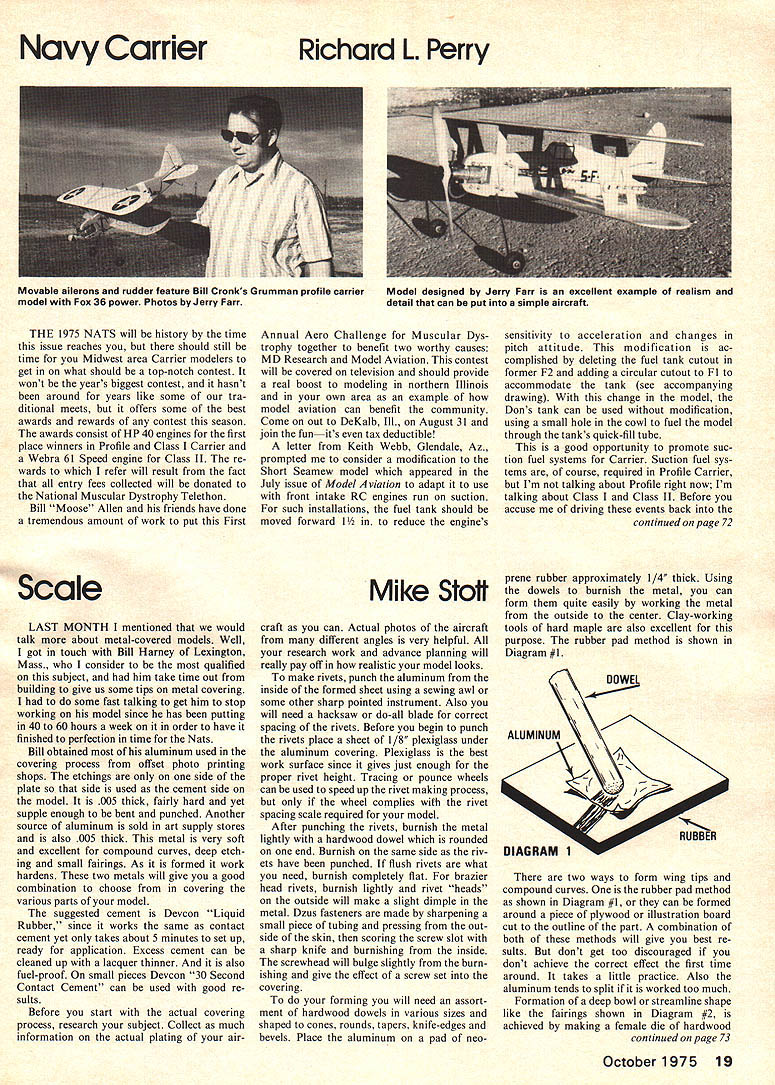
To do your forming you will need an assortment of hardwood dowels in various sizes and shaped to cones, rounds, tapers, knife-edges and bevels. Place the aluminum on a pad of neoprene rubber approximately 1/4" thick. Using the dowels to burnish the metal, you can form them quite easily by working the metal from the outside to the center. Clay-working tools of hard maple are excellent for this purpose. The rubber pad method is shown in Diagram #1.
There are two ways to form wing tips and compound curves. One is the rubber pad method, as shown in Diagram #1, or they can be formed around a piece of plywood or illustration board cut to the outline of the part. A combination of both of these methods will give you the best results. But don't get too discouraged if you don't achieve the correct effect the first time around. It takes a little practice. Also the aluminum tends to split if it is worked too much.
Formation of a deep bowl or streamline shape like the fairings shown in Diagram #2 is achieved by making a female die of hardwood.
CL Scale continued from page 19
or plywood to the shape of the part. Place the aluminum over the opening and stretch covering with your dowels, always working from outside to center of the depression. After you have the shaping completed burnish the edge flat and trim to size needed. For crush resistance, fill the hole with epoxy or fiberglass resin. Soft aluminum is best for this type of forming.
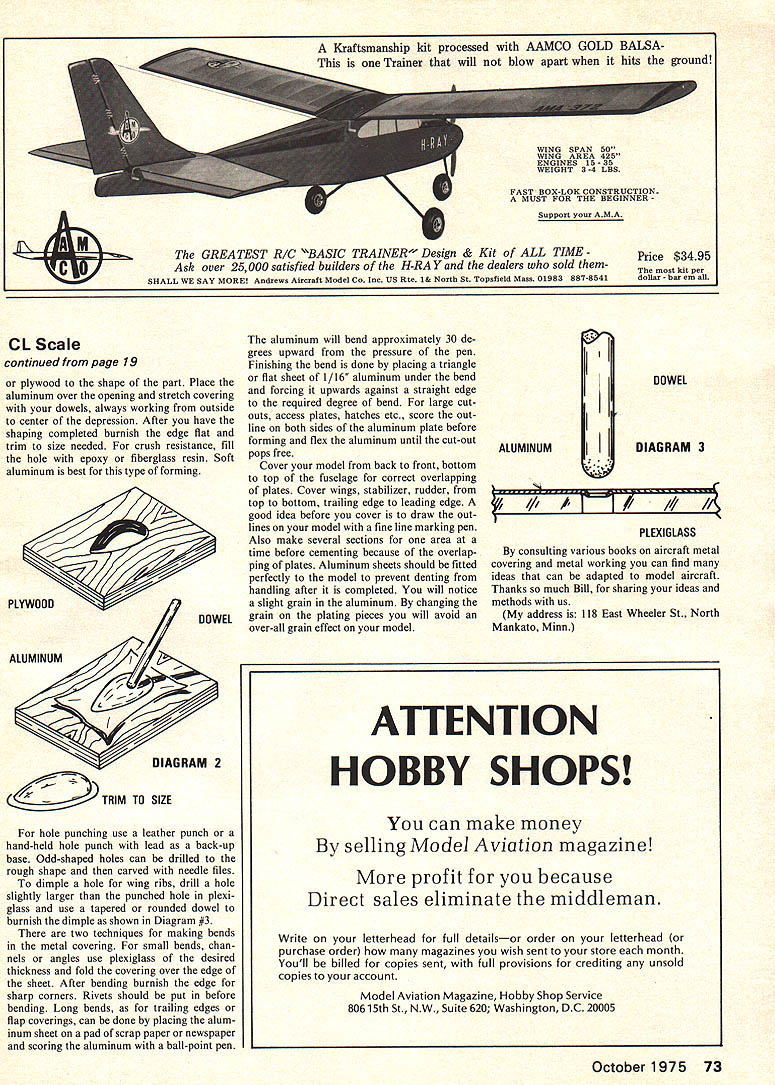
For hole punching use a leather punch or a hand-held hole punch with lead as a back-up base. Odd-shaped holes can be drilled to the rough shape and then carved with needle files. To dimple a hole for wing ribs, drill a hole slightly larger than the punched hole in plexiglass and use a tapered or rounded dowel to burnish the dimple as shown in Diagram #3.
There are two techniques for making bends in the metal covering. For small bends, channels or angles use plexiglass of the desired thickness and fold the covering over the edge of the sheet. After bending, burnish the edge for sharp corners. Rivets should be put in before bending. Long bends, as for trailing edges or flap coverings, can be done by placing the aluminum sheet on a pad of scrap paper or newspaper and scoring the aluminum with a ball-point pen.
The aluminum will bend approximately 30 degrees upward from the pressure of the pen. Finishing the bend is done by placing a triangle or flat sheet of 1/16" aluminum under the bend and forcing it upwards against a straight edge to the required degree of bend. For large cut-outs, access plates, hatches, etc., score the outline on both sides of the aluminum plate before forming and flex the aluminum until the cut-out pops free.
Cover your model from back to front, bottom to top of the fuselage for correct overlapping of plates. Cover wings, stabilizer, rudder, from top to bottom, trailing edge to leading edge. A good idea before you cover is to draw the outlines on your model with a fine line marking pen. Also make several sections for one area at a time before cementing because of the overlapping of plates. Aluminum sheets should be fitted perfectly to the model to prevent denting from handling after it is completed. You will notice a slight grain in the aluminum. By changing the grain on the plating pieces you will avoid an over-all grain effect on your model.
By consulting various books on aircraft metal covering and metal working you can find many ideas that can be adapted to model aircraft. Thanks so much Bill, for sharing your ideas and methods with us. (My address is: 118 East Wheeler St., North Mankato, Minn.)
Transcribed from original scans by AI. Minor OCR errors may remain.

