
Control Line: Scale
Mike Stott
THIS MONTH'S ARTICLE is kind of a combination of ideas and information I've had these things on my list of "writeables" for quite some time now, but always seemed to run out of space before I reached them. So read through them and see if there is anything that could pertain to your model.
I've really surprised a few guys when I've suggested they try using a RC scale kit for their next CL scale project. When choosing a scale kit, do not rule out models that you thought to be designed strictly for RC. Several kits that were designed for RC have performed extremely well in CL, in my opinion; a scale model is a scale model, not CL or RC. So this should open up a wider selection of kits to choose from.
Basically, the things you would have to convert or add would be: bellcrank location, provision for leadouts, and position the center of gravity farther forward. Also stay on the high side of the engine recommendation. Other than these few changes, it should not be difficult to convert. Another good tip in this same line is to read all scale information, whether CL or RC. The building tips can be used by either group.
Last month we discussed methods of detaching a wing for traveling purposes. For biplane enthusiasts there are also some methods of detaching wings. One of the easiest is to use the plug-in method at the fuselage on your cabane struts. This is not the only method available to you but is the most widely used. Epoxy brass tubing to formers in the fuselage leaving just a small hole showing on the outside. Then it is just a matter of slipping the cabane struts into the small holes on the outside of your fuselage.
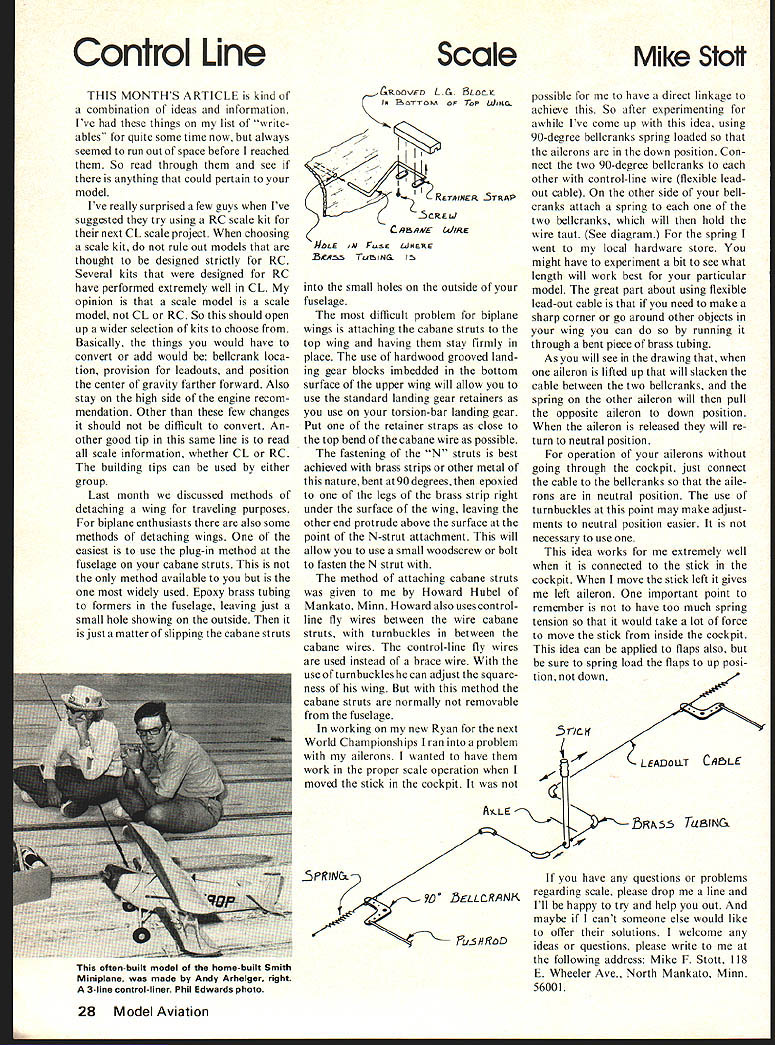
The most difficult problem for biplane wings is attaching the cabane struts to the top wing and having them stay firmly in place. The use of hardwood grooved landing gear blocks imbedded in the bottom surface of the upper wing will allow you to use the standard landing gear retainers if you use torsion-bar landing gear. Put one of the retainer straps as close to the top bend of the cabane wire as possible.
The fastening of the "N" struts is best achieved with brass strips or other metal of this nature, bent at 90 degrees, then epoxied to one of the legs of the brass strip right under the surface of the wing, leaving the other end protrude above the surface at the point of the N-strut attachment. This will allow you to use a small woodscrew or bolt to fasten the N strut with.
The method of attaching cabane struts was given to me by Howard Hubel of Mankato, Minn. Howard also uses control-line fly wires between the wire cabane struts with turnbuckles in between the cabane wires. The control-line fly wires are used instead of a brace wire. With the use of turnbuckles he can adjust the squareness of his wing. But with this method the cabane struts are normally not removable from the fuselage.
In working on my new Ryan for the next World Championships I ran into a problem with my ailerons. I wanted to have them work in the proper scale operation when I moved the stick in the cockpit. It was not possible for me to have a direct linkage to achieve this. So after experimenting for awhile I've come up with this idea, using 90-degree bellcranks spring loaded so that the ailerons are in the down position. Connect the two 90-degree bellcranks to each other with control-line wire (flexible leadout cable). On the other side of your bellcranks attach a spring to each one of the two bellcranks, which will then hold the wire taut. (See diagram.) For the spring I went to my local hardware store. You might have to experiment a bit to see what length will work best for your particular model. The great part about using flexible lead-out cable is that you can make a sharp corner or go around other objects in your wing; you can do so by running it through a bent piece of brass tubing. As you will see in the drawing, when one aileron is lifted up that will slacken the cable between the two bellcranks, and the spring on the other aileron will then pull the opposite aileron to the down position. When the aileron is released they will return to neutral position.
For operation of your ailerons without going through the cockpit, just connect the cable to the bellcranks so that the ailerons are in the neutral position. The use of turnbuckles at this point may make adjustments to neutral position easier. It is not necessary to use one.
This idea works for me extremely well when it is connected to the stick in the cockpit. When I move the stick left it gives me left aileron. One important point to remember is not to have too much spring tension so that it would take a lot of force to move the stick from inside the cockpit. This idea can be applied to flaps also, but be sure to spring load the flaps up position, not down.
If you have any questions or problems regarding scale, please drop me a line and I'll be happy to try and help you out. And maybe if I can't someone else would like to offer their solutions. I welcome any ideas or questions. Please write to me at the following address: Mike F. Stott, 118 E. Wheeler Ave., North Mankato, Minn. 56001.
Transcribed from original scans by AI. Minor OCR errors may remain.

