
Control Line Scale
Bill Boss
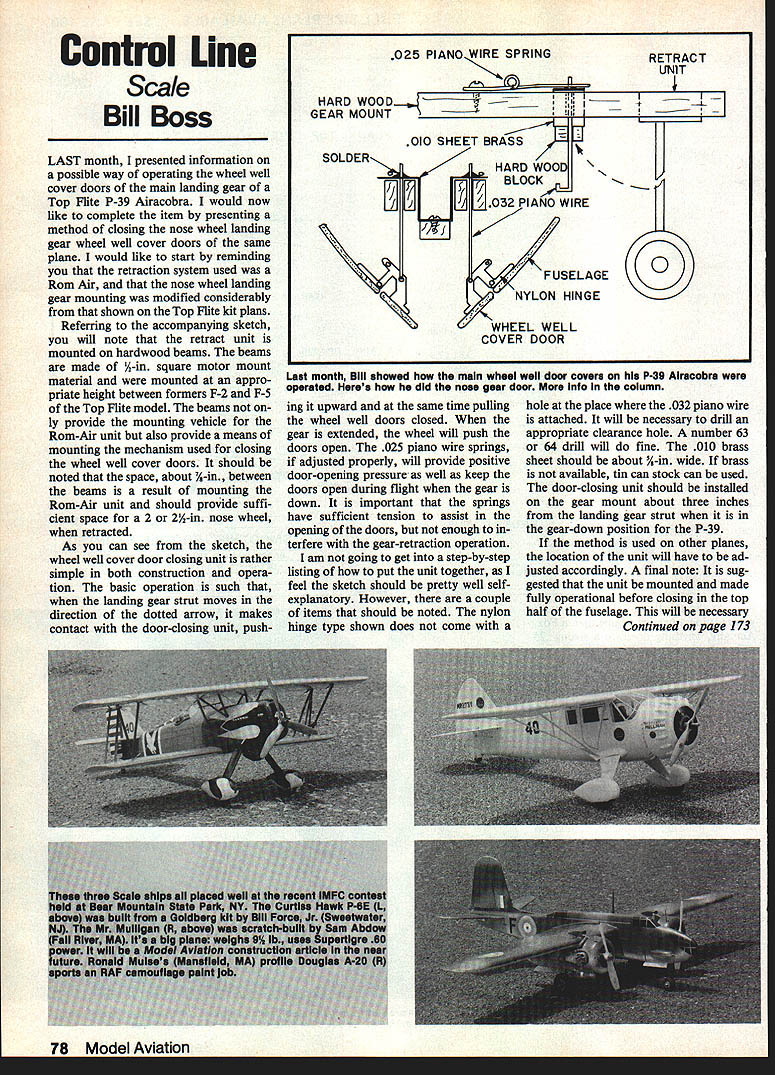
Last month I presented information on a possible way of operating the wheel well cover doors of the main landing gear of a Top Flite P-39 Airacobra. I would now like to complete the item by presenting a method of closing the nose wheel landing gear wheel well cover doors of the same plane. I would like to start by reminding you that the retraction system used was a Rom-Air, and that the nose wheel landing gear mounting was modified considerably from that shown on the Top Flite kit plans.
Referring to the accompanying sketch, you will note that the retract unit is mounted on hardwood beams. The beams are made of 1/4-in. square motor mount material and were mounted at an appropriate height between formers F-2 and F-5 of the Top Flite model. The beams not only provide the mounting vehicle for the Rom-Air unit but also provide a means of mounting the mechanism used for closing the wheel well cover doors. It should be noted that the space, about 1/4 in. between the beams, is a result of mounting the Rom-Air unit and should provide sufficient space for a 2- or 2-1/4-in. nose wheel when retracted.
As you can see from the sketch, the wheel well cover door closing unit is rather simple in both construction and operation. The basic operation is such that, when the landing gear strut moves in the direction of the dotted arrow, it makes contact with the door-closing unit, pushing it upward and at the same time pulling the wheel well doors closed. When the gear is extended, the wheel will push the doors open. The .025 piano wire springs, if adjusted properly, will provide positive door-opening pressure as well as keep the doors open during flight when the gear is down. It is important that the springs have sufficient tension to assist in opening the doors, but not enough to interfere with the gear-retraction operation.
I am not going to give a step-by-step listing of how to put the unit together, as I feel the sketch should be pretty well self-explanatory. However, there are a couple of items that should be noted. The nylon hinge type shown does not come with a hole at the place where the .032 piano wire is attached. It will be necessary to drill an appropriate clearance hole. A No. 63 or 64 drill will be fine. The .010 brass sheet should be about 3/8 in. wide. If brass is not available, tin can stock can be used.
The door-closing unit should be installed on the gear mount about three inches from the landing gear strut when it is in the gear-down position for the P-39. If the method is used on other planes, the location of the unit will have to be adjusted accordingly. A final note: it is suggested that the unit be mounted and made fully operational before closing in the top half of the fuselage. This will be necessary so that adjustments for best operation of the doors can be made to the .025 piano wire return springs or to the thickness of the hardwood block that the gear leg pushes against.
CL Scale — Continued
Continued from page 78
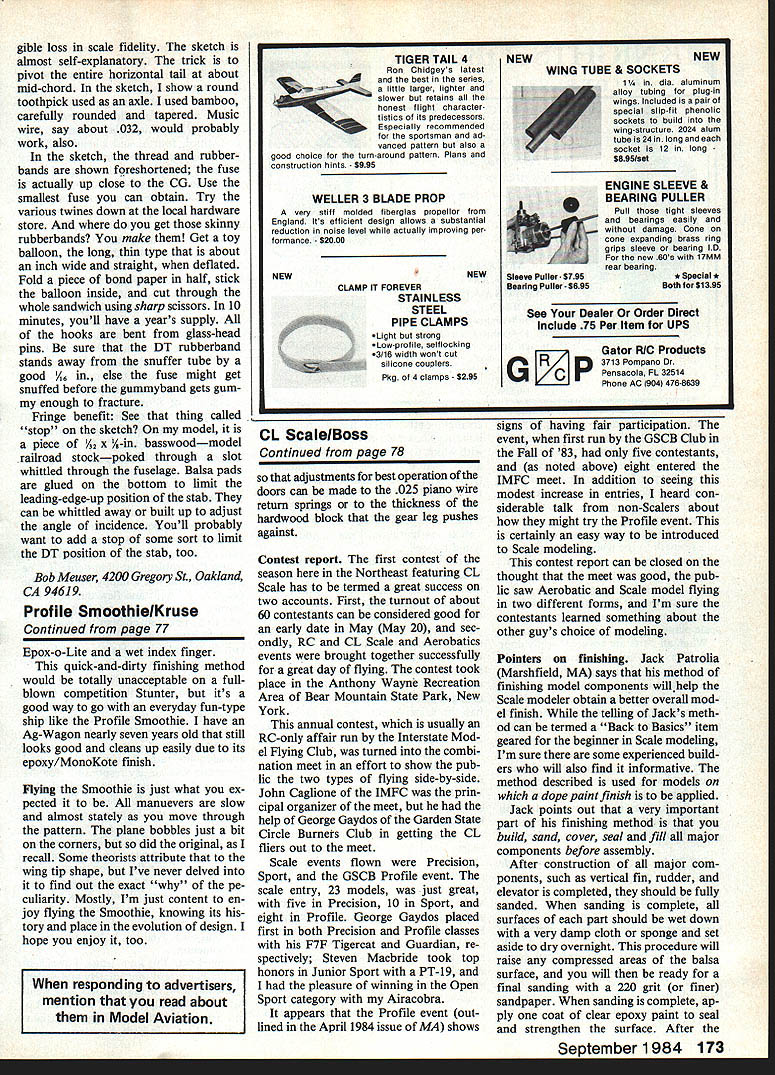
Contest report. The first contest of the season here in the Northeast featuring CL Scale has to be termed a great success on two accounts. First, the turnout of about 60 contestants can be considered good for an early date in May (May 20), and secondly, RC and CL Scale and Aerobatics events were brought together successfully for a great day of flying. The contest took place in the Anthony Wayne Recreation Area of Bear Mountain State Park, New York.
This annual contest, which is usually an RC-only affair run by the Interstate Modelers Flying Club, was turned into the combination meet in an effort to show the public the two types of flying side-by-side. John Cagione of the IMFC was the principal organizer of the meet, but he had the help of George Gaydos of the Garden State Circle Burners Club in getting the CL fliers out to the meet.
Scale events flown were Precision, Sport, and the GSCB Profile event. The scale entry, 23 models, was just great, with five in Precision, ten in Sport, and eight in Profile. George Gaydos placed first in both Precision and Profile classes with his F7F Tigercat and Guardian, respectively; Steven Macriado took top honors in Junior Sport with a PT-19; and I had the pleasure of winning in the Open Sport category with my Airacobra.
It appears that the Profile event (outlined in the April 1984 issue of MA) shows signs of having fair participation. The event, when first run by the GSCB Club in the fall of '83, had only five contestants, and, as noted above, eight entered the IMFC meet. In addition to seeing this modest increase in entries, I heard considerable talk from non-scalers about how they might try the Profile event. This is certainly an easy way to be introduced to scale modeling.
This contest report can be closed with the thought that the meet was good, the public saw Aerobatic and Scale model flying in two different forms, and I'm sure the contestants learned something about the other's type of modeling.
Pointers on finishing
Jack Patrola (Marshfield, MA) says that his method of finishing model components will help the scale modeler obtain a better overall model finish. While the telling of Jack's method can be termed a "back to basics" item for the beginner in scale modeling, I'm sure there are some experienced builders who will find it informative. The method described is used for models on which a dope paint finish is to be applied.
Jack points out that a very important part of his finishing method is that you build, sand, cover, and fill all major components before assembly.
After construction of all major components, such as vertical fin, rudder, and elevator, is completed, they should be completely sealed. When sanding is complete, all surfaces of each part should be wetted with a very damp cloth or sponge and set aside to dry overnight. This procedure will raise any compressed areas of the wood surface and will then be ready for a final sanding with 220-grit (or finer) sandpaper. When sanding is complete, apply one coat of clear epoxy paint to seal and strengthen the surface. After the epoxy paint has cured, sand lightly and apply two coats of clear dope, which will act as a filler as well as a base for the application of your choice of covering. Cover all open framework parts with silk or Silkspan. You might also want to cover all exterior balsa surfaces with the same choice of material.
Covering all exterior balsa surfaces will add strength to the wood and help to prevent stress-cracking during the model's operation. Note that silk is a better covering on open-framework components for simulating the fabric covering used on the full-scale plane.
When all parts are covered, apply dope and filler until all parts are once again completely filled and smooth. Then assemble the components, except for hinged surfaces. When assembly is completed, construct any required fillets using the same basic procedure as outlined above. When all major components are finished and assembly complete, you are ready for application of the final paint finish and scale detailing. Final assembly of all hinged surfaces can be done when the final finish painting is completed. John says that a little extra effort and patience pays off in a better-than-average finish.
Bill Ross 77-06 269th St. New Hyde Park, NY 11040
Transcribed from original scans by AI. Minor OCR errors may remain.

