
Control Line: Scale
Bill Boss
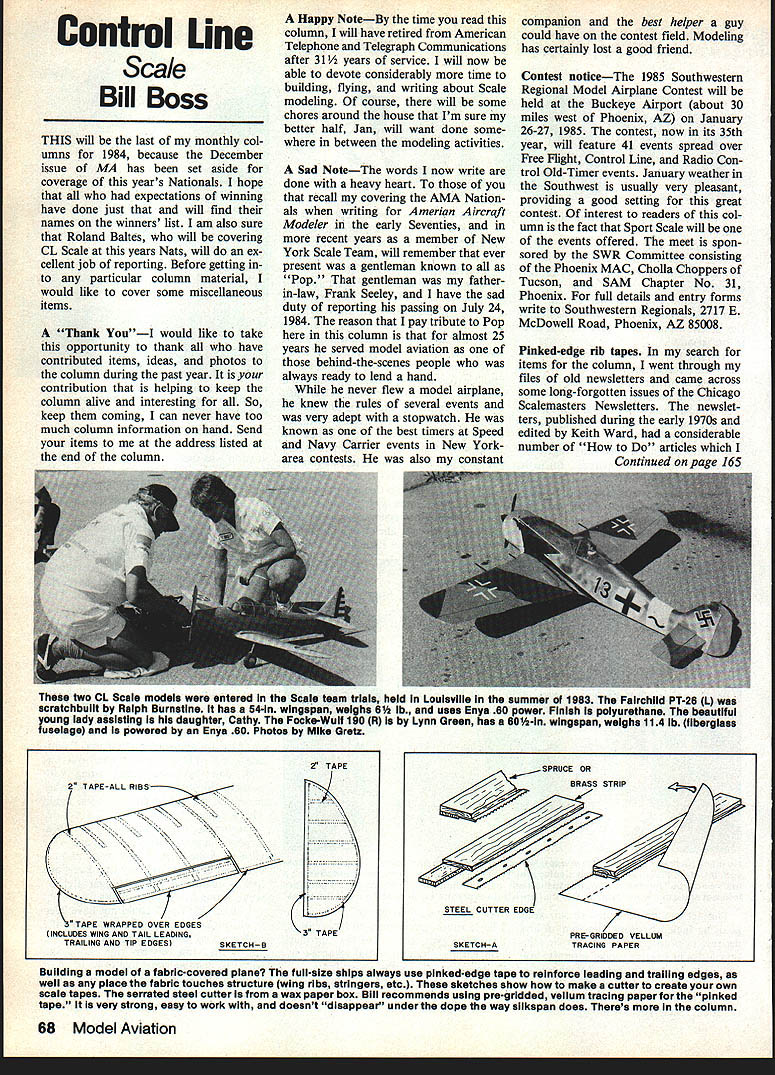
This will be the last of my monthly columns for 1984, because the December issue of MA has been set aside for coverage of this year's Nationals. I hope that all who had expectations of winning have done just that and will find their names on the winners' list. I am also sure that Roland Baltes, who will be covering CL Scale at this year's Nats, will do an excellent job of reporting. Before getting into any particular column material, I would like to cover some miscellaneous items.
Thank You
I would like to take this opportunity to thank all who have contributed items, ideas, and photos to the column during the past year. It is your contribution that is helping to keep the column alive and interesting for all. So, keep them coming. I can never have too much column information on hand. Send your items to me at the address listed at the end of the column.
A Happy Note
By the time you read this column, I will have retired from American Telephone and Telegraph Communications after 31 1/2 years of service. I will now be able to devote considerably more time to building, flying, and writing about scale modeling. Of course, there will be some chores around the house that I'm sure my better half, Jan, will want done somewhere in between the modeling activities.
A Sad Note
The words I now write are done with a heavy heart. To those of you that recall my covering the AMA Nationals when writing for American Aircraft Modeler in the early seventies, and in more recent years as a member of New York Scale Team, will remember that ever-present was a gentleman known to all as "Pop." That gentleman was my father-in-law, Frank Seeley, and I have the sad duty of reporting his passing on July 24, 1984. I pay tribute to Pop here in this column because for almost 25 years he served model aviation as one of those behind-the-scenes people who was always ready to lend a hand.
While he never flew a model airplane, he knew the rules of several events and was very adept with a stopwatch. He was known as one of the best timers at Speed and Navy Carrier events in New York-area contests. He was also my constant companion and the best helper a guy could have on the contest field. Modeling has certainly lost a good friend.
Contest Notice
The 1985 Southwestern Regional Model Airplane Contest will be held at the Buckeye Airport (about 30 miles west of Phoenix, AZ) on January 26–27, 1985. The contest, now in its 35th year, will feature 41 events spread over Free Flight, Control Line, and Radio Control Old-Timer events. January weather in the Southwest is usually very pleasant, providing a good setting for this great contest. Of interest to readers of this column is the fact that Sport Scale will be one of the events offered.
- Date: January 26–27, 1985
- Location: Buckeye Airport (about 30 miles west of Phoenix, AZ)
- Events: 41 events across Free Flight, Control Line, and Radio Control Old-Timers (includes Sport Scale)
- Sponsors: SWR Committee consisting of Phoenix MAC, Cholla Choppers of Tucson, and SAM Chapter No. 31, Phoenix
- For full details and entry forms write to: Southwestern Regionals, 2717 E. McDowell Road, Phoenix, AZ 85008
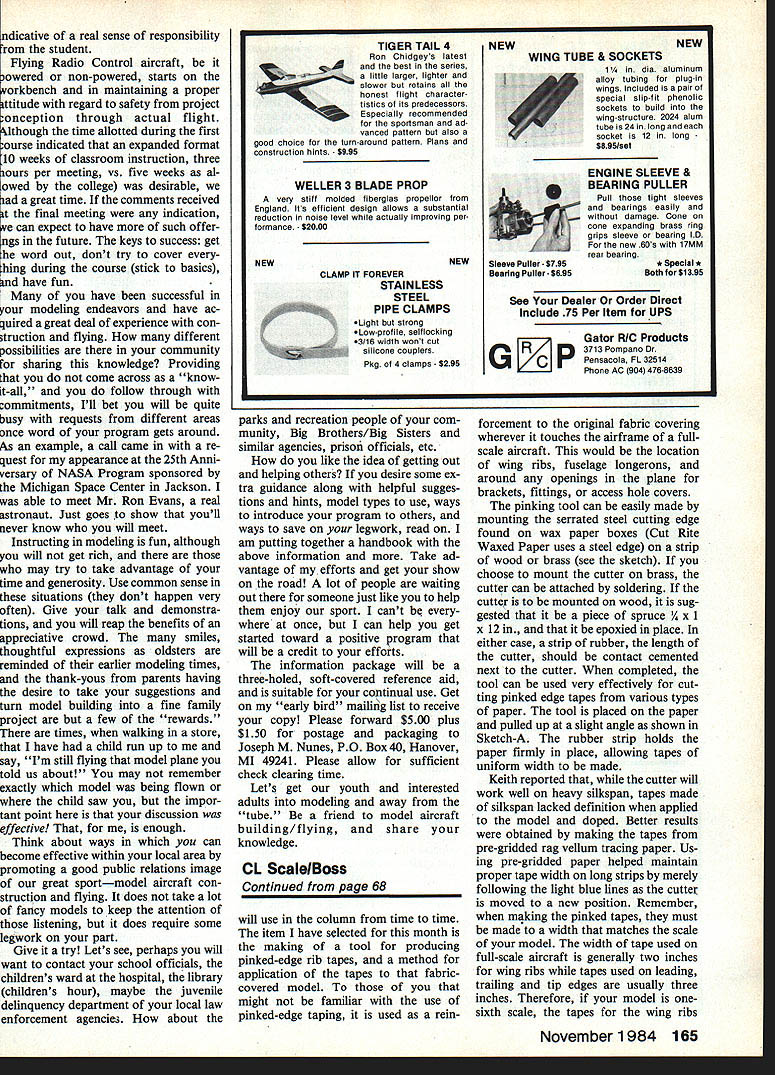
Pinked-Edge Rib Tapes
In my search for items for the column, I went through my files of old newsletters and came across some long-forgotten issues of the Chicago Scalemasters Newsletters. The newsletters, published during the early 1970s and edited by Keith Ward, had a considerable number of "How to Do" articles which I will use in the column from time to time.
The item I have selected for this month is the making of a tool for producing pinked-edge rib tapes, and a method for application of the tapes to a fabric-covered model. For those who might not be familiar with the use of pinked-edge taping, it is used as a reinforcement to the original fabric covering wherever it touches the airframe of a full-scale aircraft. Typical locations are wing ribs, fuselage longerons, and around any openings in the plane for brackets, fittings, or access covers.
#### Making the Pinking Tool
The pinking tool can be easily made by mounting the serrated steel cutting edge found on wax paper boxes (for example, Cut-Rite Waxed Paper uses a steel edge) on a strip of wood or brass. If the cutter is mounted on brass, the cutter can be attached by soldering. If the cutter is to be mounted on wood, it is suggested that it be a piece of spruce 1/4 x 1 x 12 in., and that it be epoxied in place. In either case, a strip of rubber, the length of the cutter, should be contact-cemented next to the cutter. When completed, the tool can be used very effectively for cutting pinked-edge tapes from various types of paper.
To use the cutter, place the tool on the paper and pull up at a slight angle. The rubber strip holds the paper firmly in place, allowing tapes of uniform width to be made.
It has been reported that, while the cutter will work well on heavy silkspan, tapes made of silkspan lacked definition when applied to the model and doped. Better results were obtained by making the tapes from pre-gridded vellum tracing paper. Use pre-gridded tracing paper to maintain proper tape width on long strips by following the light blue grid lines as the cutter is moved to a new position.
Remember, when making the pinked tapes, they must be sized to match the scale of your model. The width of tape used on full-scale aircraft is generally two inches for wing ribs, while tapes used on leading, trailing, and tip edges are usually three inches. Therefore, if your model is one-sixth scale, the tapes for the wing ribs would be 1/3 in. wide and those for the leading and trailing edges would be 1/2 in. wide. Sketch B (in the original article) shows typical locations of tapes on a wing and rudder.
#### Applying the Pinked Tapes
Application of the tapes to a pre-doped surface is straightforward:
- Lightly sand the area where the rib tapes are to be applied.
- Dip the tape in a cup of water with two drops of liquid detergent added as a wetting agent.
- Apply the wet tape to the model's surface using thinned Elmer's glue (thin with water 50/50 and add a drop of liquid detergent).
- Press and stretch the tape into place, keeping it wetted with the thinned glue solution.
- When the tape is firmly in place, wipe off residue with a damp cloth.
- When the tapes are dry, cover the area with a slightly thinned coat of clear dope, and you're ready for painting.
When taping is completed, your fabric-covered aircraft will be well on its way to a better appearance—and perhaps better scores.
Send items on CL Scale to Bill Boss, 77-06 269th St., New Hyde Park, NY 11040.
Transcribed from original scans by AI. Minor OCR errors may remain.

