
Control Line: Scale
Bill Boss
Flying in the Wind
FLYING IN THE WIND. One of the most dreaded things that can happen at a Control Line Scale meet is for the wind to come up heavy and put fear in the hearts of each of the competitors at flying time. It is that moment when each contestant makes the "Do I?" or "Don't I?" decision to fly his model that day. It is just this situation that leads Orin Humphries (Scale columnist for Flying Lines newsletter, News of Northwest CL Model Aviation) to make the statement that the typical Scale model can be 10 years old and only have 70 or fewer flights on it. Why should we fly in the wind and risk all that work? Orin has learned, and perhaps you have too, through sometimes bitter experience, how to fly in the wind and has the following advice to those who have not.
A control line model flies through a constantly changing atmosphere. At one moment the wind is dead calm, and the next it is blowing quite hard, or perhaps it has changed direction, and so on. The speed of the plane through the air combines with the speed and direction of the air itself to make a "relative wind over the wing of our model." This relative wind determines how much lift is being generated from moment to moment. With a headwind, the model "balloons," gaining altitude; with the wind on the outboard wingtip or on the tail, the model sags, losing altitude. The question at hand: what can we do to keep the model from sagging or losing altitude?
There are any number of answers you might get to that question. Probably the most common answer would be to gain as much altitude as possible so that you can make up speed by diving on that portion of the circle where the model will be sagging, and thus be able to maintain a reasonable altitude. While this might work in a very light wind, it is not the procedure to use in very heavy wind conditions.
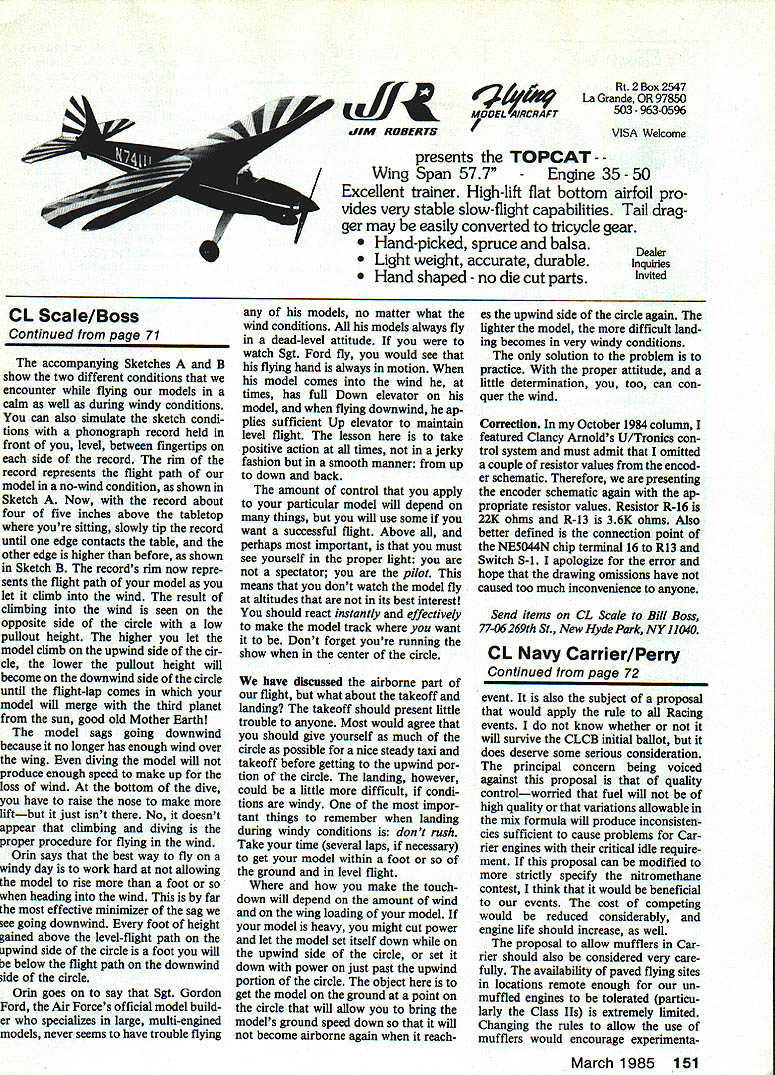
The accompanying Sketches A and B show the two different conditions that we encounter while flying our models in calm as well as windy conditions. You can also simulate the sketch conditions with a phonograph record held in front of you, level, between fingertips on each side of the record. The rim of the record represents the flight path of our model in a no-wind condition, as shown in Sketch A. Now, with the record about four or five inches above the tabletop where you're sitting, slowly tip the record until one edge contacts the table; the other edge is higher than before, as shown in Sketch B. The record's rim now represents the flight path of your model as you let it climb into the wind. The result of climbing into the wind is seen on the opposite side of the circle with a low pullout height. The higher you let the model climb on the upwind side of the circle, the lower the pullout height will become on the downwind side of the circle until the flight lap in which your model will merge with the third planet—Mother Earth!
The model sags going downwind because it no longer has enough wind over the wing. Even diving the model will not produce enough speed to make up for the loss of wind. At the bottom of the dive, you have to raise the nose to make more lift—but it just isn't there. No, it doesn't appear that climbing and diving is the proper procedure for flying in the wind.
Orin says that the best way to fly on a windy day is to work hard at not allowing the model to rise more than a foot or so when heading into the wind. This is by far the most effective way to minimize the sag we see going downwind. Every foot of height gained above the level-flight path on the upwind side of the circle is a foot you will be below the flight path on the downwind side of the circle.
Orin goes on to say that Sgt. Gordon Ford, the Air Force's official model builder who specializes in large, multi‑engined models, never seems to have trouble flying any of his models, no matter what the wind conditions. All his models always fly in a dead‑level attitude. If you watch Sgt. Ford fly, you would see that his flying hand is always in motion. When his model comes into the wind he, at times, has full down elevator on his model, and when flying downwind, he applies sufficient up elevator to maintain level flight. The lesson here is to take positive action at all times—not in a jerky fashion but in a smooth manner: from up to down and back.
The amount of control that you apply to your particular model will depend on many things, but you will use some if you want a successful flight. Above all, and perhaps most important, you must see yourself in the proper light: you are the pilot. The pilot means that you don't watch the model fly at altitudes that are not in its best interest. You should react instantly and effectively to make the model track where you want it to be. Don't forget you're running the show when in the center of the circle.
Takeoff and Landing
We have discussed the airborne part of our flight, but what about the takeoff and landing? The takeoff should present little trouble to anyone. Most would agree that you should give yourself as much of the circle as possible for a nice steady taxi and takeoff before getting to the upwind portion of the circle. The landing, however, could be a little more difficult if conditions are windy.
One of the most important things to remember when landing during windy conditions is: don't rush. Take your time (several laps, if necessary) to get the model within a foot or so of the ground and in level flight.
Where and how you make the touchdown will depend on the amount of wind and on the wing loading of your model.
- If your model is heavy, you might cut power and let the model set itself down while on the upwind side of the circle, or set it down with power on just past the upwind portion of the circle.
- The object is to get the model on the ground at a point on the circle that will allow you to bring the model's ground speed down so that it will not become airborne again when it reaches the upwind side of the circle.
- The lighter the model, the more difficult landing becomes in very windy conditions.
The only solution to the problem is to practice. With the proper attitude and a little determination, you, too, can conquer the wind.
Correction
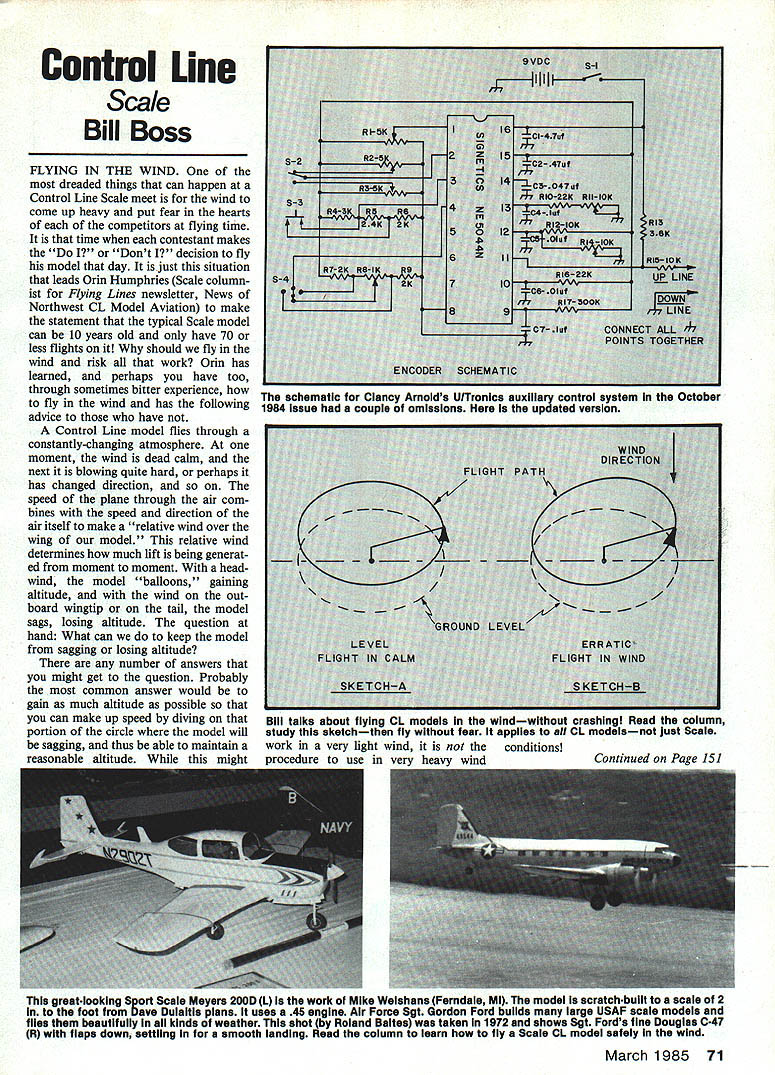
In my October 1984 column I featured Clancy Arnold's UTronics control system and must admit that I omitted a couple of resistor values from the encoder schematic. Therefore, we are presenting the encoder schematic again with the appropriate resistor values.
- Resistor R-16 is 22K ohms.
- Resistor R-13 is 3.6K ohms.
Also better defined is the connection point of the NE5044N chip terminal 16 to R-13 and switch S-1. I apologize for the error and hope that the drawing omissions have not caused too much inconvenience to anyone.
Send items on CL Scale to Bill Boss, 77-06 269th St., New Hyde Park, NY 11040.
Transcribed from original scans by AI. Minor OCR errors may remain.

