

Control Line: Speed
Gene Hempel and Tom Upton
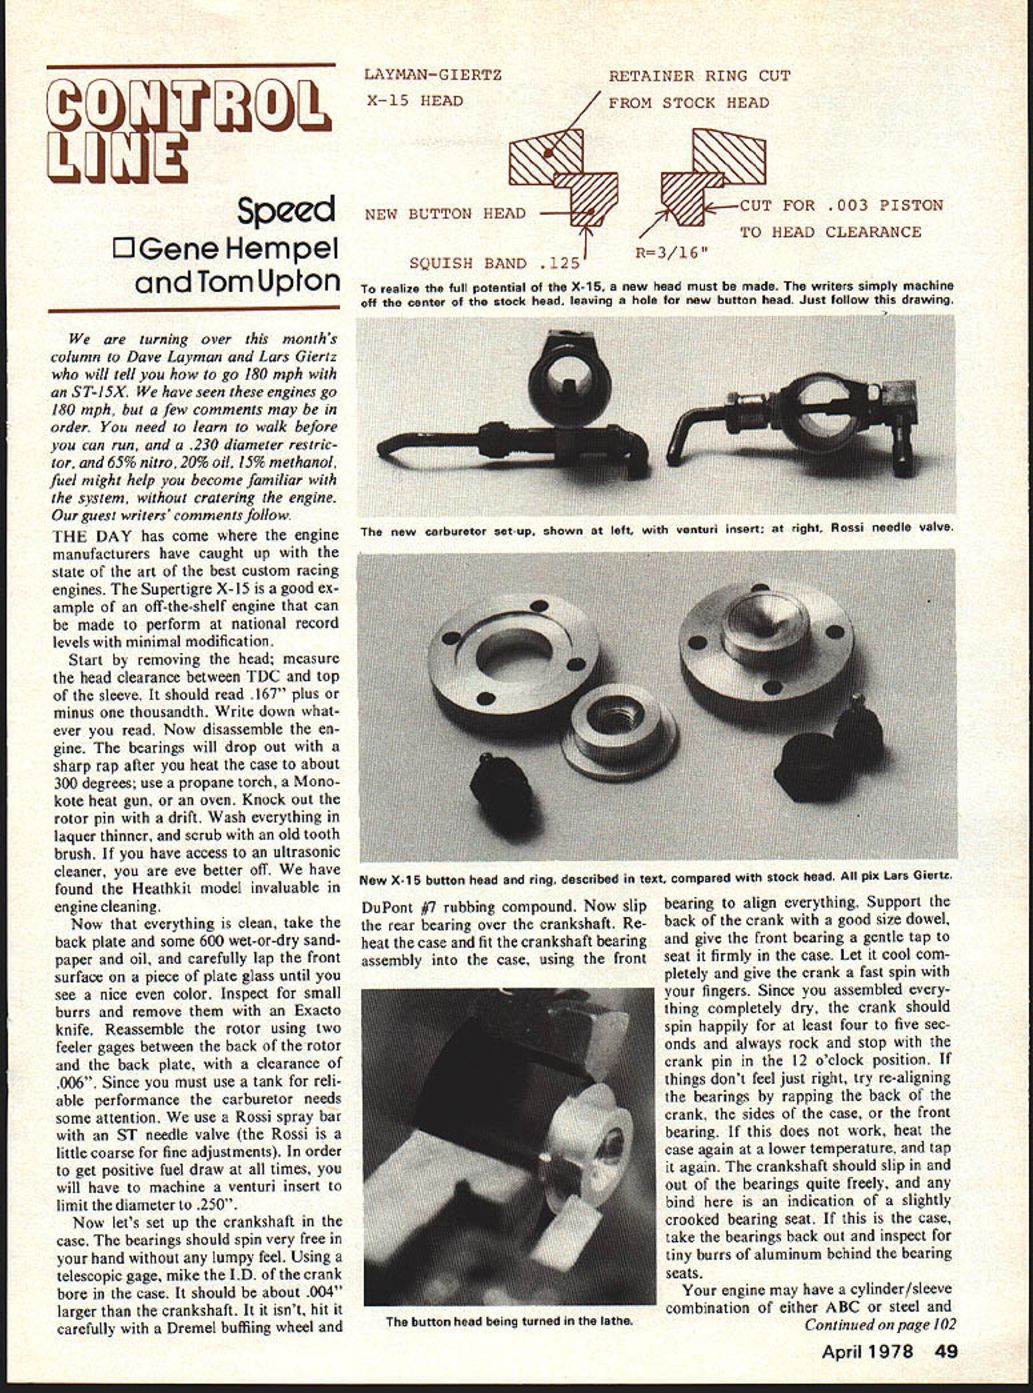
We are turning over this month's column to Dave Layman and Lars Giertz who will tell you how to go 180 mph with an ST-15X. We have seen these engines go 180 mph, but a few comments may be in order. You need to learn to walk before you can run, and a .230 diameter restrictor, and 65% nitro, 20% oil, 15% methanol, fuel might help you become familiar with the system, without cratering the engine. Our guest writers' comments follow.
THE DAY has come where the engine manufacturers have caught up with the state of the art of the best custom racing engines. The Supertigre X-15 is a good example of an off-the-shelf engine that can be made to perform at national record levels with minimal modification.
Start by removing the head; measure the head clearance between TDC and top of the sleeve. It should read .167" plus or minus one thousandth. Write down whatever you read. Now disassemble the engine. The bearings will drop out with a sharp rap after you heat the case to about 300 degrees; use a propane torch, a Monokote heat gun, or an oven. Knock out the rotor pin with a drift. Wash everything in lacquer thinner, and scrub with an old toothbrush. If you have access to an ultrasonic cleaner, you are even better off. We have found the Heathkit model invaluable in engine cleaning.
Now that everything is clean, take the back plate and some 600 wet-or-dry sandpaper and oil, and carefully lap the front surface on a piece of plate glass until you see a nice even color. Inspect for small burrs and remove them with an Exacto knife. Reassemble the rotor using two feeler gages between the back of the rotor and the back plate, with a clearance of .006". Since you must use a tank for reliable performance the carburetor needs some attention. We use a Rossi spray bar with an ST needle valve (the Rossi is a little coarse for fine adjustments). In order to get positive fuel draw at all times, you will have to machine a venturi insert to limit the diameter to .250".
Now let's set up the crankshaft in the case. The bearings should spin very free in your hand without any lumpy feel. Using a telescopic gage, mike the I.D. of the crank bore in the case. It should be about .004" larger than the crankshaft. If it isn't, hit it carefully with a Dremel buffing wheel and DuPont #7 rubbing compound. Now slip the rear bearing over the crankshaft. Re-heat the case and fit the crankshaft/bearing assembly into the case, using the front bearing to align everything. Support the back of the crank with a good size dowel, and give the front bearing a gentle tap to seat it firmly in the case. Let it cool completely and give the crank a fast spin with your fingers. Since you assembled everything completely dry, the crank should spin happily for at least four to five seconds and always rock and stop with the crank pin in the 12 o'clock position. If things don't feel just right, try re-aligning the bearings by rapping the back of the crank, the sides of the case, or the front bearing. If this does not work, heat the case again to a lower temperature and tap it again. The crankshaft should slip in and out of the bearings quite freely, and any bind here is an indication of a slightly crooked bearing seat. If this is the case, take the bearings back out and inspect for tiny burrs of aluminum behind the bearing seats.
Your engine may have a cylinder/sleeve combination of either ABC or steel and iron. Either combination will work fine, but you will need to chrome the steel sleeve to insure good life and consistent runs. The stock timing should be 133° intake, and 173° exhaust. If you don't have a degree wheel to check this, you can measure the ports from the top of the sleeve, and the exhaust will come out .500" and the intake .596". Be sure to make the piston carefully for roundness and size. Sometimes the skirt may be a hair fatter than the top; if so, carefully taper the bottom of the piston with 600 wet-or-dry in a lathe, so that the skirt is just a hair smaller in diameter than the crown. The sleeve should be a drop-fit in the case, and if it is a little tight, sandpaper the inside of the case and clean again. If the sleeve was chromed, inspect the ports for flash or roughness and remove it.
Fuel Tanks: If you want a 5-ounce or larger tank for your ST 46, HP 40, or Fox 45 engine, about the only source I know of presently is Randy Hancock, who custom makes them from .008 tin plate. These tanks are a work of art and well worth the $10.00, plus postage prices. Write him at 541 Columbia Blvd., Lexington, KY 40508 (tel: 606-252-8137).
Foam Wings: Look for another manufacturer of custom stunt foam wings in the near future. John Poynter and Kirk Mullinnix, of California, are getting into the business and will soon have a price list and catalog available. If you are interested in a price list, write them at J & K Foam Wings, 10261 Janice Lynn, Cypress, CA 90630. I also have heard that when Arnold Stott gets relocated in Texas he intends to start producing wings again on a more substantial basis. Haven't heard from him, but I am certain that he will let Model Aviation know when he is ready to produce. To realize the full potential of the engine you must make a new head. We simply machine off the center of the stock head and leave a hole for the new button head. Make the button head according to the drawing. We cut the combustion chamber by first drilling a #3 hole for the tap, and then running a 7/64-in. ball end mill up until it touches the #3 hole. Then make the chamber by milling an additional .090".
Now reassemble the rest of the engine dry, leaving the plug out for now. You can replace the stock head bolts with metric Allen screws (OS Max 40SRII replacement set of screws works fine). Spin the engine again as before; there should still be no binds anywhere. If the piston drags at TDC, you either will have to lap the piston or rehone the cylinder carefully until there is absolutely no bind at the top. To check your ultimate fit and compression seal, put a few drops of Marvel Mystery Oil in the engine and flip the engine over a few times with a prop. It should snap very smartly and hold compression at TDC for at least five seconds. Remember that a tight engine does not necessarily mean that it has a good seal.
The entire exercise you have gone through has been designed to eliminate all possible friction. Careful honing or lapping will give you a perfect seal without any bind in the cylinder. The best fit will allow the piston to whistle right through and yet seal perfectly.
Don't forget to squirt some WD-40, or similar, oil into the rear exhaust and carb intake to fully lubricate everything. OK, now the fun part with testing and break-in. Mix some fuel consisting of 75% nitro, 5% propylene oxide, and 20% Ucon 2270 or Klotz, as sold by SIG. Do not use any castor oil under any circumstances; it will only gum up your fine engine and ruin your fit. We use the 75-5-20 all the time, and would advise you to forget about any black magic in the fuel department. Set up the engine in your test stand with a K&B short plug, a bladder, and a 6–7 Rev-Up for a tach prop. Put four or five 2-oz. bladders through the engine at a fast four-cycle to seat the piston.
If the plug blows, pull the head and clean out all the little beads of element. Now tach the engine at full rpm for 10 to 15 seconds, being sure not to let it go too lean at any time. You should get somewhere between 22,500 and 23,000 rpm. You will blow the plug every time, so you better have a few on hand. To further check the engine, attach a Rossi header and pipe, set at 1-1/4" measured from the glowplug to end of pipe. Still using the 6–7 Rev-Up, the tach should read around 26,000 rpm, or maybe a little more. With a 6–8 Rev-Up flying prop, your engine should be capable of 180 mph in A Speed.
If you have any questions, call us at Speed and Racing Specialties, (713) 723-6463 in Houston, Texas.
Gene Hempel (and Tom Upton), 301 N. Yale, Garland, TX 75042.
Transcribed from original scans by AI. Minor OCR errors may remain.

