
Control Line: Speed
Gene Hempel
How to build a 1/4A pipe. This column and the next will be devoted to a construction article written by Jerry Bradshaw of Sacramento, CA. On March 14, 1980, I asked Jerry if he would be willing to share some of his valuable 1/4A pipe information and construction techniques. After some arm twisting and a bunch of "pleases," he consented. Last month, Jerry bestowed upon me this fantastic construction article, which follows.
I have thoroughly enjoyed working with Jerry, and would like to express my appreciation to him for a job very well done. So — read on, guys; I'm sure you will agree with me.
Build Your Own 1/4A Tuned Pipe
To be competitive in 1/4A Speed, it is advantageous to use a tuned pipe. Unfortunately, the only 1/4A pipes are homebuilt ones. By sharing my construction techniques, I hope to help and encourage modelers to build their own tuned pipes. The pipe design in this article is the exact one I used to establish the 1/4A Speed record of 120.11 mph in 1974. These construction techniques can be used to build any size pipe. In fact, Luther Roy and I used these techniques to make the pipe that he used when he set a new FAI Speed record of 160.29 mph. (Editor's note: This record has subsequently been bettered by Charles Lieber at 162.21 mph, RBMCM.)
Pipe material
- Select the purest aluminum for all parts; this gives the best braze and is soft and easier to form. Avoid 2000- and 7000-series aluminum, as they are very difficult to braze.
- Cones: 1100-H sheet aluminum, 0.018-in. thick.
- Adapter, headpipe end, and headpipe: 6061-T4 aluminum.
- Headpipe tubing: 5/16-in. I.D. by 3/8-in. O.D. aluminum tubing.
- Tailpipe tubing: 7/32-in. I.D. by 1/4-in. O.D. aluminum tubing (available at most hobby shops).
- Local surplus stores are a good source for other aluminum.
Brazing material
- Craftsman No. 718 aluminum brazing wire, 1/16-in. diameter, and No. 33 aluminum brazing flux. These come in a twin-pack, Sears part no. 80994.
Heat source
- A Bernzomatic propane torch. For brazing, use the pencil-flame burner unit, model JT 681.
Caution
- A propane torch can produce heat up to about 1,400°F. Keep the work area clear of flammable items and use appropriate safety precautions.
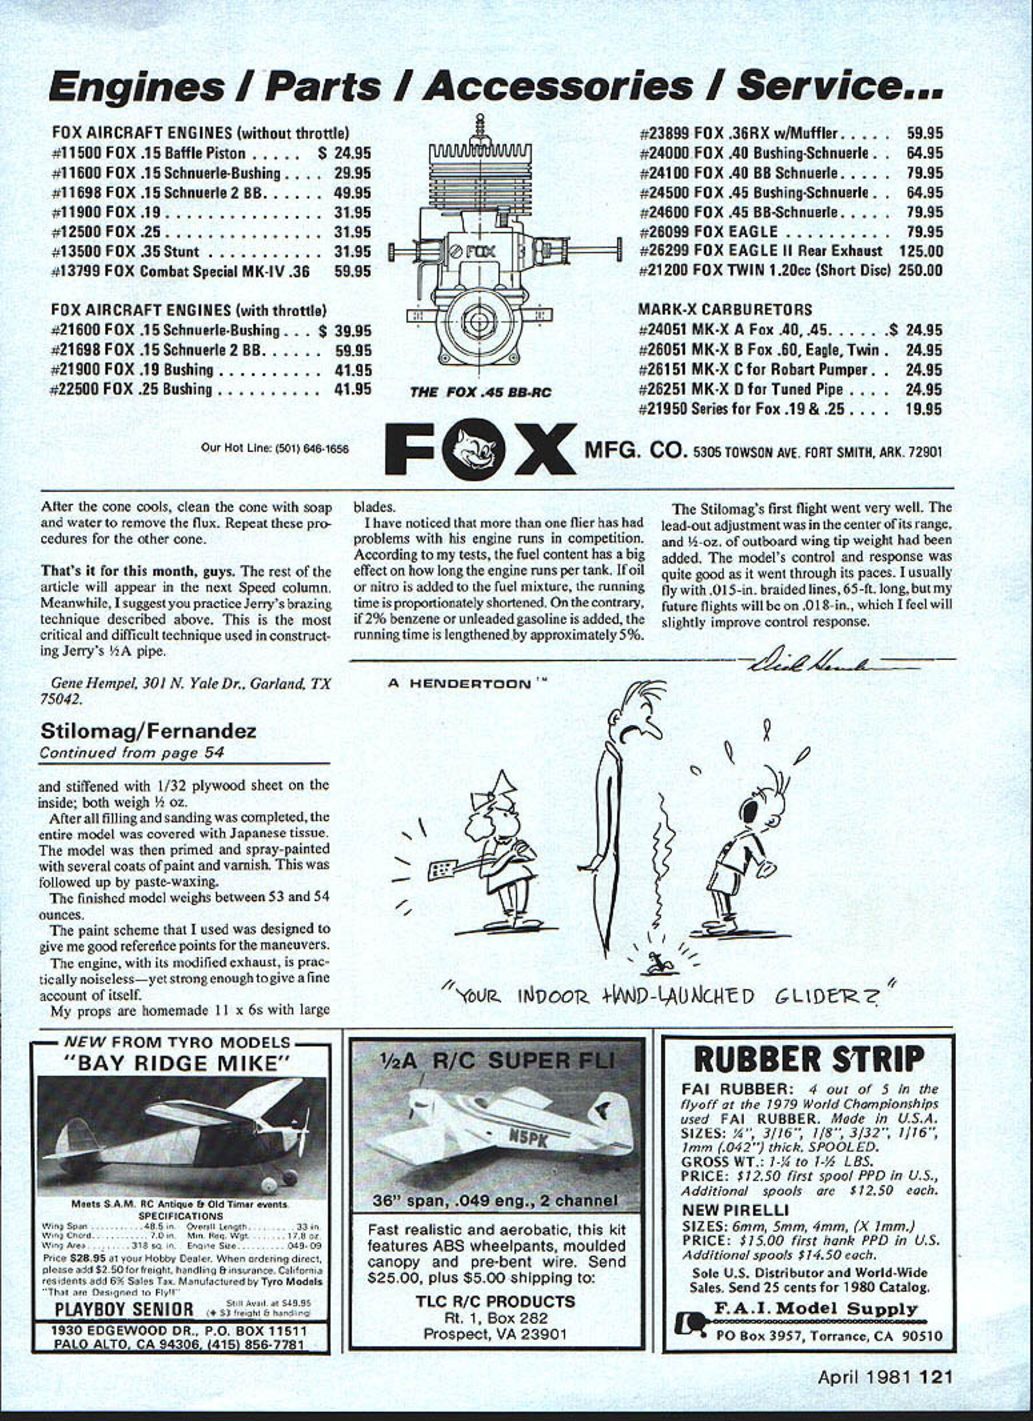
Pipe design
- The pipe design shown here was arrived at after much trial and error. Although effective, it is not necessarily the ultimate. By experimenting with different lengths and angles you may find additional power.
- This article shows how to construct a tuned pipe using basic tools; it is not a treatise on resonant expansion chamber theory. Good references: Two-Stroke Tuners' Handbook by Gordon Jennings, and Bill Wisniewski's article in Model Airplane News, March 1967.
Brazing considerations
- Brazing aluminum is not easy. There is only roughly a 50°F spread between the brazing rod melting point and the sheet aluminum softening/melting point. Learn how much heat to use and when to remove the flame. With practice it can be done.
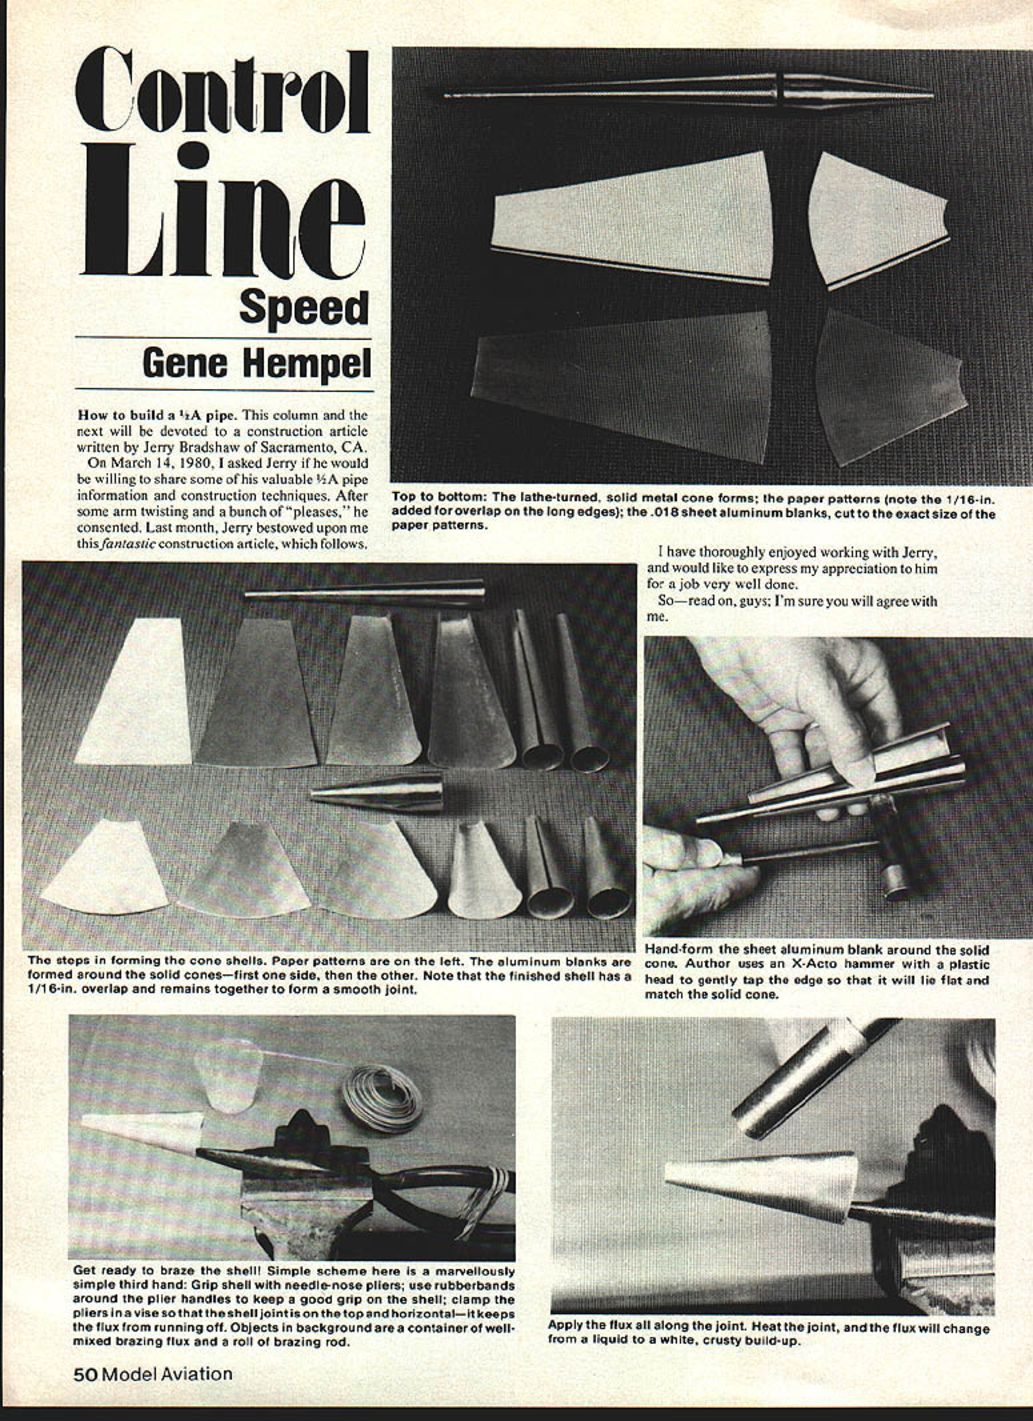
Construction techniques
- On a lathe, turn two solid metal or wood cones to the exact inside dimensions of the front and rear cones.
- Make a paper pattern of each cone:
- Roll a piece of paper around the solid cone so the edge of the paper forms a center line from end to end.
- On the paper, draw lines around the ends of the cone and another line down the center.
- Allow for 1/16-in. overlap on the joint.
- Cut a piece of sheet aluminum the same size as the pattern. Repeat for the other cone.
- Clean the pieces with Scotch-Brite, then wash with soap and water. Do not use steel wool — tiny steel particles could contaminate the metal.
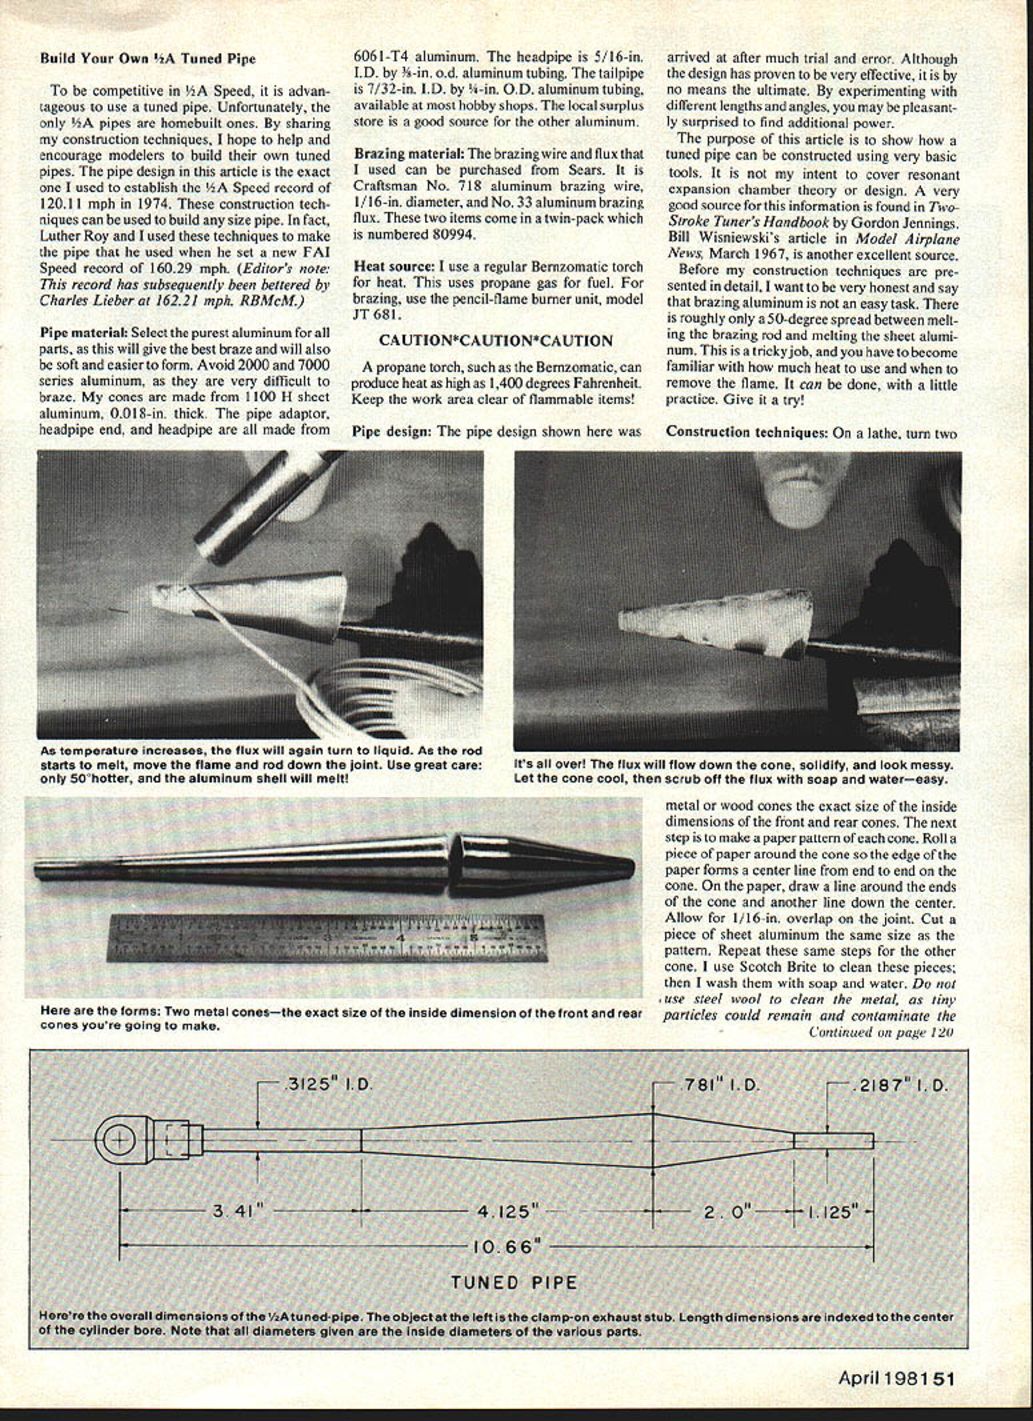
- Form the sheet aluminum around the solid cone:
- Start with one edge and bend the metal slowly with your fingers; avoid creasing.
- Use an X-Acto hammer with a plastic head and gently tap the edge so it will lie flat and match the solid cone.
- Do the other edge the same way.
- Roll the cone on a flat surface so the sheet metal conforms to the solid cone shape.
- Ensure the metal overlaps 1/16 in. and the joint remains smooth.
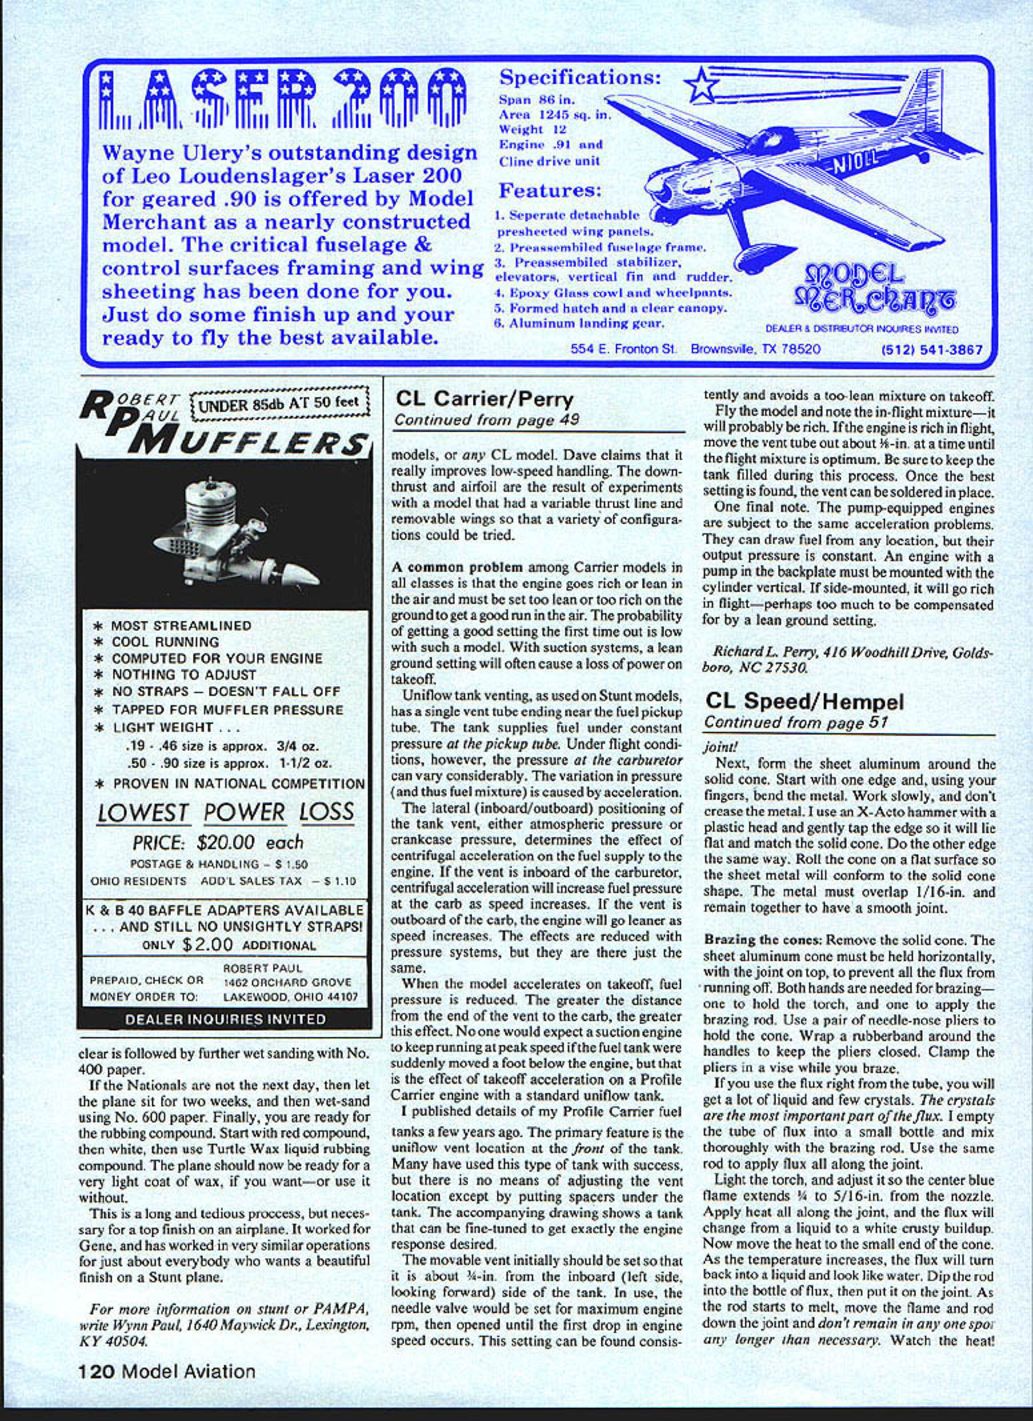
Brazing the cones
- Hold the sheet cone horizontally with the joint on top to prevent flux from running off. Both hands are needed for brazing — one to hold the torch and one to apply the brazing rod. Use a pair of needle-nose pliers to hold the cone; wrap a rubber band around the handles to keep the pliers closed, and clamp the pliers in a vise while you braze.
- Flux usage:
- If you use the flux straight from the tube you will get a lot of liquid and few crystals. The crystals are the most important part of the flux.
- Empty the tube of flux into a small bottle and mix it thoroughly with the brazing rod. Use the same rod to apply flux all along the joint.
- Torch adjustment and brazing steps:
- Light the torch and adjust so the center blue flame extends about 1/8 to 5/16 in. from the nozzle.
- Apply heat at the joint; the flux will change from a liquid to a white crusty buildup.
- Move the heat to the small end of the cone. As temperature increases, the flux will turn black and then disappear.
- Tilt the cone with the pliers so the remaining flux runs to the joint.
- As the rod starts to melt, move the rod along the joint. Do not remain in any one spot longer than necessary; watch the heat closely to avoid overheating.
- After brazing:
- Allow the cone to cool.
- Clean the brazed area with water and a brush to remove flux residue.
- Finish the joint by sanding and filing as required so the cone is smooth and true.
- Repeat these procedures for the other cone.
Assembly and final fitting
- Assemble the pipe components, making sure the headpipe and tailpipe are aligned.
- Fit the adapter and check for smooth internal transitions.
- Test-fit the pipe on the engine and make final adjustments before installation.
Engine tuning notes
- Fly the model and note the in-flight mixture — it will probably be rich. If the engine is rich in flight, move the vent tube out about 1/8 in. at a time until the flight mixture is optimum. Be sure to keep the fuel tank filled during this process. Once the best setting is found, the vent can be soldered in place.
- Pump-equipped engines can have the same acceleration problems. They draw fuel from any location, but their output pressure is constant. An engine with a pump in the backplate must be mounted with the cylinder vertical. If side-mounted, it will go rich in flight — perhaps too much to be compensated for by a lean ground setting.
Practice and continuation
- Practice the brazing technique described above. This is the most critical and difficult technique used in constructing Jerry's 1/4A pipe.
- The rest of the article will appear in the next Speed column.
Gene Hempel, 301 N. Yale Dr., Garland, TX 75042.
Transcribed from original scans by AI. Minor OCR errors may remain.

