

Control Line: Speed
Gene Hempel (Contributions from John C. Ballard)
Clarifications and rules
- All AMA rules pertaining to CL Speed will be implemented — no exceptions.
- Minimum distance between lead-outs: no less than 0.500 inches (1/2 in.).
- Lead-out wires: Pylon Brand No. 146 stranded stainless steel, or equivalent, subject to the rule book.
Liability and safety
Be sure to check with your insurance agent or attorney about ramifications when you ask someone else to fly your Speed model. In the event of an accident, a non-builder pilot may have to assume liability — this depends on the state where the trial is held and how a jury rules. We must ask whether someone has to be seriously injured before we address safety. Have we approached the safety-factor limit used to determine tensile strength of our flying lines? Juries do not accept excuses — they want to know whether someone was seriously injured.
New products
- After several years of a dry spell, Dyna Jet engines and parts are now available from P&G Metal Products. For more information, mail a SASE to the address listed at the end of this column.
- Osamu Khono manufactures a complete line of monoline torque control units, guaranteed for life. Price is relatively high, but workmanship is superb. See contact listing at the end of the column.
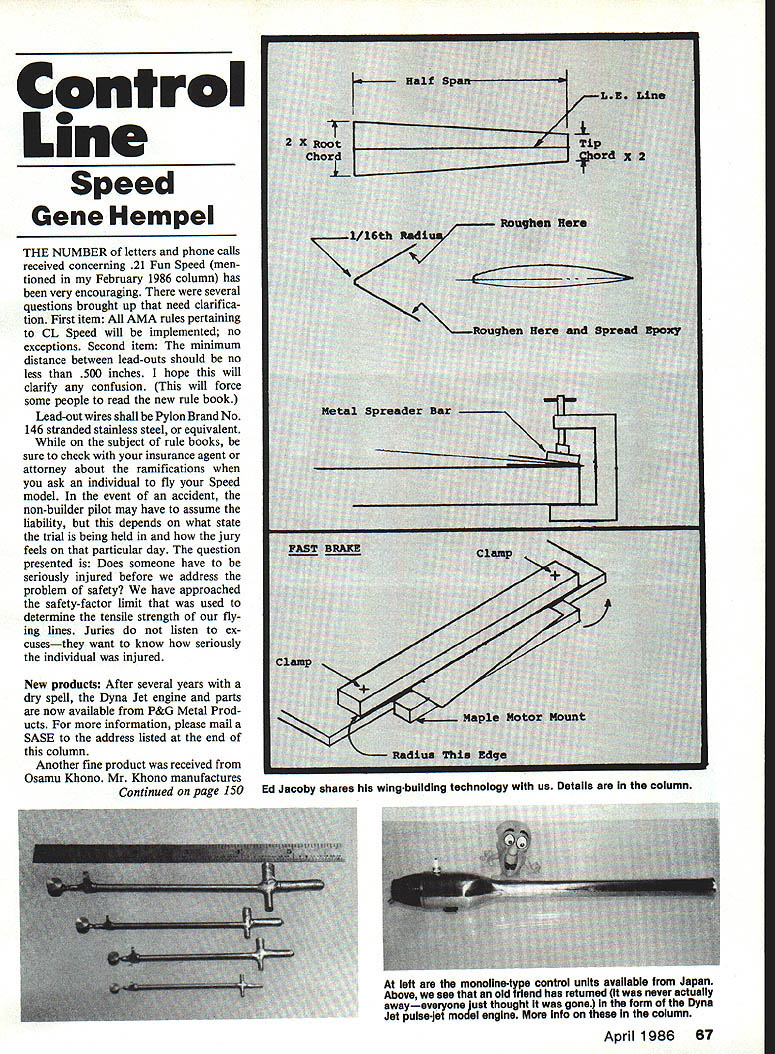
FYI Department: Aluminum Wing Panels
"Flashing aluminum" is sold by many hardware/building supply stores and works well for our purposes. As sold, temper is approximately half-hard and thickness is 0.012 in. I have found this material in 14-in. wide rolls at less than $1 per foot.
- Lay out each half-span panel as required and cut out with a sharp modeler's knife (such as a No. 11 X-Acto).
- De-burr all edges.
- Bend the panel on the leading-edge line. If you have access to a bending brake, use it. If not, a reasonable substitute can be made using a length of 1/2 x 3/4 in. maple motor-mount material. Bend the panels beyond 90° if possible.
- Rough up the inside surfaces of the trailing edge with 80-grit sandpaper. Glue the two surfaces together with Hobbypoxy Formula II. Spread the epoxy thin and keep other surfaces clean with alcohol.
- Protect your workbench with waxed paper and clamp the trailing edge down using a spreader bar as shown. The spreader bar is used to apply evenly distributed pressure.
Glen's outboard wing incident
Glen lost his outboard wing during a race. The picture shows him refueling; the plane continued and flew approximately 300 laps of the 700-lap race without the outboard wing — but with decreased maneuverability, speed, and takeoff characteristics.
Epoxy coating for fuel protection
I have found that taking a two-component epoxy, thinning it 25–50% with solvent, and applying it over the planked wing area and out about three or four ribs from the center section reduces fuel and oil intrusion and helps maintain airframe strength. This is especially useful with shrinkable wing coverings that do not penetrate the wood surface as epoxy does. When such coverings peel back or are melted by heat, the wood is vulnerable; the thinned epoxy provides protection without significant build-up. It can also be used to coat profile fuselage and tail surfaces, yielding excellent adhesion for shrinkable coverings.
Safety first: fueling and priming hazards
You will remember that Jerry Meyer had a serious fire during the Slow Rat racing event at the 1985 Nats. This resulted from spilled raw fuel on the airframe, an extremely hot Glo-Bee battery, and large amounts of fuel on the tarmac around the pitting area. Overflow during fueling (tank filler not fully pushed down) can run down an inboard wing; that fuel plus fuel on the ground can be ignited easily on a hot day by a well-charged Glo-Bee battery.
Many Slow Rat and Sport Race aircraft have an automatic priming system that routes part of the overflow from the tank into the exhaust port area with the piston closed, leaving a large amount of fuel in the exhaust region. A hot battery applied to the glow plug can easily ignite these vapors.
For Rat Racers, quick fills are usually in the body portion of the aircraft, minimizing fuel over the rear during filling. Most engines are rear-exhaust types, and many competitors use a mini-pipe to direct exhaust away from the airframe. One of the best ways to prime a Rat engine is to tilt the airplane forward and squirt a small amount of fuel into the pipe so it runs down into the exhaust port — this directs oil, heat, and residue away from the fuel tank area and reduces fire hazard at the exhaust stack.
Special priming on a uniflow tank
Several Sport Race enthusiasts use a uniflow tank arrangement with an added overflow tube for priming. A useful method is to exit a tube from an upper portion of the tank and mount an alligator clip on the side of the tank to pinch the flexible line leading to the exhaust-prime tube. While filling the tank, press the alligator clip with a finger to open the overflow, allowing air to escape and priming the engine. When priming is finished, release the clip so the system is sealed except for the uniflow tube pointing into the airstream. (A photo shows the clip in the closed position.)
Engine mounting note
A large aluminum mounting plate is often used on sleeve-bearing K&B .35 engines. Without ball bearings in the case, engine vibration can be significant; incorporate an extremely strong fuselage section and mounting plate or your engine performance and airspeed will suffer.
As always, your comments are appreciated.
Contacts
- John C. Ballard, 10102 Kimblewick Dr., Louisville, KY 40223.
- Gene Hempel, 301 N. Yale Dr., Garland, TX 75042.
- Osamu Khono / T. Horio Speed Sang Co., F-Coat 207 Yakumoai 1-25-2, Chofu City, Tokyo 182, Japan.
Transcribed from original scans by AI. Minor OCR errors may remain.

