
Control Line: Speed
Glenn Lee 819 Mandrake Batavia, IL 60510
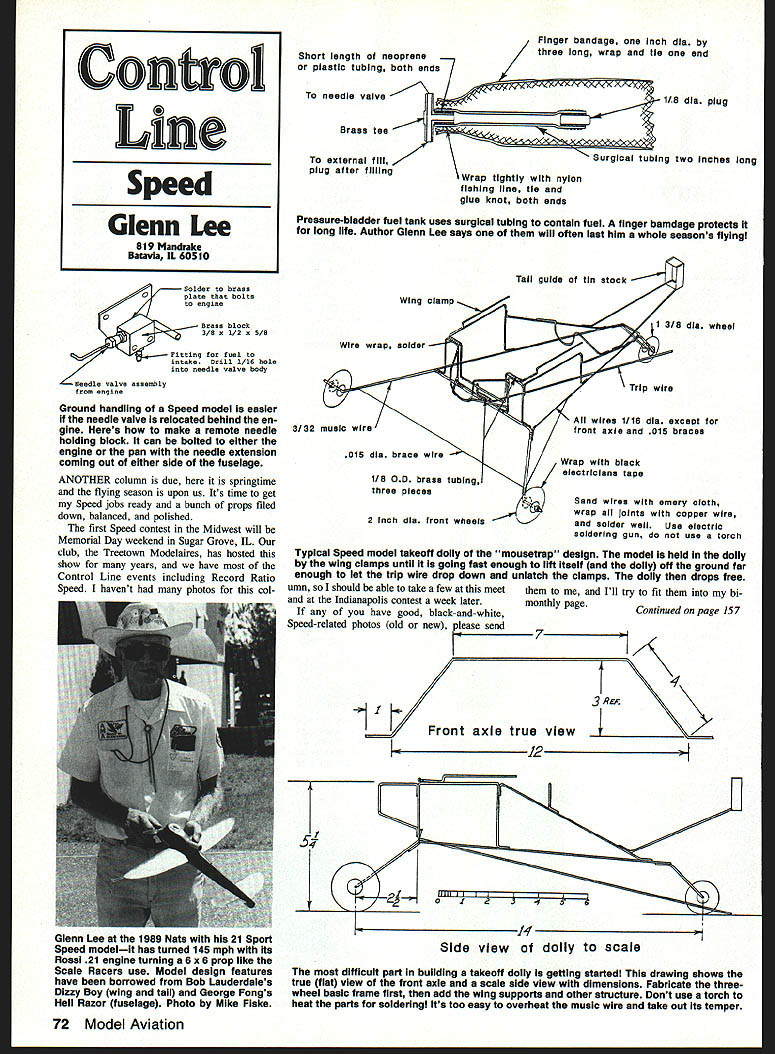
Ground handling of a Speed model is easier if the needle valve is relocated behind the engine. Here's how to make a remote needle holding block. It can be bolted to either the engine or the pan with the needle extension coming out of either side of the fuselage.
Springtime and the flying season
Another column is due — here it is springtime and the flying season is upon us. It's time to get my Speed jobs ready and a bunch of props filed down, balanced, and polished.
The first Speed contest in the Midwest will be Memorial Day weekend in Sugar Grove, IL. Our club, the Treetown Modelaires, has hosted this show for many years, and we have most of the Control Line events including Record Ratio Speed. I haven't had many photos for this column.
Sport Jet
This month's photo was sent by Mike Fiske (Fort Worth, TX), along with a nice letter about Sport Jet flying in Texas. Sport Jet is another low-key Speed event designed as an introduction to jet-powered control-line speed. It is meant as an event for beginners who would like to fly jets but cannot handle the 200-mph jobs. It's a fun event, requires two lines, stock jet engines, external controls, and contest-supplied fuel (80% alcohol / 20% MEK — methyl ethyl ketone). Speeds have been around 140 mph, and the fuel has proved to be reliable and easy starting.
I'm building a model for this event now and will have photos and more information after I fly it. Model design and trim greatly affect the speeds, so anyone has a chance to win. Care and finesse are more important in building your model than raw power.
Upcoming reports
Next month I'll be reporting on the .30-size contest in Champaign. We'll see how the Concepts, Enforcers, and Shuttles did back to back and get an idea of how people have modified their ships, the techniques they use, and things like that. Tune in next month for a .30-size roundup.
You don't have to worry about expensive, exotic fuels and engine modifications. The Texas guys are having a great time. They are out there flying these things for fun — isn't that what this is all about?
I try to write this column for everyone, beginner or "Old Pro," so don't get upset if I dwell on basics quite a bit. I'm trying to increase the number of Speed fliers in competition, so I have to convince the tyros and others who think Speed is too complicated or technical to jump in and try it! Those of you who know it all can skip over beginner's stuff, OK?
Back to 21 Sport Speed. A lot of guys are building airplanes for this event, so I expect a real blowout at the Nats! Get busy, and get yours finished! If you don't have a takeoff dolly, I'm sure you can borrow one at the contest.
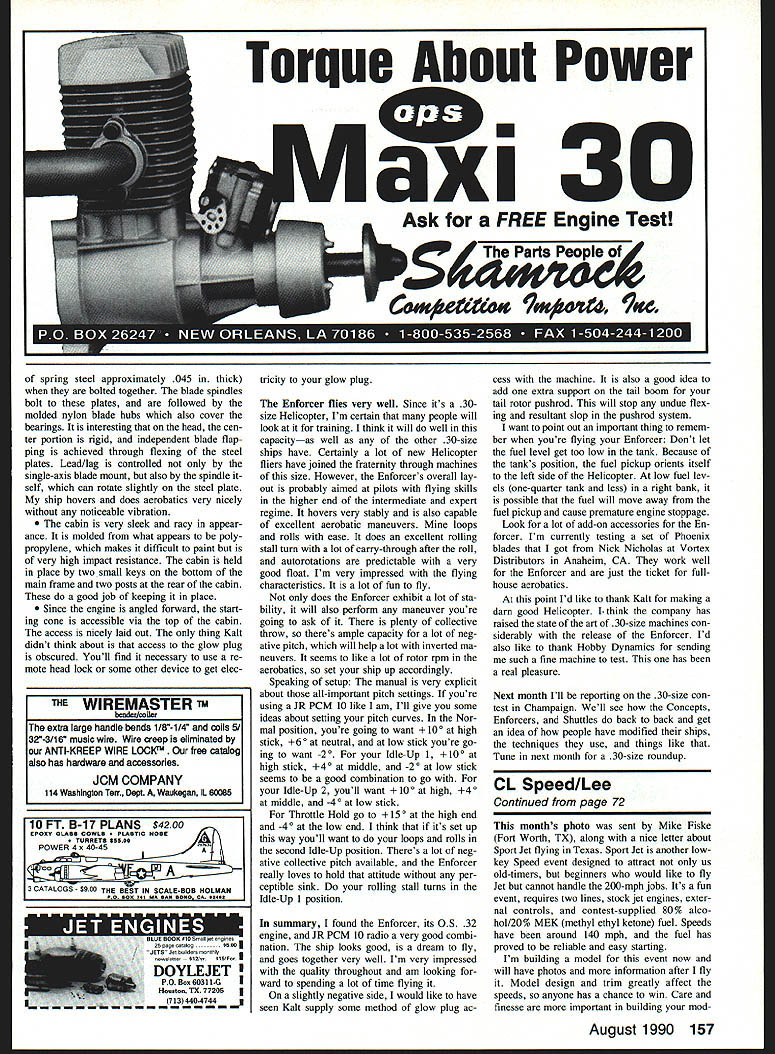
Takeoff dolly — the mousetrap design
Many potential Speed fliers are intimidated by the thought of building a dolly. It isn't really that tough, but it can drive you up a wall if the thing doesn't work right. I have built many dollies during the years; some of them have worked great, some have been thrown away!
My D Speed dolly, for instance, is a big, old, raunchy-looking affair, but I can't remember it ever failing to launch my airplane.
The 21 Sport Speed one, however, has failed several times. It has dumped the model out a couple of times, and it has failed to drop off the airplane several times! I landed the airplane safely on the dolly after the fuel ran out, but little happenings like this do give me a few more gray hairs!
This 21 SS dolly is the lock-on "mousetrap" type, and I've been analyzing the problem in my head all winter. One error was that the trip wire was so short that it could hang up on other construction wires if you didn't check every time you launched the airplane. I soldered on an extension to fix that, but still had the hanging-on problem a couple of times.
I think the problem is that the wing is too close to the pivot point of the clamp-down wires. The kink will be modified before flying season, and the sketch of the dolly includes this change. Try to keep the dolly light by using small wire where possible.
Also note the tail restrictor that keeps the model lined up in the dolly. It serves two other functions, too:
- It prevents the airplane from nosing over.
- It prevents the airplane from sliding back in the dolly when starting, thereby chewing up the back of the prop.
Don't forget to wrap the inner front wheel with black electricians' tape. It has to skid a little during the takeoff run. Make sure that the needle valve cannot hang up on any of the wires. I use a slotted extension to open the needle valve, since it seems there's never enough room in a small dolly to allow my hands to reach it easily. To make one:
- Slot the end of a 3/8-in. dowel.
- Glue a piece of brass tubing on it as a retainer and guide.
The most difficult part in building a takeoff dolly is getting started! The drawing I use shows the true (flat) view of the front axle and a scale side view with dimensions. Fabricate the three-wheel basic frame first, then add the wing supports and other structure. Don't use a torch to heat the parts for soldering — it's too easy to overheat the music wire and take out its temper.
The rear-mounted needle valve assemblies shown in the drawings work very well, so use the one that is easiest for you to fabricate. I like an external-fill feature — you don't have to take the airplane apart every time you refuel.
Pressure-bladder fuel tank
A pressure-bladder fuel tank uses surgical tubing to contain fuel. A finger bandage protects it for long life. One of these bladders will often last me a whole season's flying!
The tubing I use for bladders is a pure latex, black, thin-walled type that comes from Fisher Scientific Co. Two sizes are usable for Speed:
- 1/4-in. inside diameter (ID) with a 1/16-in. wall for most Speed classes (Fisher stock 14-150-5A).
- 3/16-in. ID x 1/32-in. wall for D Speed (Fisher stock 14-150-5B).
Individuals may have difficulty buying direct from Fisher, so we need some company to order it for us. This tubing is tough, and usually one bladder tank will last one season. I did have one break last year, but that at least is a rare occurrence.
The finger bandage material is necessary, since it isolates the tubing from the hot speed pan, extending the lifetime and greatly improving reliability.
It takes quite a bit of pressure to fill these tanks, so a syringe is almost a necessity. After filling the tank, the needle valve is tucked up under the engine where it is less likely to be broken. When the fuel starts to dribble in, close the needle. Now the engine will have fuel and lubrication immediately when you shove it in the starter.
Needle setting and engine tuning
Learn how and where to set the needle valve properly. A poor setting will cost you several mph. Set the first few flights on the rich side — just backed up into four-cycling — and then lean it out a little every flight until you hit top speed.
There are plenty of engine variables to play with before trying advanced tricks such as single-bladed props, lower oil content in the fuel, or fuel additives. A few basics to check:
- Exhaust timing: raising the exhaust opening to about 185°–190° duration may help pipe performance.
- (This means the exhaust port is open as the crankshaft rotates 190°, or 95° rotation each way from bottom dead center — BDC — piston position.)
- Intake/rotary valve timing: the rotary valve should open around 30°–40° after BDC and close about 60° after top dead center (TDC). These are approximate numbers; testing is required to find the best settings for a given engine.
RC Speed call — tips from a pylon racer
I had an interesting call from a modeler (whose name I forgot) from Memphis, TN. He and his friends are flying Speed — RC Speed! They have pylon-racing-type airplanes with full tuned pipes on .40–.49 engines, which produced speeds near 200 mph. He was getting beaten too often, so he needed some "secrets" to up his performance.
First, he was looking for better props. The 8 x 8 he was using wasn't enough. I suggested that he try some 8 x 8 fiberglass versions and increase the pitch as much as he could.
I don't trust wood props any more. Modern engines put out so much power that they break the blades off with the forward thrust. I don't believe that it's the centrifugal force on the blades caused by high rpm that makes them fail — it looks more like they are just snapped forward! When this happens during flight, the airplane is shaken apart; RC jobs lose control instantly, and things turn to junk really fast. Don't mess around. Go to fiberglass or graphite composite now!
The fuel they were using had 40% nitromethane, so I also suggested that he try 60%. At one time I used 60%-nitro fuel for test flying my B Speed job. It would give reasonable speeds without burning or blowing up the engine. I hope his .46 can take it!
I didn't ask him if his exhaust timing was proper for good pipe performance, so possibly raising the exhaust opening to 185° or 190° duration might help, too. I also didn't ask whether the engine is front- or rear-intake; in either case the intake timing should be set for high rpm.
Closing
So, you can see that there are plenty of things to play with. That should be enough for this month. Future columns will cover more Jet information and other items that I can pick up at contests. I'll also tell you about some new revolutionary technology: bearings rated above 60,000 rpm. We can now build an engine that will last almost forever! It might also drastically improve performance, too — so stay tuned.
Transcribed from original scans by AI. Minor OCR errors may remain.

