
Converting RC Sailplane to Electroflight
By Mitch Poling
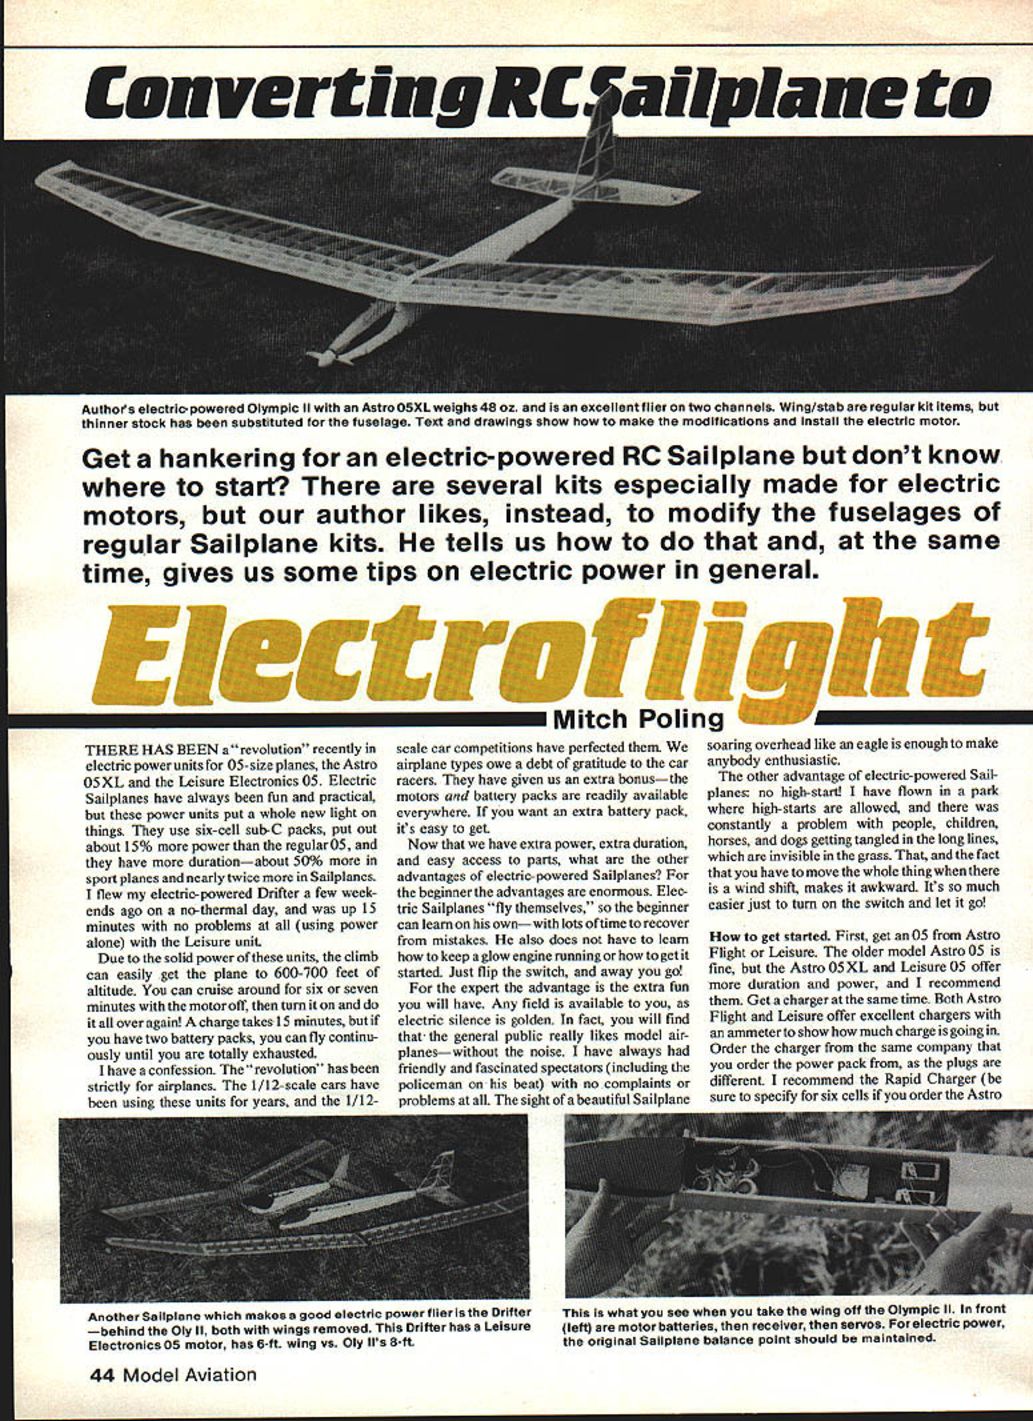
Get a hankering for an electric-powered RC sailplane but don't know where to start? There are several kits especially made for electric motors, but I prefer to modify the fuselages of regular sailplane kits. Below I describe how to do that and offer general tips on electric power.
Overview
There has been a "revolution" recently in electric power units for 05-size planes—the Astro 05XL and the Leisure Electronics 05. Electric sailplanes have always been fun and practical, but these power units put a whole new light on things. They use six-cell sub-C packs, put out about 15% more power than regular 05s, and have more duration—about 50% more in sport planes and nearly twice as much in sailplanes.
I flew my electric-powered Drifter on a no-thermal day and was aloft 15 minutes with no problems at all (using power alone) with the Leisure unit. With the solid power of these units, a climb can easily get the plane to 600–700 feet. You can cruise with the motor off for six or seven minutes, then turn it on and repeat. A charge takes about 15 minutes, but with two battery packs you can fly continuously until you are totally exhausted.
The "revolution" has been strictly for airplanes; 1/12-scale cars have been using these units for years. Car racing perfected the motors and battery packs, and the parts are now readily available.
Advantages of electric-powered sailplanes:
- For beginners: the planes "fly themselves," giving lots of time to recover from mistakes. No need to learn glow engine starting or tuning—just flip the switch and go.
- For experts: extra fun, ability to fly in more places because of quiet operation, and friendly public reaction.
- No high-start needed: avoids long lines that can tangle people, animals, or objects in a park.
Getting Started
First, get an 05 from Astro Flight or Leisure. The older Astro 05 is fine, but the Astro 05XL and Leisure 05 offer more duration and power; I recommend them. Get a charger at the same time. Both Astro Flight and Leisure offer excellent chargers with an ammeter to show how much charge is going in. Order the charger from the same company you order the power pack from, as the plugs differ.
Recommended chargers:
- Astro Flight Rapid Charger (be sure to specify six cells if you order the Astro 05XL). Options: cigarette lighter plug or alligator clips—specify your choice.
- Leisure Model 105 (comes with alligator clips).
Many people use a car battery for charging, which is a good, solid option—especially at first. If you plan to use a field battery, alligator clips are handy. Field battery portability is attractive, but the battery must be good; bad field batteries cause most complaints about "no power" or "no duration."
Batteries and Chargers
- Buy a new field battery. Do not use a battery that's been sitting in your field box for a year.
- For the new systems with sub-C cells, get a 12-volt battery with at least a six-ampere-hour (6 Ah) capacity. This yields about five flights—well over an hour of flying.
- I recommend sealed gel-cell batteries; motorcycle batteries will leak acid and can damage gear.
- Astro Flight sells six-ampere-hour gel-cells; four-ampere-hour gel-cells are more common but give only about three flights. You can hook smaller gel-cells in parallel to increase capacity.
- Gel-cells and motorcycle batteries have lead plates and should never be left discharged. If allowed to sit dead, they may not recharge. Charge them after each use. Astro Flight sells a handy wall charger for maintenance charging.
The nickel-cadmium pack used to run the motor is tougher: it isn't picky about being left charged or uncharged.
Choosing a Sailplane
Some kits are made specifically for electric power: Super Monterey (Astro Flight), Corvette (Parker R/C Planes), Electra Lite (Midnight Models). Plans for scratch builders include Electra Glide 62 and Electra Lite from RCM Plans Service. These designs solve motor mounting and battery placement logistics.
I prefer converting kit sailplanes to electric. It's fun and quite easy.
Converting Kit Sailplanes
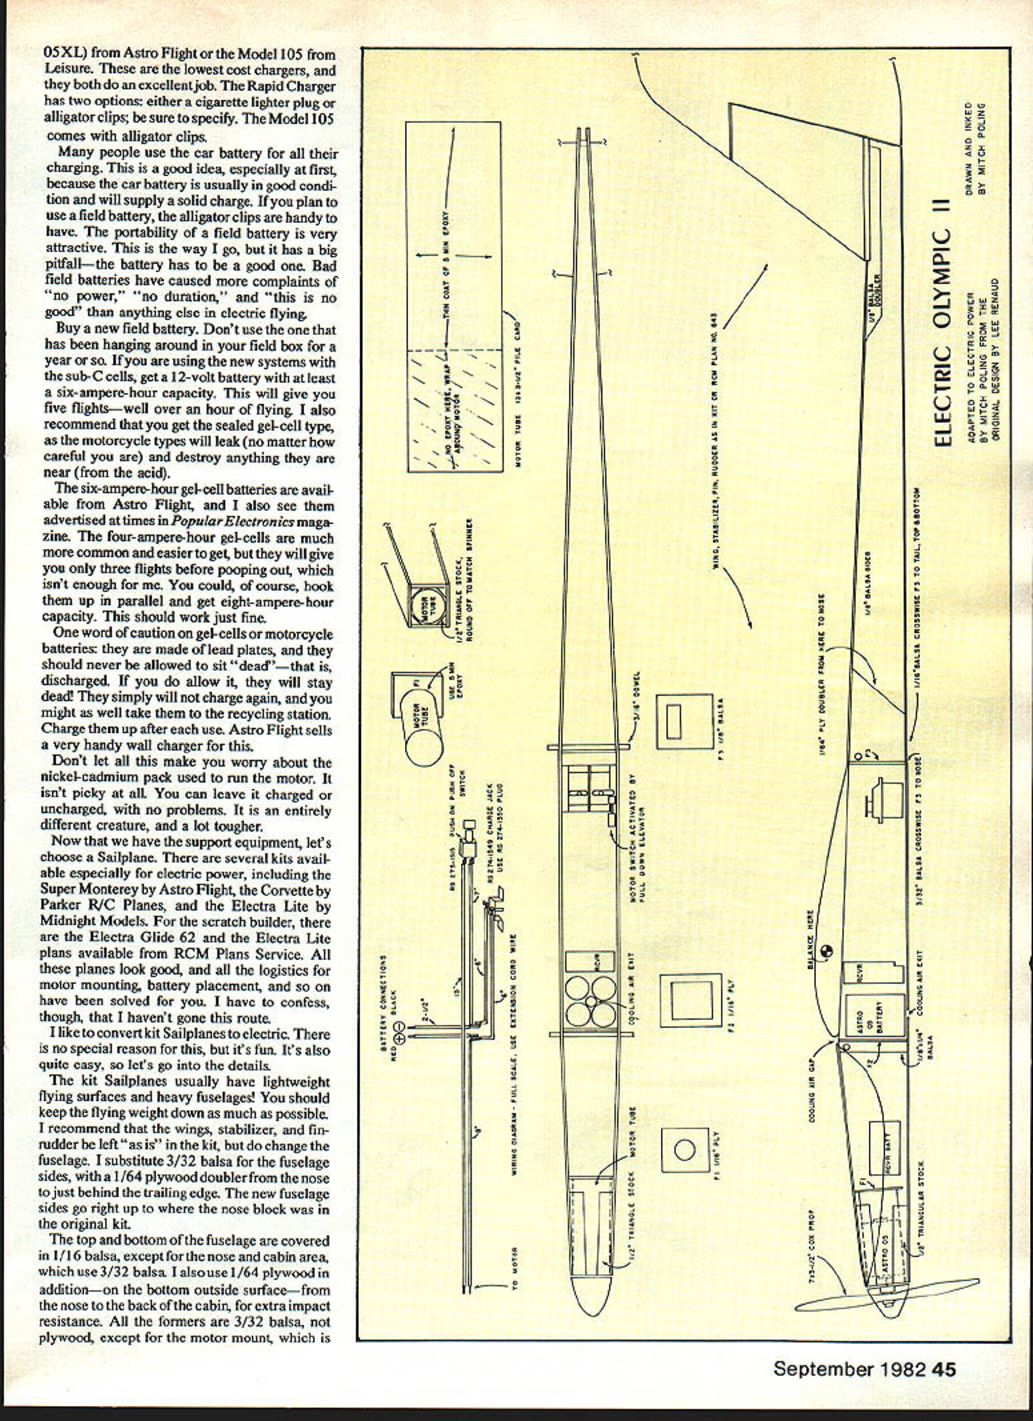
Kit sailplanes usually have lightweight flying surfaces and heavy fuselages—keep flying weight down. My recommended approach:
- Leave wings, stabilizer, and fin-rudder as in the kit.
- Replace fuselage sides with 3/32" balsa, and add a 1/64" plywood doubler from the nose to just behind the trailing edge. The new fuselage sides go up to where the original nose block was.
- Cover top and bottom of the fuselage with 1/16" balsa, except the nose and cabin area, which use 3/32" balsa.
- Add 1/64" plywood on the bottom outside surface from the nose to the back of the cabin for extra impact resistance.
- Use 3/32" balsa formers (not plywood), except the motor mount former, which should be 3/32" plywood.
About 1/64" plywood:
- It provides great strength with minimal weight and is easy to cut (scissors work).
- Use a thick cyanoacrylate glue (Super Jet, Hot Stuff Super 'T', etc.) to bond doublers. Streak the glue on, press sides and doublers together on a flat surface, and trim any misalignment with scissors.
- Sig Manufacturing Co. supplies 1/64" plywood if your hobby shop doesn't.
Balsa weight recommendations:
- 3/32" balsa: less than 1 oz. for a 3 x 36-in. sheet.
- 1/16" balsa: less than 3/4 oz. for a 3 x 36-in. sheet.
A small postal or dial scale is useful for checking these.
When installing formers, lay the motor in the nose to determine how far back the motor former should be. The motor should have just the prop holder sticking out for the best appearance.
Motor Mounting
- The motor former should be slanted back at the bottom to give some downthrust and square left to right (no side thrust). About 3° down relative to the stabilizer plane is a reasonable guideline—it's not critical, but some downthrust is necessary to prevent nose-up pull on launch and possible stall.
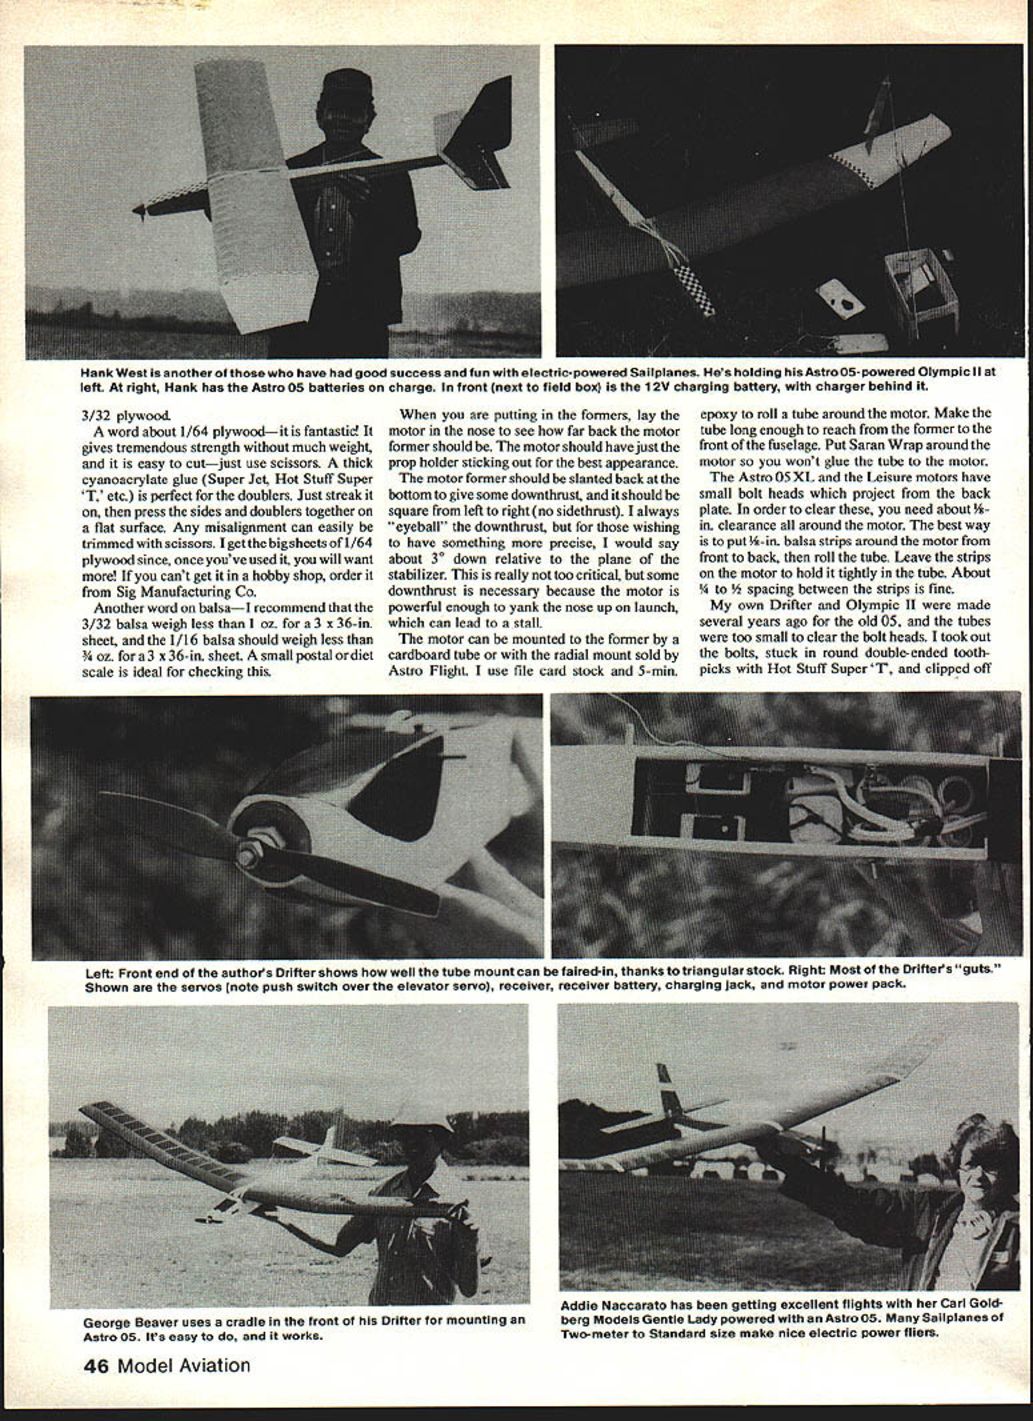
- Mount the motor to the former using a cardboard tube or an Astro Flight radial mount. I roll a tube from file card stock and bond it with 5-minute epoxy. Make the tube long enough to reach from the former to the front of the fuselage. Wrap the motor in Saran Wrap so you don't glue the tube to the motor.
- Astro 05XL and Leisure motors have small bolt heads projecting from the back plate. Allow about 1/8" clearance around the motor. Put 1/16" balsa strips around the motor from front to back, then roll the tube; leave the strips in place to hold the motor tightly. Spacing of 1/8" to 3/16" between strips is fine.
- In older motors where bolt heads are a problem, one workaround is to replace bolts with round double-ended toothpicks glued in and trimmed flush. Beware: do not push on the prop driver when inserting the motor—push only on the front plate; otherwise the toothpicks can break and the back plate fall off.
- Glue the cardboard tube to the former with 5-minute epoxy, add triangular stock around it, round the corners of the nose for a smooth finish, then complete the fuselage.
Equipment placement:
- Motor battery: just behind the front cabin former.
- Radio equipment: rear of the cabin.
- Servos: right in front of the back former.
- The ready-to-fly balance point should match the plans.
Motor Control and Switches
You can fly without motor control, but it's not advisable—planes can get very high and hard to see. Recommended control methods:
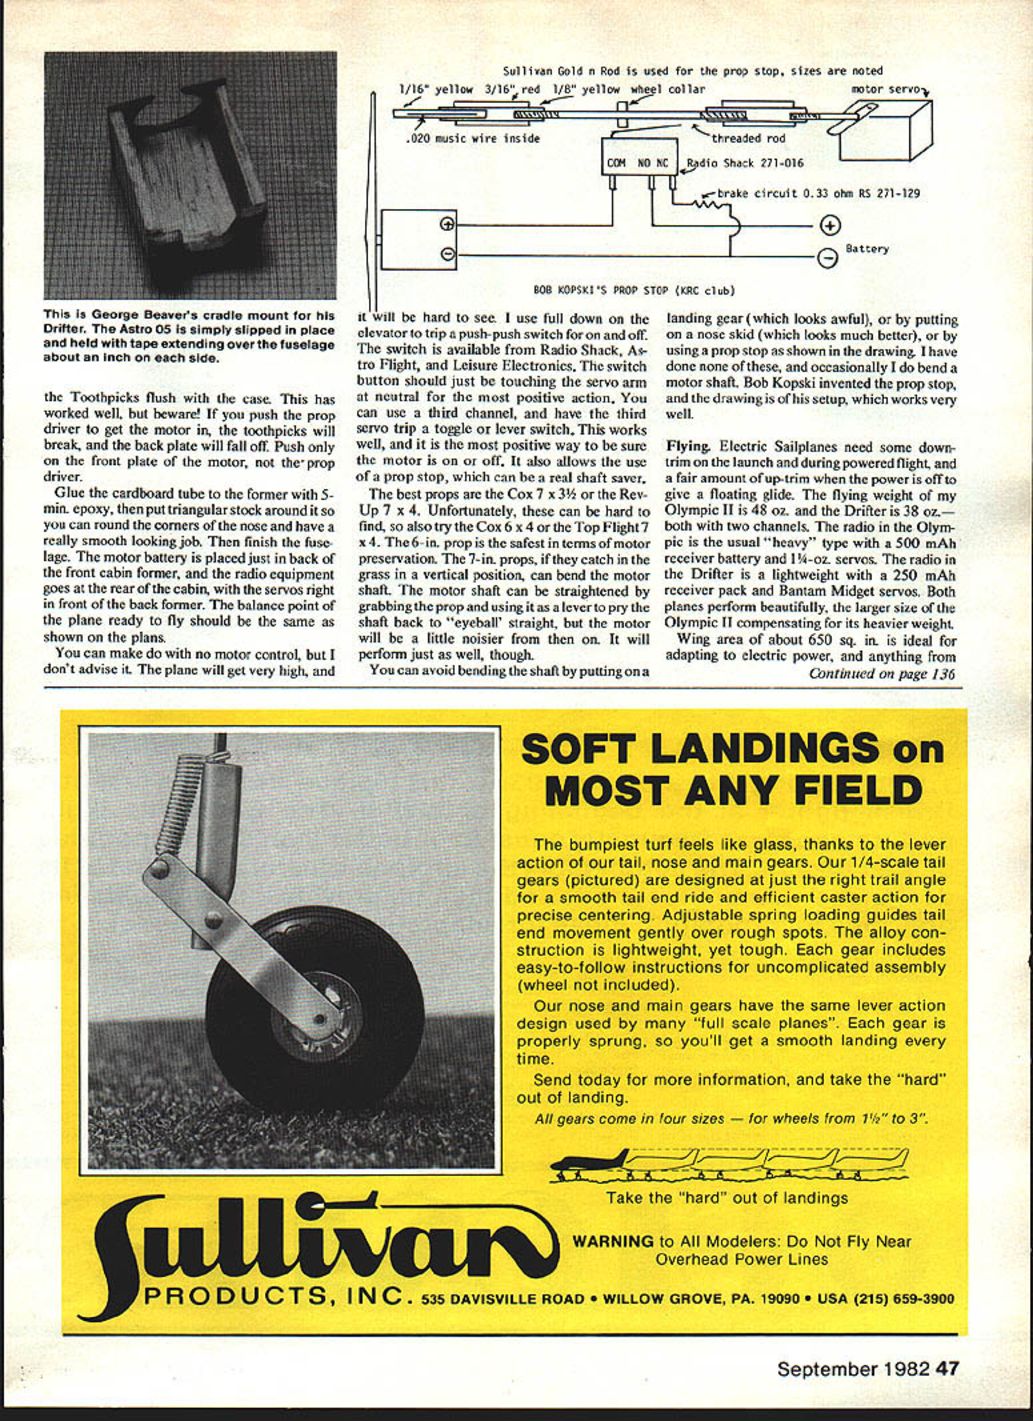
- Use elevator full down to trip a push-push switch for on/off. Push-push switches are available from Radio Shack, Astro Flight, and Leisure Electronics. Position the push button so it just touches the servo arm at neutral for positive action.
- Alternatively, use a third radio channel with a servo to trip a toggle or lever switch—this is reliable and allows use of a prop stop (a shaft saver).
Propellers and Shaft Protection
Recommended props:
- Cox 7 x 3-1/2 or Rev-Up 7 x 4 (best).
- If hard to find, try Cox 6 x 4 or Top Flight 7 x 4.
- The 6" prop is safer for the motor shaft; 7" props can bend the shaft if they catch in grass in a vertical position.
If the shaft bends:
- You can straighten it by grabbing the prop and prying the shaft back to eyeball straight. The motor may be slightly noisier afterward but will still perform well.
To avoid bending the shaft:
- Add a landing gear (ugly).
- Add a nose skid (better looking).
- Use a prop stop (effective). Bob Kopski invented a prop stop setup that works well.
Flying Tips
- Flying electric sailplanes need some down trim on launch and during powered flight, and a fair amount of up trim when the power is off for a floating glide.
- Example weights: Olympic II flying weight 48 oz. (two channels); Drifter 38 oz. (two channels). The Olympic used a heavier radio with a 500 mAh receiver battery and 1/4-oz servos; the Drifter used a lightweight radio with a 250 mAh receiver pack and Bantam Midget servos. Both performed well.
- Wing area: about 650 sq. in. is ideal for adapting to electric power; anything from 550 to 900 sq. in. will fly well.
Hand-launch technique:
- Set a little down-trim on the transmitter. Launch level or slightly "downhill." Use a toss (more like a javelin toss is unnecessary); be ready on the transmitter for nose-up pitch—apply down as needed to avoid a stall. Keep it from climbing for the first few seconds until it has flying speed, then let it climb.
Thermals and power-off flight:
- When at desired altitude, turn off the motor. The sailplane will feel nose-heavy and speed up; trim in enough up so that the glide is gentle with no stick pressure. Now look for thermals.
- If the nose or a wingtip suddenly pitches up, you've hit lift—turn back to that spot and circle until you rise.
Landing:
- Keep the motor off and trim for a level glide. Land into the wind if possible and keep the wings level.
- If you want to flare, wait until the plane is nearly on the ground—flaring too early often causes the plane to jump up and come down hard. Either "drive it on" or give up elevator only in the last half-second.
Maintenance note:
- Check the motor battery pack every two flights; if it is hot, let it cool off.
Welcome to the club. It's all fun!
Sources
- Astro Flight, Inc., 13311 Beach Ave., Venice, CA 90291.
- Leisure Electronics, 11 Deerspring, Irvine, CA 92714.
- Parker R/C Planes, P.O. Box 8195, Van Nuys, CA 91409.
- Midnight Models—Dave's Custom Models, 1844 W. Glenoaks Blvd., Glendale, CA 91201.
- RCM Plans Service, P.O. Box 487, Sierra Madre, CA 91024.
- Sig Manufacturing Co., Inc., Montezuma, IA 50171.
Transcribed from original scans by AI. Minor OCR errors may remain.

