
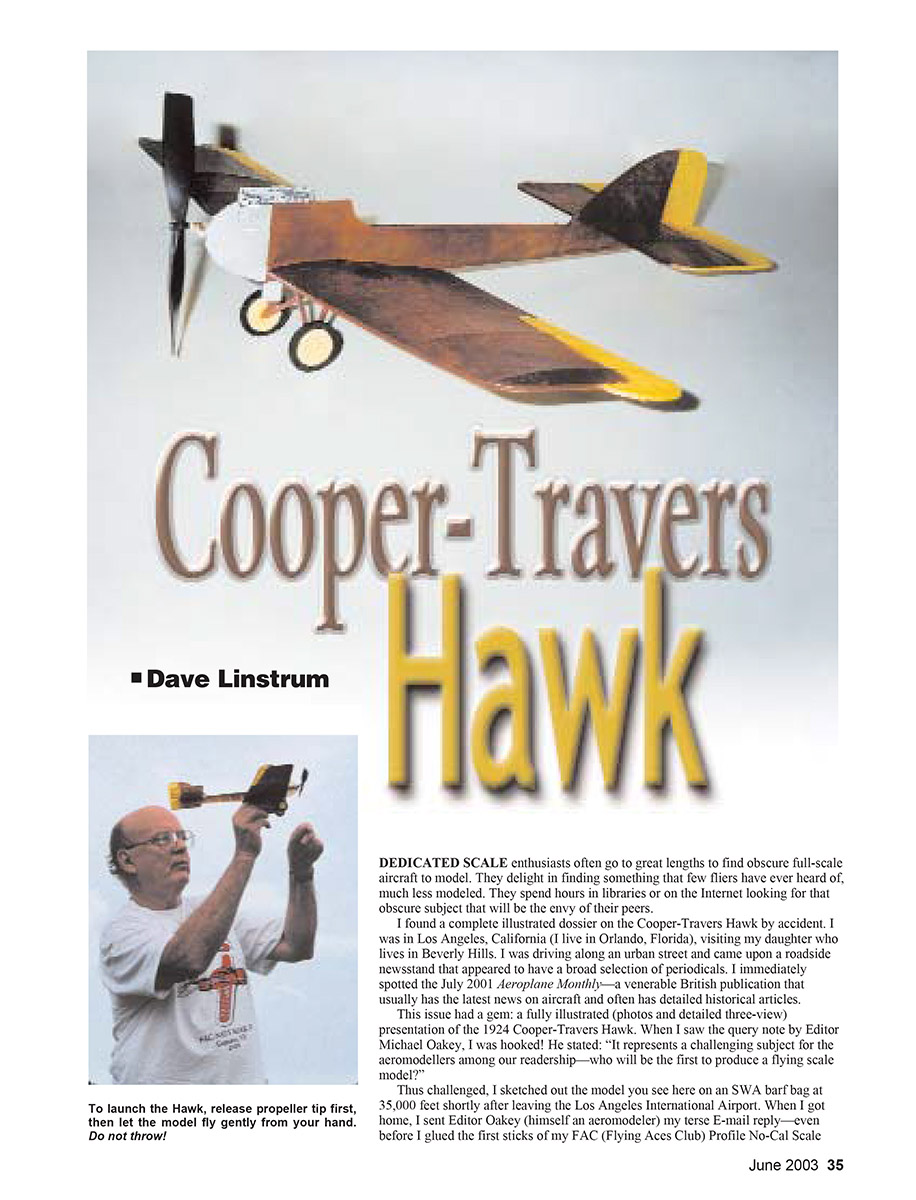
Cooper-Travers Hawk
Dave Linstrum
DEDICATED scale enthusiasts often go to great lengths to find obscure full-scale aircraft to model. They delight in finding something that few fliers have ever heard of, much less modeled. They spend hours in libraries or on the Internet looking for that obscure subject that will be the envy of their peers.
I found a complete illustrated dossier on the Cooper-Travers Hawk by accident. I was in Los Angeles, California (I live in Orlando, Florida), visiting my daughter who lives in Beverly Hills. I was driving along an urban street and came upon a roadside newsstand that appeared to have a broad selection of periodicals. I immediately spotted the July 2001 Aeroplane Monthly — a venerable British publication that usually has the latest news on aircraft and often has detailed historical articles.
This issue had a gem: a fully illustrated (photos and detailed three-view) presentation of the 1924 Cooper-Travers Hawk. When I saw the query note by Editor Michael Oakey, I was hooked! He stated: "It represents a challenging subject for the aeromodellers among our readership — who will be the first to produce a flying scale model?" Thus challenged, I sketched out the model you see here on an SWA barf bag at 35,000 feet shortly after leaving the Los Angeles International Airport. When I got home, I sent Editor Oakey (himself an aeromodeler) my terse E-mail reply—even before I glued the first sticks of my FAC (Flying Aces Club) Profile No-Cal Scale design. I wrote: "A Yank will be first!" He sent his E-mail reply from London that he was looking forward to hearing more. I built the model, took flight photos, and mailed them to him as proof. Indeed, I was first.
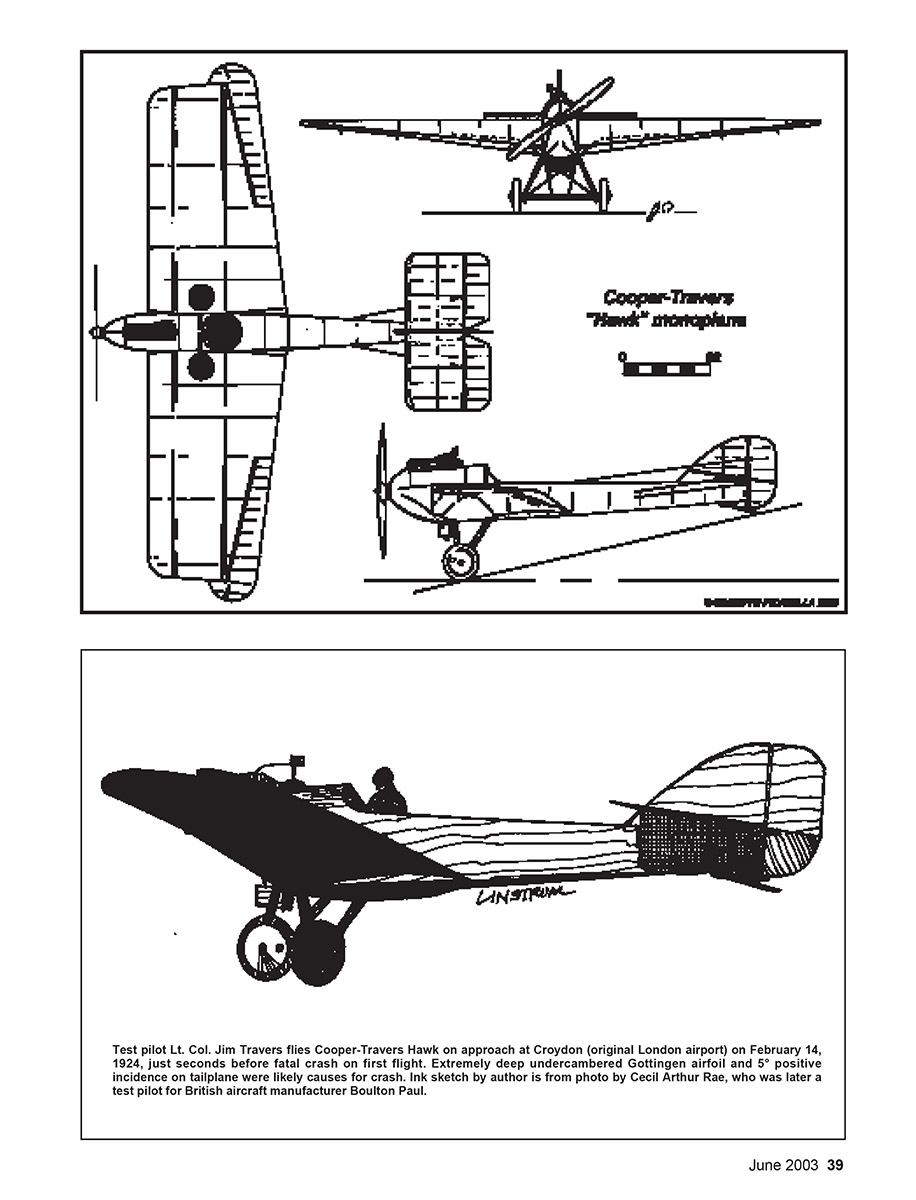
In the article "Lesser-Known Aircraft" by distinguished aerohistorian Arthur W.J.G. Ord-Hume, there is a photo of casual, intrepid test pilot James L. Travers taken when he was a regular flier at Hendon Aerodrome (London) in 1912. There is also a photo of Lt. Col. Jim Travers on approach at Croydon Aerodrome (London) taken the afternoon of February 14, 1924, captioned: "… The aircraft and its designer are seconds from disaster. The picture shows clearly the extremely deep undercambered Gottingen wing section, as well as revealing the five-degree angle of incidence on the unbraced tailplane." My ink sketch from that photo shows these two fatal design flaws. The thick wing was to accommodate two passengers in the wing root — one on either side of the pilot's cockpit. Cooper put the positive incidence in the tailplane, and it gave Travers pause before he took off, but not enough pause … A fatal crash on the first test flight was proof enough for me to eliminate both of those flaws from my model design.
I used a simple undercambered wing rib and set the stabilizer at 0° — a setup proven on my past No-Cal designs (such as the Dornier Falke) as stable for Free Flight. I was proven right — and no test pilot was put at risk.
As Aeroplane stated, "The short life of the one-off Cooper-Travers Hawk of 1924 has denied it a place in aviation history. Arthur W.J.G. Ord-Hume investigates why this revolutionary design ended in a flaming pyre." You do not need further history to build this simple replica, but you can order a back issue of the 7/01 Aeroplane if you want more details or want to design your own Radio Control version. See the end of this article for details. I thank that publication and Editor Oakey for his kind permission to reproduce here the beautifully drawn Giuseppe Picarella three-view and the preceding quotes. Giuseppe is a maestro.
Construction
Preparation:
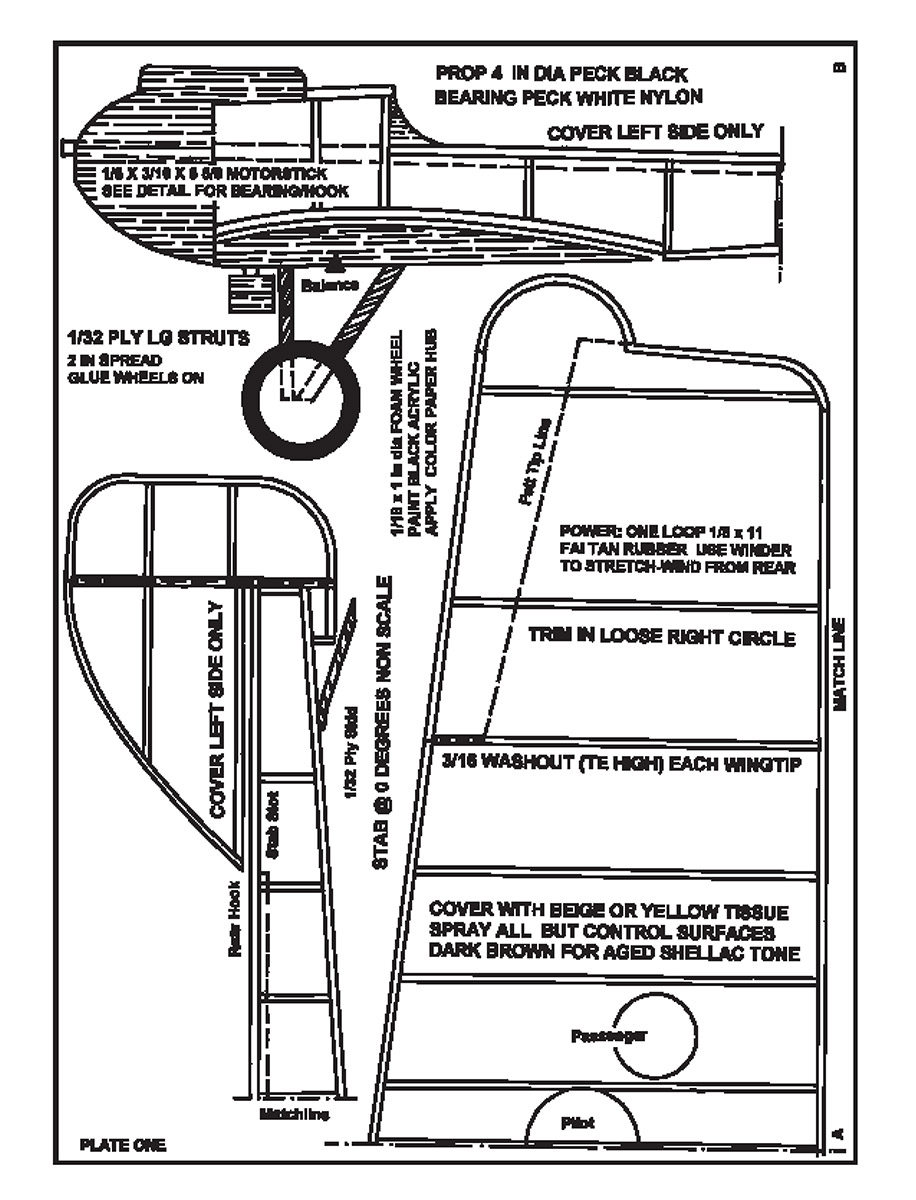
- Make photocopies (two each — the second set is for patterns) of the two letter-size plates of building plans. This way you can avoid cutting up your Model Aviation. Be sure to hold the magazine down tight on the copier glass to capture the image near the binding.
- Tape the building plates together along match line A–B with 3M Scotch Magic Tape.
- Tape the plates to your building board (an 11 x 17-inch scrap of pin-stickable Fome‑Cor will do), and cover with waxed paper to prevent glued balsa from adhering to the plans.
Materials and Tools
Free Flight stick-and-tissue construction and flying require special tools and materials. At the least, you must have:
- X-Acto (or similar) model knife with a #11 pointed blade
- Bead-head dressmaker pins
- Self-healing cutting board (or a scrap of dark artist’s matboard)
- Glue: Duco cement or thick gel CyA (cyanoacrylate)
- Glue stick for covering with tissue
- Needle-nose pliers for bending the rear hook and propeller shaft
Get the preceding items at your local Wal‑Mart. You may need to go to an art store for the cutting/matboard. Cutting balsa on this is a pleasure. Do not cut on the plans!
Wing
- Build the wing in two halves — port and starboard — each built upside down over the plan.
- Cement a 1/16 x 3/32-inch leading-edge strip in place.
- Add the ribs and a 1/16 x 1/8-inch rear spar, then add the 1/16 x 1/4-inch trailing-edge stock.
- Pin the assembly over the plan and add 1/16 x 1/4-inch tip stock to each wing half.
- When both halves are completed, cement the center joiner block between the spar ends and build the wing dihedral by surfacing the top center of the joiner block with a small sheet of 1/16-inch to make the proper dihedral angle.
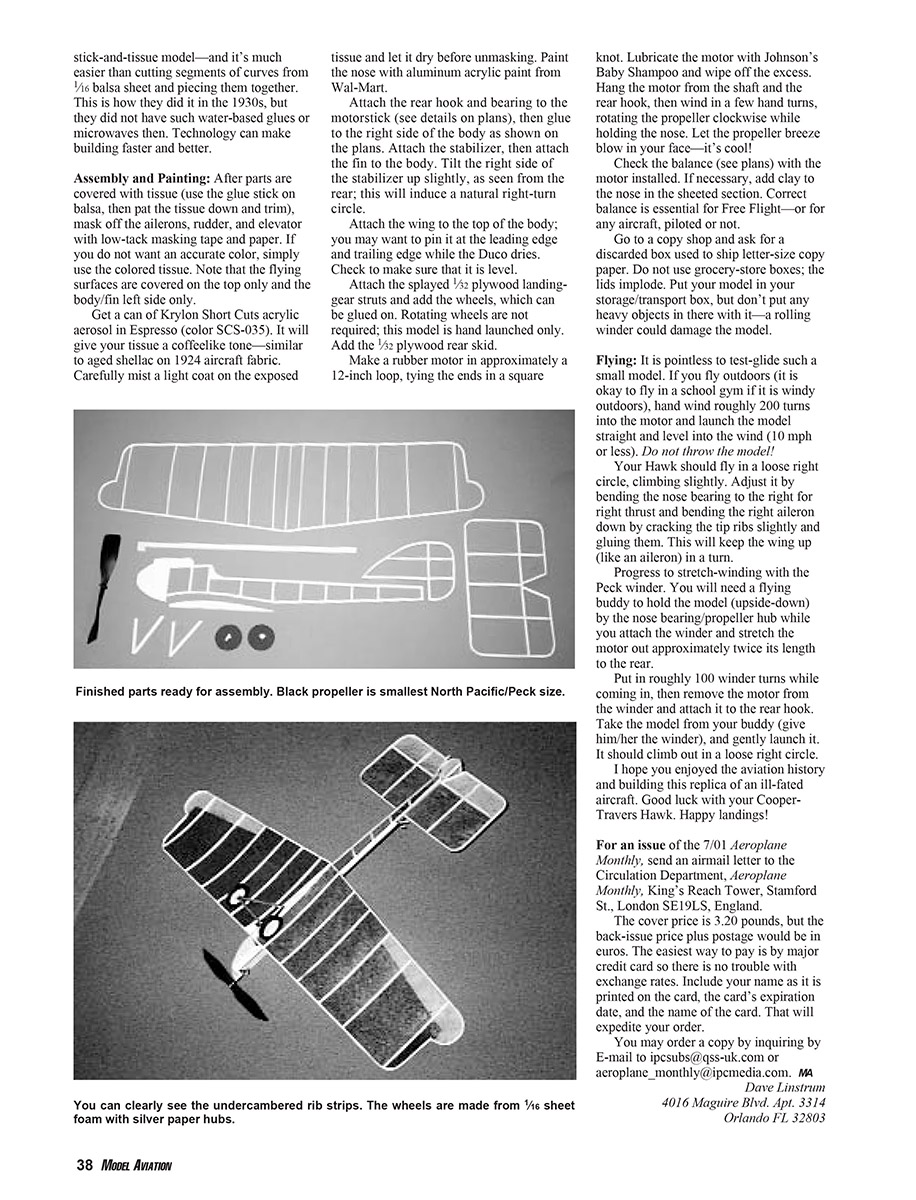
- Sand the wing to shape and add 1/32-inch balsa sheeting on the top center from tip to tip (the bottom center remains uncovered).
Fuselage
- Build the fuselage sides over the plan using 1/16 x 1/8-inch longerons and 1/16-inch verticals.
- Join the sides at the tail post and add the 1/16-inch formers.
- Add 1/16 x 1/8-inch top and bottom stringers and sand to shape.
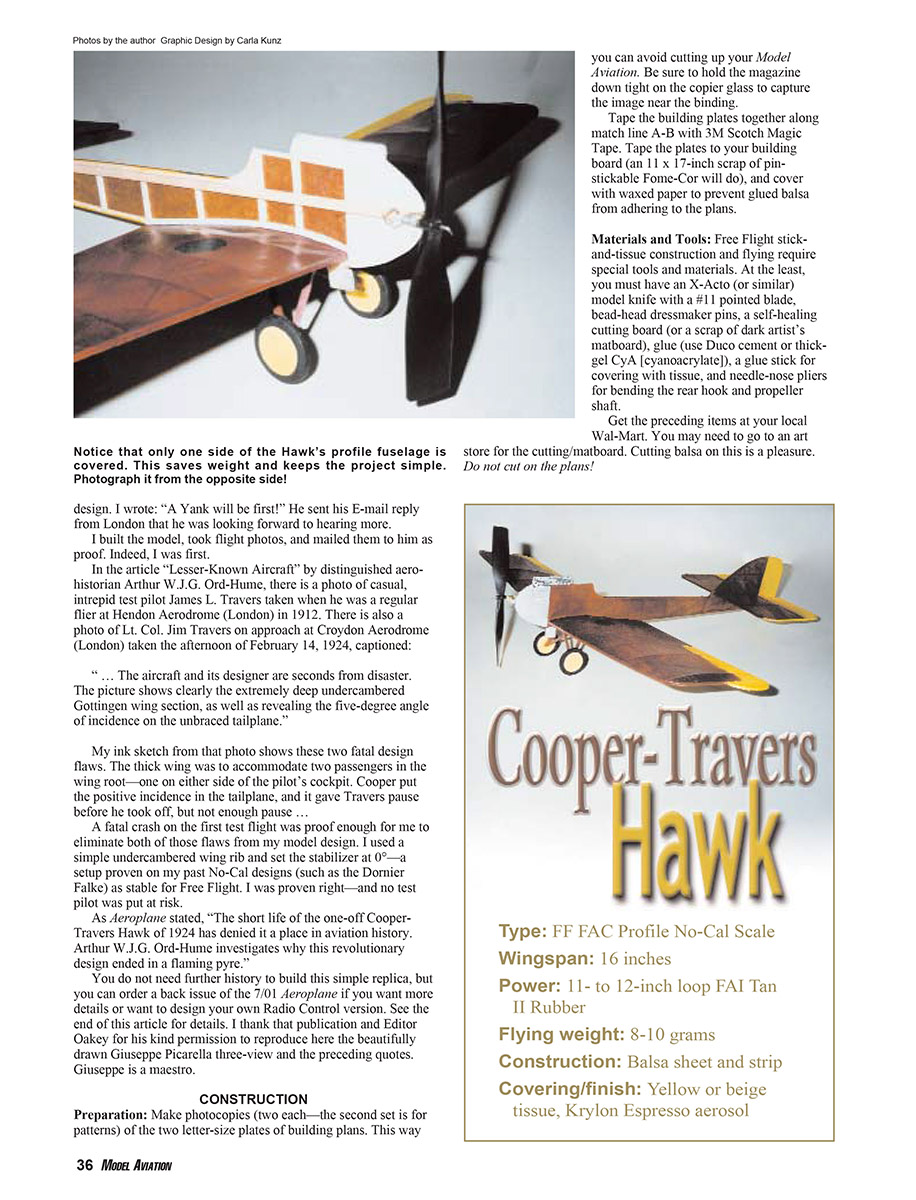
- The port-side fuselage is sheeted with 1/32-inch balsa forward of the cockpit; leave the starboard side open to save weight and simplify rigging.
- Glue in the wing saddle and mount the wing with a small block and screw.
Tail
- The tailplane and fin are built flat from 1/16-inch balsa sheet. Cut them carefully and sand to shape.
- Set the stabilizer at 0° incidence.
- Add the rudder and elevators with small hinges and trim to balance.
Covering and Finish
- Cover the model with lightweight tissue (Klein or Jap tissue) and dope or iron-on covering as preferred.
- The sample model uses yellow or beige tissue with Krylon Espresso aerosol for the top surfaces.
- Dope gently to avoid warps and add trim markings with colored tissue or paint.
Trim and Flying
- Balance the model at the point shown on the plan (about 1/3 chord).
- Add small amounts of nose weight as necessary to achieve the proper balance.
- Set the motor to give moderate power for glide tests and adjust the elevator and rudder for straight flight.
- To launch the Hawk, release propeller tip first, then let the model fly gently from your hand. Do not throw!
Most hobby shops do not have the light balsa and tissue needed to build this model. An excellent mail-order source is Peck-Polymers (see the company's ad in Model Aviation). To order the complete catalog for S4, which is a good investment, call (619) 448-1818. Mail order is a great resource. Peck is the best source for Free Flight.
You should order:
- 1/16 and 1/32 balsa (get small sheets and a dozen 1/16 square sticks)
- 1/32 plywood
- a sheet of yellow or tan Esaki tissue
- a 4-inch black square-tip plastic propeller
- a pack of 1/32-inch-diameter shafts
- a pack of white nylon Peanut bearings
- a pack of 1-inch black plastic wheels (or cut your own from white carryout tray foam)
- a pack of 1/8-inch FAI Tan II rubber
- a Peck 5:1 winder for rubber
- X-Acto knife
Recommended reference books:
- Don Ross — Rubber Power Flying Models
- Building the Peck ROG by Bill Warner
Both have many photos and excellent drawings by Jim Kaman and are available from Peck-Polymers.
If you have no stick-and-tissue experience, order some simple kits:
- an AMA Cub (Delta Dart)
- a Peck ROG
- perhaps a Sky Bunny
These have complete, illustrated instructions that will make you skillful in a hurry. The Hawk is not a beginner's model!
Building
- I will not tell you how to glue Part A to Part B; the aforementioned kits and books will teach you that. The Cooper-Travers Hawk is not an ARF (Almost Ready-to-Fly) with an instruction book; it is a craftsman's project requiring some basic skills.
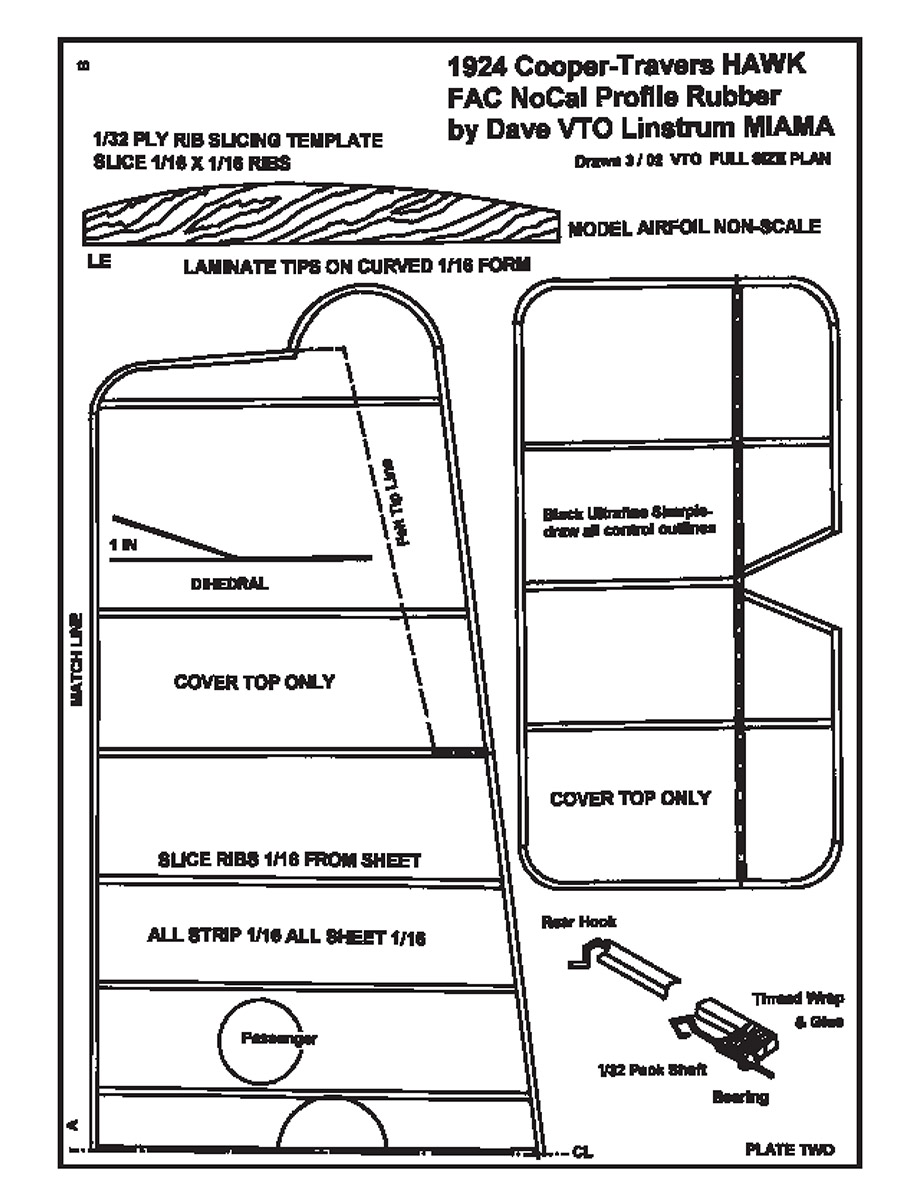
- The sliced wing ribs may be new to you. Make a rib-slicing pattern from 1/32 plywood using the extra plans copy (glue-stick the pattern to the plywood). Cut a sheet of 1/16 balsa to the length of the center rib, then tape it to the cutting board at the bottom of the balsa. Slice away with the X-Acto knife at the top and discard the scrap, then move the pattern down 1/16 inch. Carefully slice again; you may need a couple of light strokes.
- Cut a full set of ribs. Taper them from the rear before you glue them in place to the leading edge and trailing edge. Note that there is only one center rib, which is added as you put in the 1-inch dihedral. Be sure that half of the wing is pinned down flat as you raise the other tip.
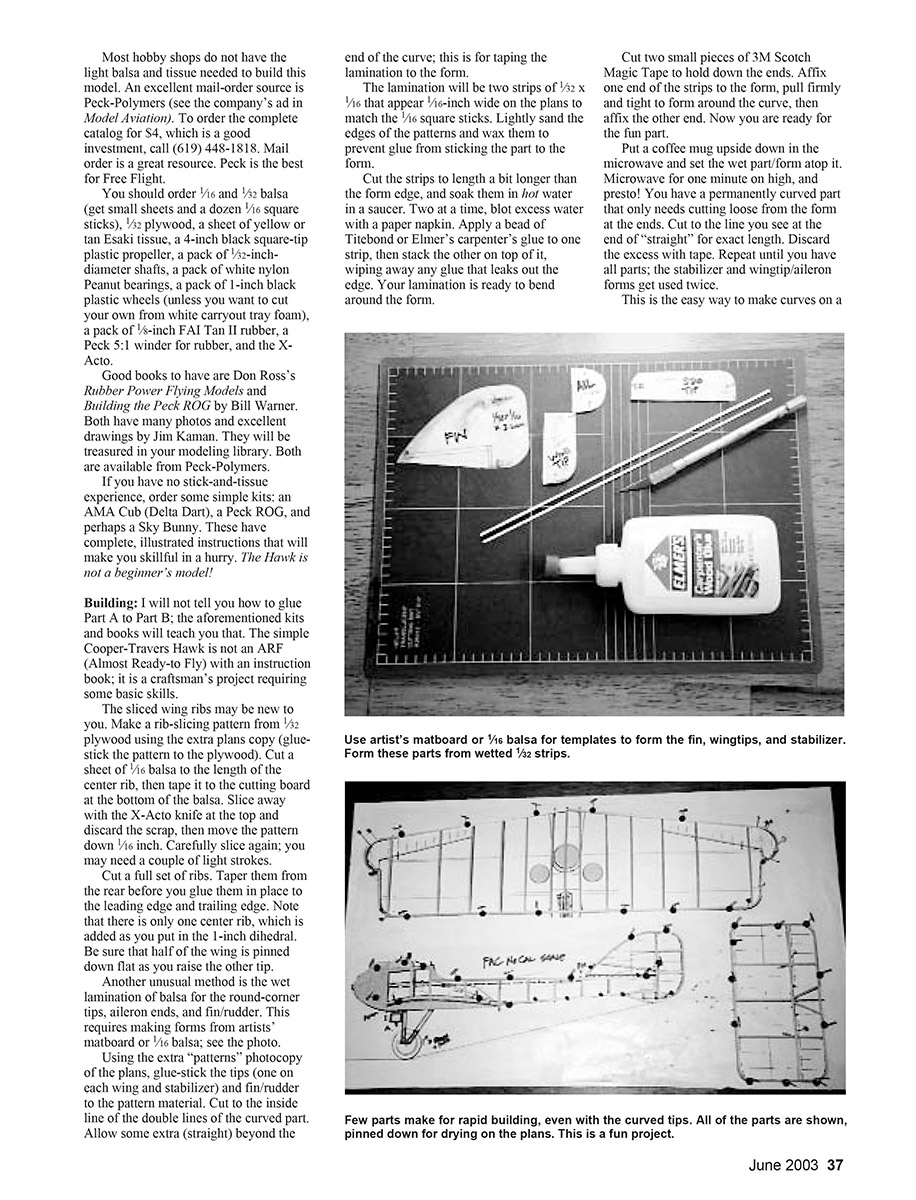
Wet lamination for rounded tips, aileron ends, and fin/rudder:
- Make forms from artists' matboard or 1/16 balsa.
- Using the extra "patterns" photocopy of the plans, glue-stick the tips (one on each wing and stabilizer) and fin/rudder to the pattern material. Cut to the inside line of the double lines of the curved part. Allow some extra (straight) beyond the end of the curve; this is for taping the lamination to the form.
- The lamination will be two strips of 1/32 x 1/16 that appear 1/16-inch wide on the plans to match the 1/16 square sticks. Lightly sand the edges of the patterns and wax them to prevent glue from sticking the part to the form.
- Cut the strips to length a bit longer than the form edge, and soak them in hot water in a saucer. Two at a time, blot excess water with a paper napkin. Apply a bead of Titebond or Elmer's carpenter's glue to one strip, then stack the other on top of it, wiping away any glue that leaks out the edge.
- Affix one end of the strips to the form with small pieces of 3M Scotch Magic Tape, pull firmly and tight to form around the curve, then affix the other end.
- Put the wet part/form on an inverted coffee mug in the microwave and heat for one minute on high. When dry, cut the part loose from the form at the ends and trim to the line.
This method is much easier than cutting segments of curves from 1/16 balsa sheet and piecing them together.
Assembly and Painting
- After parts are covered with tissue (use the glue stick on balsa, then pat the tissue down and trim), mask off the ailerons, rudder, and elevator with low-tack masking tape and paper. Note that the flying surfaces are covered on the top only and the body/fin left side only.
- Use Krylon Short Cuts acrylic aerosol in Espresso (color SCS-035) to give the tissue a coffee-like tone — similar to aged shellac on 1924 aircraft fabric. Carefully mist a light coat on the exposed tissue and let it dry before unmasking. Paint the nose with aluminum acrylic paint from Wal‑Mart.
- Attach the rear hook and bearing to the motorstick (see details on plans), then glue to the right side of the body as shown on the plans. Attach the stabilizer, then attach the fin to the body. Tilt the right side of the stabilizer up slightly, as seen from the rear; this will induce a natural right-turn circle.
- Attach the wing to the top of the body; you may want to pin it at the leading edge and trailing edge while the Duco dries. Check to make sure that it is level.
- Attach the splayed 1/32 plywood landing-gear struts and add the wheels; rotating wheels are not required as this model is hand launched only. Add the 1/32 plywood rear skid.
Motor and balance:
- Make a rubber motor in approximately a 12-inch loop, tying the ends in a square knot. Lubricate the motor with Johnson's Baby Shampoo and wipe off the excess.
- Hang the motor from the shaft and the rear hook, then wind a few hand turns, rotating the propeller clockwise while holding the nose.
- Check the balance with the motor installed. If necessary, add clay to the nose in the sheeted section. Correct balance is essential for Free Flight.
Storage:
- Go to a copy shop and ask for a discarded box used to ship letter-size copy paper. Do not use grocery-store boxes; the lids implode. Put your model in your storage/transport box, but don't put any heavy objects in there with it — a rolling winder could damage the model.
Flying
- It is pointless to test-glide such a small model. If you fly outdoors (it is okay to fly in a school gym if it is windy outdoors), hand wind roughly 200 turns into the motor and launch the model straight and level into the wind (10 mph or less). Do not throw the model!
- Your Hawk should fly in a loose right circle, climbing slightly. Adjust it by bending the nose bearing to the right for right thrust and bending the right aileron down by cracking the tip ribs slightly and gluing them. This will keep the wing up (like an aileron) in a turn.
- Progress to stretch-winding with the Peck winder. You will need a flying buddy to hold the model (upside-down by the nose bearing/propeller hub) while you attach the winder and stretch the motor out approximately twice its length to the rear.
- Put in roughly 100 winder turns while coming in, then remove the motor from the winder and attach it to the rear hook. Take the model from your buddy (give him/her the winder), and gently launch it. It should climb out in a loose right circle.
I hope you enjoyed the aviation history and building this replica of an ill-fated aircraft. Good luck with your Cooper-Travers Hawk. Happy landings!
Ordering the 7/01 Aeroplane Monthly back issue
For an issue of the 7/01 Aeroplane Monthly, send an airmail letter to:
- Circulation Department, Aeroplane Monthly
- King's Reach Tower, Stamford St., London SE1 9LS, England
The cover price is 3.20 pounds, but the back-issue price plus postage would be in euros. The easiest way to pay is by major credit card so there is no trouble with exchange rates. Include your name as it is printed on the card, the card's expiration date, and the name on the card. That will expedite your order.
You may also order or inquire by E-mail:
Plans / Notes (extracted)
- 1924 Cooper-Travers HAWK
- FAC NoCal Profile Rubber
- by Dave Linstrum
- Drawn 3/04 — Full-size plan
- 1/32 PLY RIB SLICING TEMPLATE — SLICE 1/16 x 1/16 RIBS
- LAMINATE TIPS ON CURVED 1/16 FORM
- MODEL AIRFOIL NON-SCALE
- MATCH LINE
- DIHEDRAL — 1 IN
- COVER TOP ONLY
- SLICE RIBS 1/16 FROM SHEET
- ALL STRIP 1/16 ALL SHEET 1/16
- Passenger
- CL
- Black Ultrafine Sharpie — draw all control outlines
- Rear Hook
- Thread Wrap & Glue
- 1/32 Shaft
- Bearing
- PLATE TWO
Contact: Dave Linstrum 4016 Maguire Blvd., Apt. 3314 Orlando, FL 32803
Transcribed from original scans by AI. Minor OCR errors may remain.

