
Country Boy
JUST AS SURELY as names like "Citation" and "Whirlaway" and "Bold Ruler" and "Foolish Pleasure" conjure up glimpses of power and motion in the minds of horse race fans, so names like "Witch Doctor" and "Scrambler" and "Fire Wagon" and "Okie Bird" set free visions of swiftness and grace in the minds of free flighters. Make no mistake about it, blood lines tell in any sort of competition.
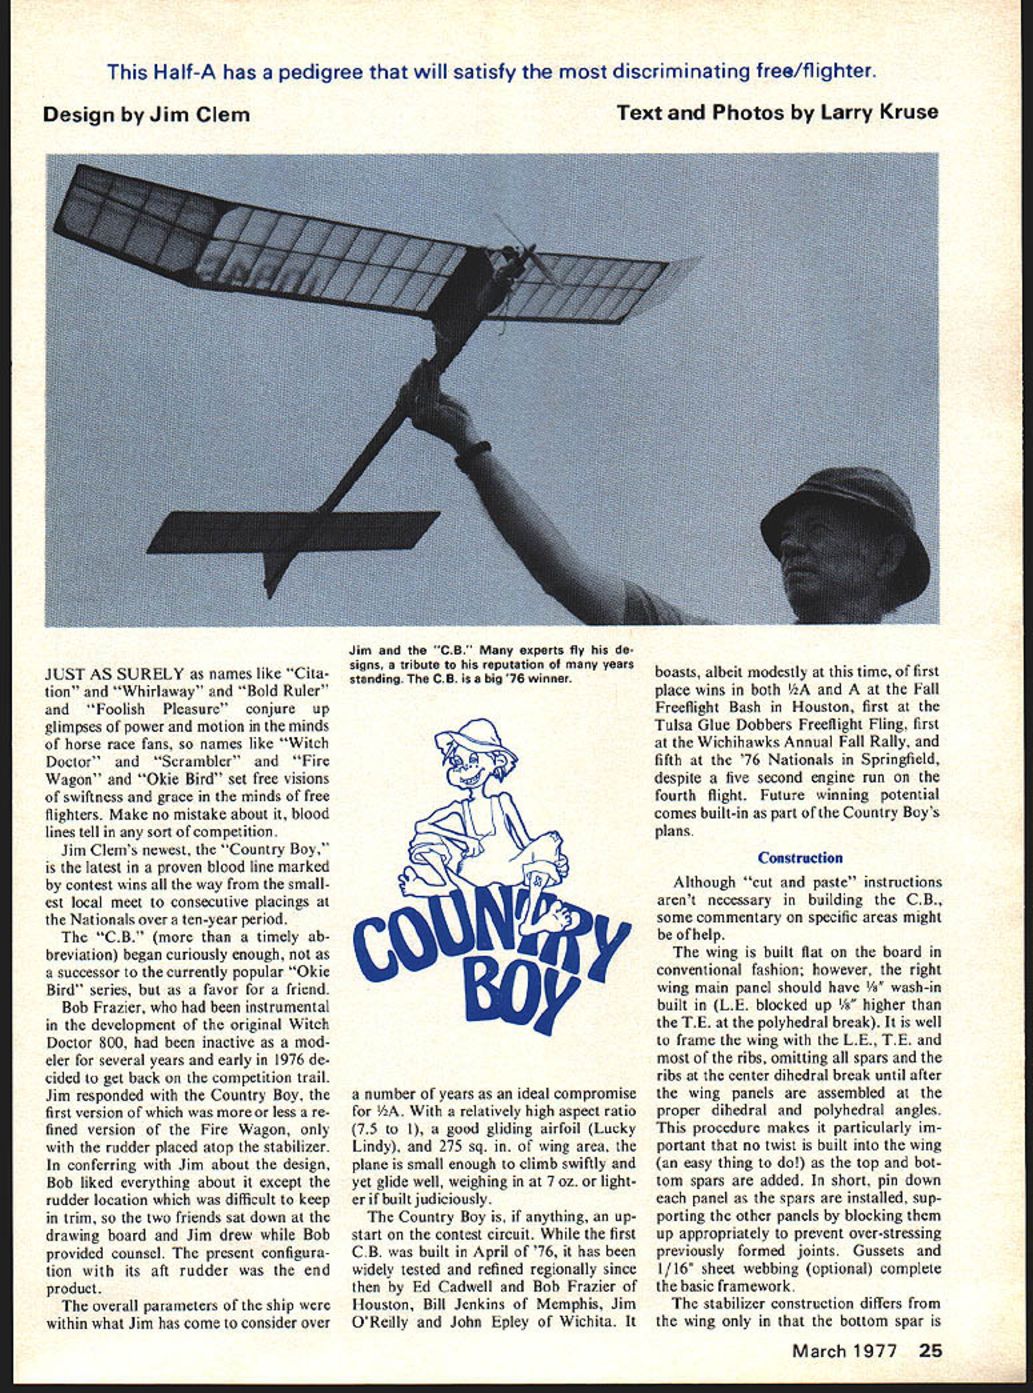
Jim Clem's newest, the "Country Boy," is the latest in a proven blood line marked by contest wins all the way from the smallest local meet to consecutive placings at the Nationals over a ten-year period.
The "C.B." (more than a timely abbreviation) began construction as a successor to the currently popular "Okie Bird" series, but as a favor for a friend.
Bob Frazier, who had been instrumental in the development of the original Witch Doctor 800, had been inactive as a modeler for several years and early in 1976 decided to get back on the competition trail. He quickly became a Country Boy, the first version of which was more or less a refined version of the Fire Wagon, only with the rudder placed atop the stabilizer. Bob liked everything about the design except for one minor detail. Mounting the rudder location was difficult to keep in trim, so the rudder was set down on the drawing board by Jim and swell Bob provided clout. The present configuration with its aft rudder was the end product.
The overall parameters of the ship were within what Jim has come to consider over a number of years as an ideal compromise for ½A. With a relatively high aspect ratio (7.5 to 1), a good gliding airfoil (Lucky Lindy), and 275 sq. in. of wing area, the plane is small enough to climb swiftly and yet glide well, weighing in at 7 oz. or lighter if built judiciously.
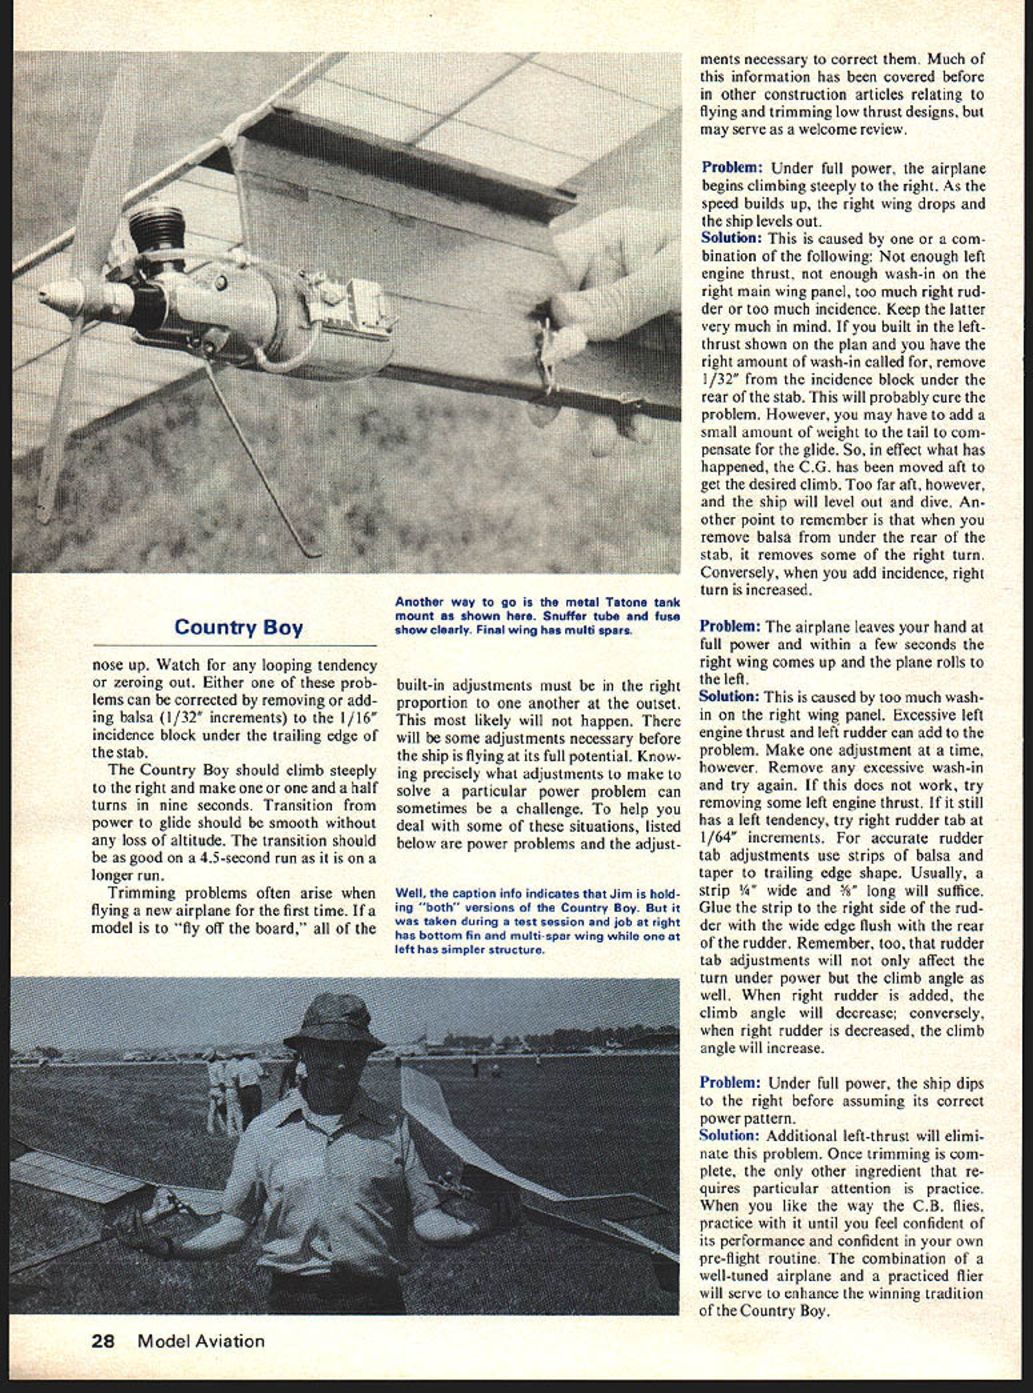
The C.B. has won, if anything, an upper on the contest circuit. While the first C.B. was built in April of '76, it has been widely tested and refined repeatedly. It is flown by Ed Cadwell and Bob Frazier of Houston, Bill Swindell of Memphis, Jim O'Reilly and John Epley of Wichita. It boasts, albeit modestly at this time, of first place wins in both ½A and A at the Fall Freeflight Bash in Houston, first at the Tulsa Glue Dobbers Freeflite Fling, first at the Wichiwakes Annual Fall Rally, and fifth at the '76 Nationals in Springfield, despite a five second engine run on the fourth flight. Future winning potential comes built-in as part of the Country Boy's plans.
Construction
Although "cut and paste" instructions aren't necessary in building the C.B., some commentary on specific areas might be of help.
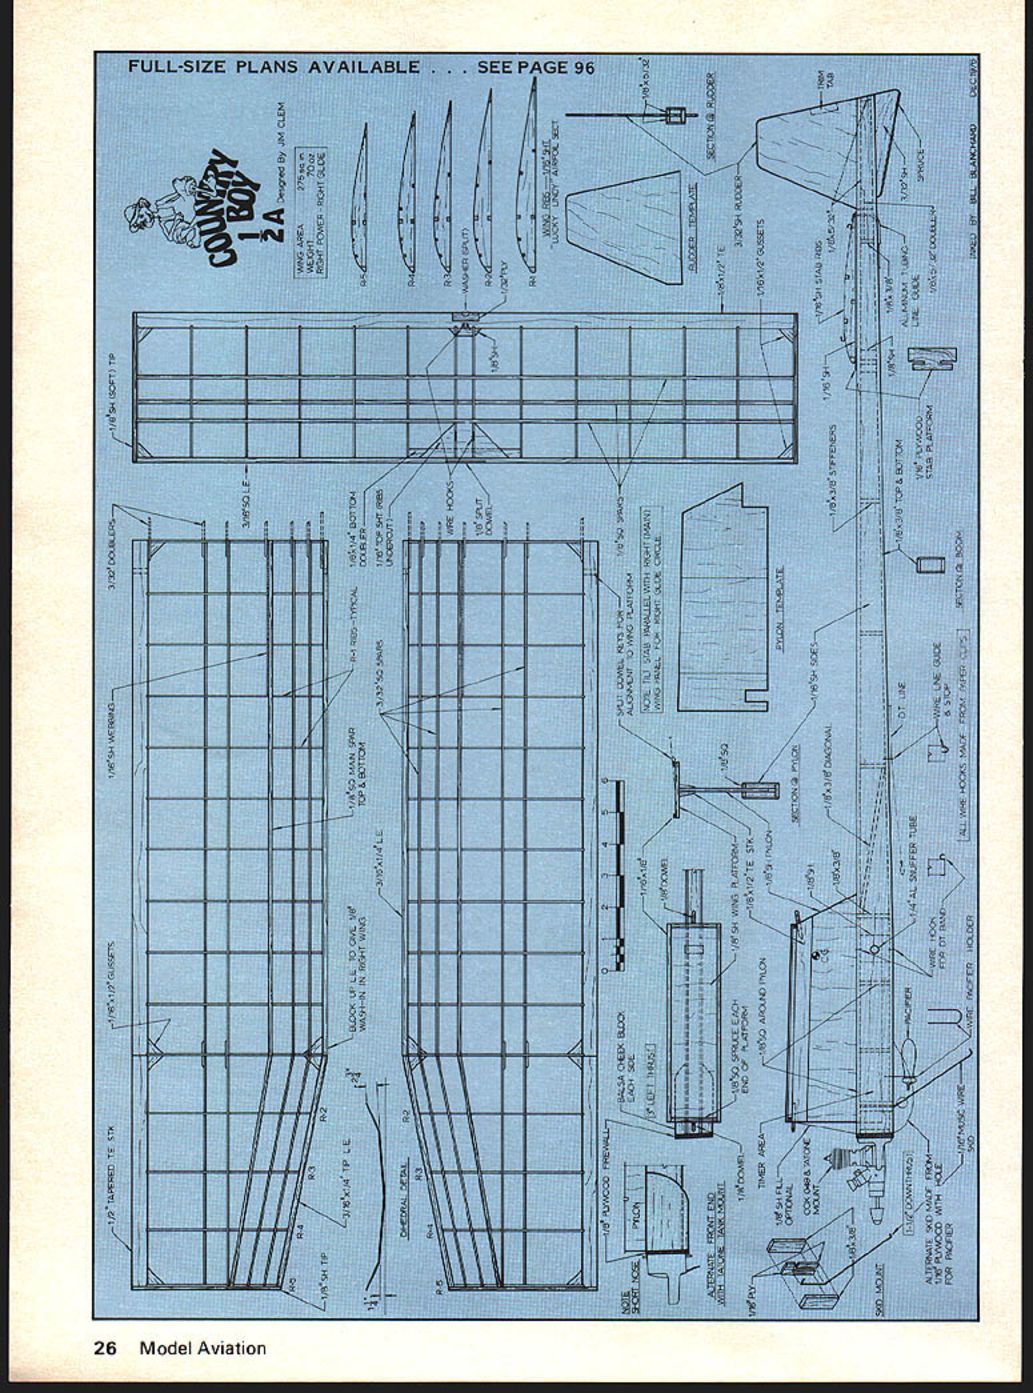
The wing is built flat on the board in conventional fashion; however, the right wing main panel should have ⅜" wash-in built in (L.E. blocked up ⅛" higher than the T.E. at the polyhedral break). It is well to frame the wing right on the top contour of the ribs, omitting all spars and the rest of the center sheeting assembly. The D.T. should be accommodated in one of the upper dihedral and polyhedral angles. Because this is particularly important that no twist is built into the other wing panel, build on a solid and bottom joints. The other wing panel can be framed the same way with stress making sure both spars align exactly when the joint dihedral brace is fitted. The tapered latter and the T.E. are soldered together to prevent over-stressing the spar joints.
The building (optional) complete of the basic framework construction differs from the wing only in that the bottom spar is placed on the plan along with the leading and trailing edges. The ribs, top spars, and sheeted portion of the front center can now be set together, with the sheeting providing the necessary strength for the D-T hooks. The remaining construction is detailed on the plans.
The fuselage, likewise, presents no surprises, except that the basic framework of ¼ X ½" longerons and vertical members, ⅜" sq. strips in the pylon area, and ½ x 5/32" strips in the rudder area are all assembled (complete with the pylon and the rudder, of course) directly on the plan, pins sheet fuselage sides in place.
Pay particular attention to perfectly aligning the rudder and the pylon during the basic framing process. Any misalignment will show up quickly (you'd be amazed how quickly!) in later flight testing.
When the fuselage framework is dry, remove it from the plans and use it as a template to trace the 1/16" sheet sides. Use Tite Bond or some other aliphatic resin glue to cement both sides in place at the same time and weight them down 'til they're dry.
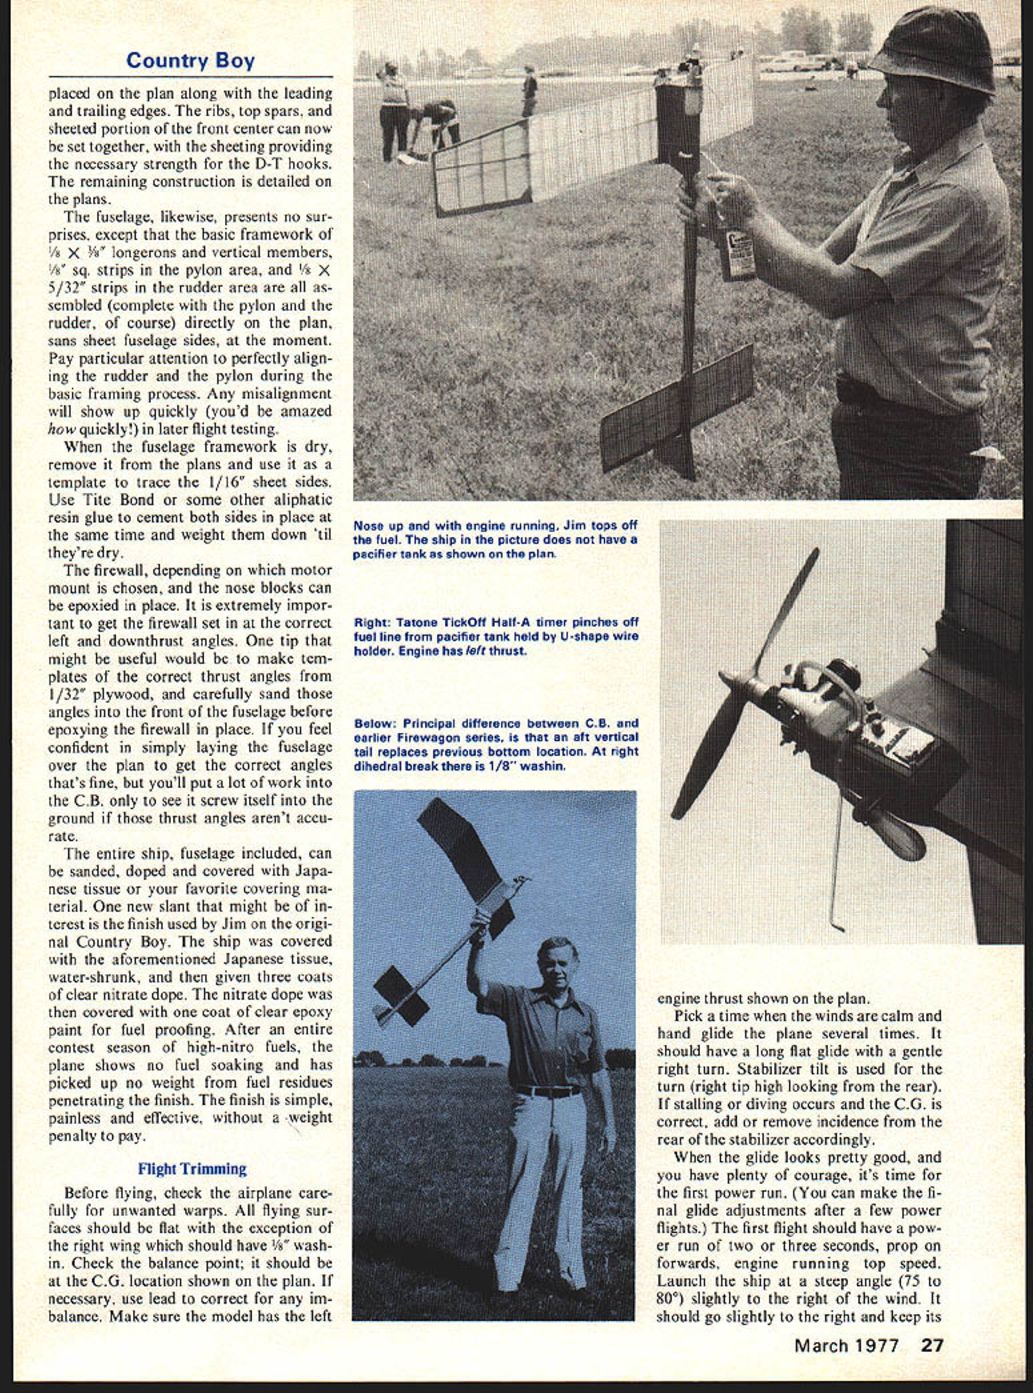
The firewall, depending on which motor mount is chosen, and the nose blocks can be epoxied in place. It is extremely important to get the firewall set in at the correct left and downthrust angles. One tip that might be useful would be to make templates of the correct thrust angles from 1/32" plywood, and temporarily glue those angles into the front of the fuselage before epoxying the firewall in place. If you feel confident in simply laying the fuselage over the plan to get the correct angles that's fine, but you'll put a lot of work into the C.B. only to see it screw itself into the ground if those thrust angles aren't accurate.
The entire ship, fuselage included, can be sanded, doped and covered with Japanese tissue or your favorite covering material. One new slant that might be of interest is the finish used by Jim on the covered Country Boy. The ship was covered with the aforementioned Japanese tissue, water-shrunk, and then given three coats of clear nitrate dope. The nitrate dope was then covered with one coat of clear epoxy paint for fuel proofing. After an entire contest season of high-nitro fuels, the plane shows no fuel soaking and has picked up no weight from repeated penetrating the finish. The finish is simple, painless and effective, without a weight penalty to pay.
Flight Trimming
Before flying, check the airplane carefully for unwanted warps. All flying surfaces should be flat, with the exception of the right wing which should have ⅜" wash-in. Check the balance and adjust weight at the C.G. location shown on the plan. If necessary, use lead to correct for any out of balance. Make sure the model has the left engine thrust shown on the plan.
Pick a time when the winds are calm and hand glide the plane several times. It should have a long flat glide with a gentle right turn. Stabilizer tilt is used for the turn (right tip high looking from the rear). If stalling or diving occurs and the C.G. is correct, add or remove incidence from the rear of the stabilizer accordingly.
When the glide looks pretty good, and you have plenty of courage, it's time for the first power run. (You can make the final glide adjustments after a few power flights.) The first flight should have a power run of two or three seconds, prop on forwards, engine running counterclockwise. Launch the ship at a steep angle (75 to 80°) slightly to the right of the wind. It should go slightly to the right and keep its nose up. Watch for any looping tendency or zeroing out. Either one of these problems can be corrected by removing or adding balsa (1/32" increments) to the 1/16" incidence block under the trailing edge of the stab.
The Country Boy should climb steeply to the right and make one or one and a half turns in nine seconds. Transition from power to glide should be smooth without any loss of altitude. The transition should be as good on a 4.5-second run as it is on a longer run.
Trimming problems often arise when flying a new airplane for the first time. If a model is to "fly off the board," all of the built-in adjustments must be in the right proportion to one another at the outset. This most likely will not happen. There will be some adjustments necessary before the ship is flying at its full potential. Knowing precisely what adjustments to make to solve a particular power problem can sometimes be a challenge. To help you deal with some of these situations, listed below are power problems and the adjustments necessary to correct them. Much of this information has been covered before in other construction articles relating to flying and trimming low thrust designs, but may serve as a welcome review.
Problem:
Under full power, the airplane begins climbing steeply to the right. As the speed builds up, the right wing drops and the ship levels out.
Solution:
This is caused by one or a combination of the following: Not enough left engine thrust, not enough wash-in on the right main wing panel, too much right rudder or too much incidence. Keep the latter very much in mind. If you built in the left thrust shown on the plan and have the right amount of wash-in called for, remove 1/32" from the incidence block under the rear of the stab. This will probably cure the problem. However, you may have to add a small amount of weight to the tail to compensate for the glide. So, in effect what has happened, the C.G. has been moved aft to get the desired climb. Too far aft, however, and the ship will level out and dive. Another point to remember is that when you remove balsa from under the rear of the stab, it removes some of the right turn. Conversely, when you add incidence, right turn is increased.
Problem:
The airplane leaves your hand at full power and within a few seconds the right wing comes up and the plane rolls to the left.
Solution:
This is caused by too much wash-in on the right wing panel. Excessive left engine thrust and left rudder can add to the problem. Make one adjustment at a time, however. Remove any excessive wash-in and try again, some left engine thrust. If it still has a left tendency, try right rudder tab adjustments. For accurate rudder tab adjustments use strips of balsa and CA to trailing edge. Usually, a strip ¼" wide and ⅜" long will suffice. Glue strip to the right side of the rudder directly with the edge flush with the rear of the rudder. Remember, too, that rudder tab adjustments must be accordingly made from under power but no climb angle when rudging the ship. Add climb angle and it will decrease; conversely, when right rudder is decreased, the climb angle will increase.
Problem:
Under full power, the ship dips to the right before assuming its correct power pattern.
Solution:
Additional left-thrust will eliminate the problem. Once trimming is complete, the only other ingredient that requires particular attention is practice. Fly when you like the way the C.B. flies, with assurance and confidence in yourself of its performance in talented your own pre-flight routine. Make the count of a well-tuned airplane and a practiced flier will serve to enhance the winning tradition of the Country Boy.

