
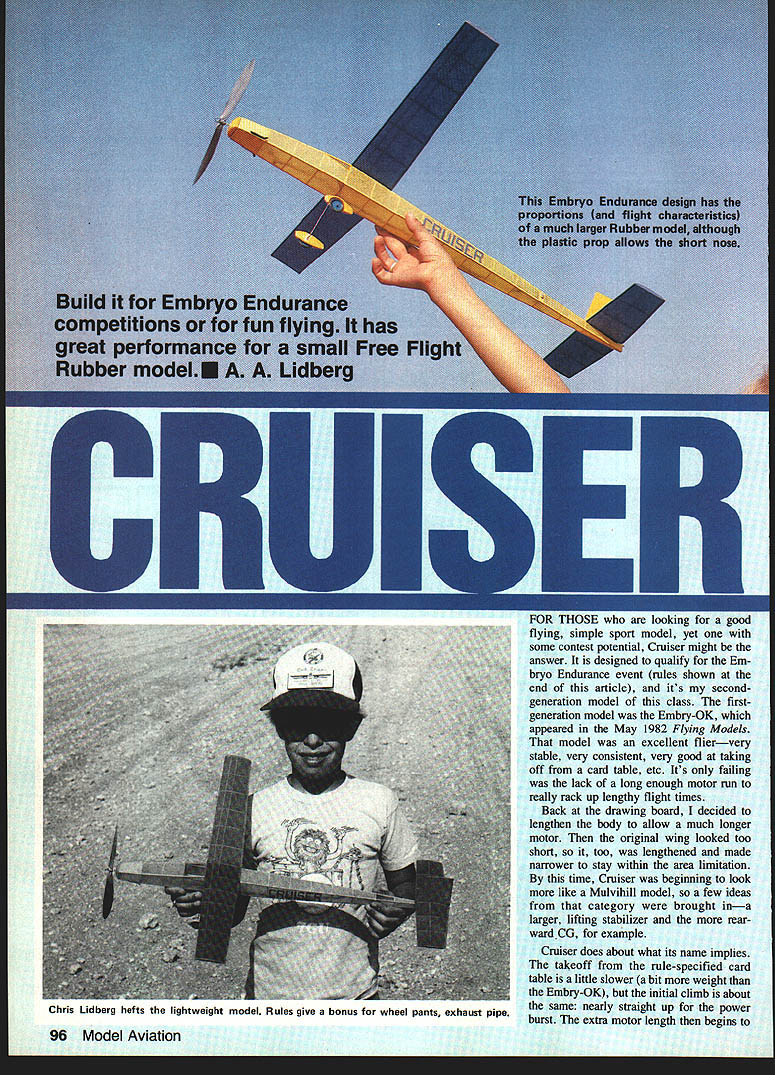
CRUISER
Build it for Embryo Endurance competitions or for fun flying. It has great performance for a small Free Flight Rubber model. A. A. Lidberg
FOR THOSE who are looking for a good flying, simple sport model, yet one with some contest potential, Cruiser might be the answer. It is designed to qualify for the Embryo Endurance event (rules shown at the end of this article), and it's my second-generation model of this class. The first-generation model was the Embryo-OK, which appeared in the May 1982 Flying Models. That model was an excellent flier—very stable, very consistent, very good at taking off from a card table, etc. Its only failing was the lack of a long enough motor run to really rack up lengthy flight times.
Back at the drawing board, I decided to lengthen the body to allow a much longer motor. Then the original wing looked too short, so it, too, was lengthened and made narrower to stay within the area limitation. By this time, Cruiser was beginning to look more like a Mulvihill model, so a few ideas from that category were brought in—a larger, lifting stabilizer and the more rearward CG, for example.
Cruiser does about what its name implies. The takeoff from the rule-specified card table is a little slower (a bit more weight than the Embryo-OK), but the initial climb is about the same: nearly straight up for the power burst. The extra motor length then begins to show its value as the motor run lasts quite a bit longer. The glide is improved from the aft CG, and the lifting stab allows Cruiser to glide more slowly and longer.
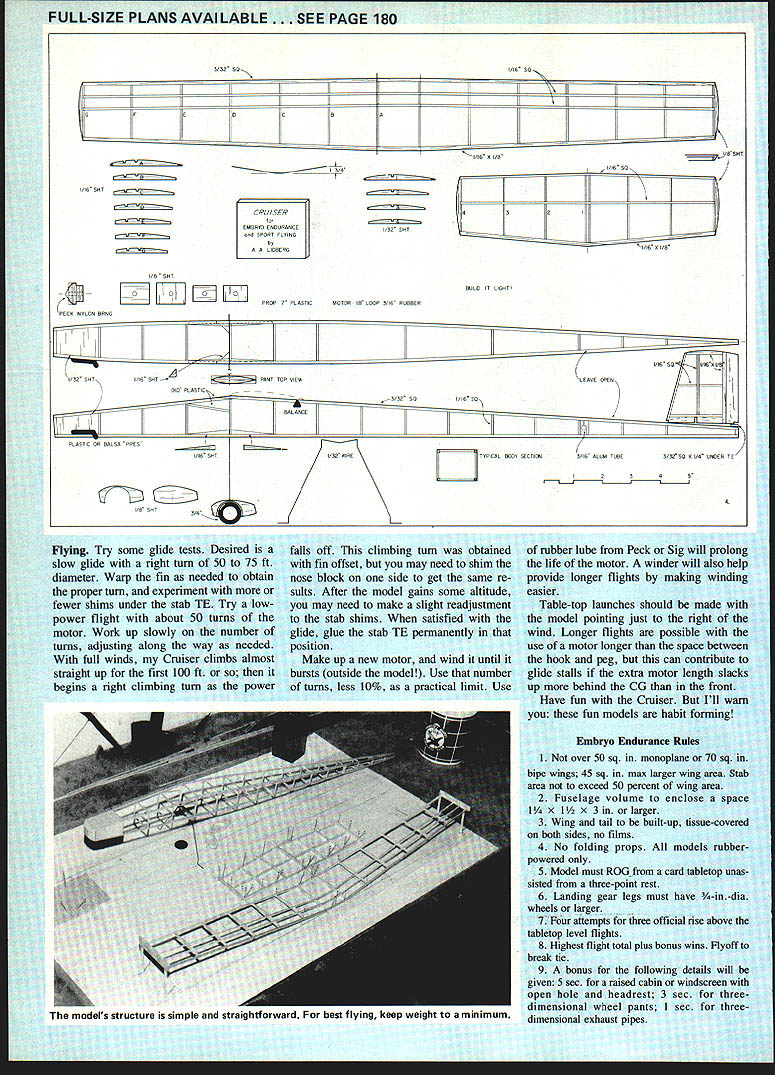
This is a fairly large model for Embryo, so you'll want to be careful to use the very lightest wood. Pass up the hard pieces. The only piece of slightly harder, heavier wood should be the 3/32-in. square for the wing leading edge (LE). This piece must take some hard knocks, so pick it accordingly.
FLYING SURFACES
Begin with the wing. Trace out the ribs using your favorite method. Mine is to xerox the rib drawings and use a household iron applied to the back of the photocopy to transfer an impression of the ribs to sheet wood—instant printwood!
Lay out and pin down the wing LE and trailing edge (TE). It's a bit easier if you preshape the TE using a sanding block before it's pinned down. Fit and glue the ribs in place, leaving out the spars and "A" ribs for now. Raise the tips for dihedral as shown, and sand the mating edges of the LE and TE for a tight-fitting glue joint. Glue together, then add the "A" ribs and the spars.
Build the stab. In the stab, make sure to allow a 1/16-in. space at the center for the fin. The fin is just a simple flat structure of square and sheet scraps.
FUSELAGE
Build two identical sides. That deceptively simple statement has probably been written thousands of times, yet the task involved is not really all that easy. Here are a couple of methods that can help.
- Build the second side directly over the first. This method isn't bad, because the pins haven't moved, and the first-side pieces serve as good guides for placement of the second-side pieces. However, the two sides will be glued to each other at many of the joints. A thin knife or razor blade must be used to separate them, after which a sanding block should be used to smooth the glue joints.
- My favorite method is to begin with a carefully placed row of closely spaced pins around the outer edges of the fuselage side drawing. Pins are also placed on the left side of each vertical piece. These pins should be pushed into the board as nearly vertical as possible. Then the longerons (long pieces) are put in place and clamped against the outside pins with additional pins. Each vertical piece is then put in. When the glue dries, only the clamping pins are removed, and the side is carefully pried from the board. The second side is then built. A sanding block should be used to smooth away any glue bumps.
Assemble the two sides into the usual box shape by pinning them over the top view. Add all of the crosspieces, and use a drafting triangle or carpenter's square to keep the sides vertical. Bend the landing gear (LG) and glue it in place. Add the LG gussets—two in front, two in back, and two on the bottom. Add the sheet fill-in at the nose and back by the rubber peg. Laminate the nose block, making sure it's a tight fit in the fuselage opening. Drill for the Peck-Polymers bearing, and add the prop shaft and prop. Mark the top of the nose block so it will always be positioned the same way. Cut out the parts for the wheel pants, and glue them to the LG after shaping and sanding.
Sand the model carefully to get rid of any lumps and bumps. Cover it with lightweight, brightly colored tissue. Lightly water-spray the tissue to shrink it, and apply one or two coats of very thin dope—either nitrate with a little castor oil mixed in or use Sig Litecote. Add tissue trim, windshield and side windows, and your name, address, and phone. The wheel pants and nose block can be colored with a highlight marker to match the tissue. Make the "exhaust pipes" from balsa or plastic tubing.
Assemble the model, making sure that there is an incidence block about 3/32 in. high under the stab TE. Tack-glue the stab to the body only at its LE. This will allow adding to or subtracting from the thickness of the block as needed for glide adjustment. Pin the TE down for warp. Check the wing and stabilizer for warps; every panel should be flat. If necessary, use steam or the heat from an electric stove burner for removing warps. Install the rubber motor, and check the balance point; use small bits of lead or clay fore or aft, as needed, to bring the balance point to the correct position.
FLYING
Try some glide tests. Desired is a slow glide with a right turn of 50 to 75 ft. diameter. Warp the fin as needed to obtain the proper turn, and experiment with more or fewer shims under the stab TE. Try a low-power flight with about 50 turns of the motor. Work up slowly on the number of turns, adjusting along the way as needed. With full winds, my Cruiser climbs almost straight up for the first 100 ft. or so; then it begins a right climbing turn as the power falls off. This climbing turn was obtained with fin offset, but you may need to shim the nose block on one side to get the same results. After the model gains some altitude, you may need to make a slight readjustment to the stab shims. When satisfied with the glide, glue the stab TE permanently in that position.
Make up a new motor, and wind it until it bursts (outside the model). Use that number of turns, less 10%, as a practical limit. Use of rubber lube from Peck or Sig will prolong the life of the motor. A winder will also help provide longer flights by making winding easier.
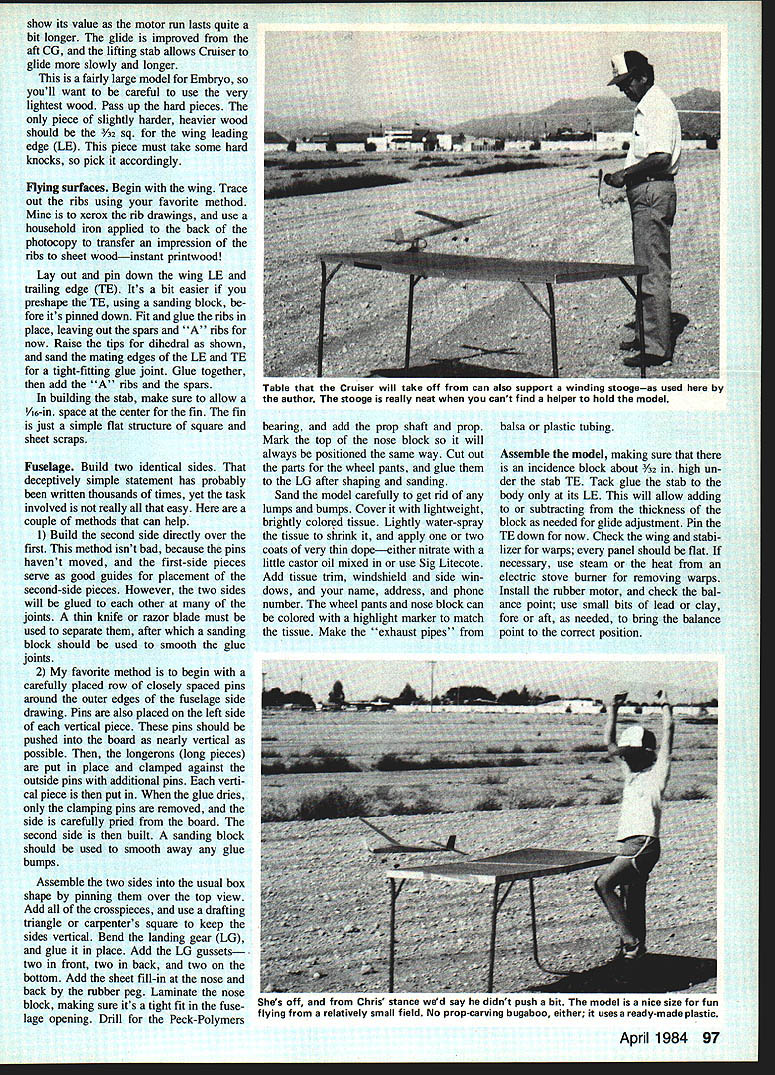
Table-top launches should be made with the model pointing just to the right of the wind. Longer flights are possible with the use of a motor longer than the space between the hook and peg, but this can contribute to glide stalls if the extra motor length slacks up more behind the CG than in the front. Have fun with the Cruiser. But I'll warn you: these fun models are habit forming!
EMBRYO ENDURANCE RULES
- Not over 50 sq. in. monoplane or 70 sq. in. biplane wings; 45 sq. in. max larger wing area. Stab area not to exceed 50 percent of wing area.
- Fuselage volume to enclose a space 1 1/4 x 1/2 x 3 in. or larger.
- Wing and tail to be built-up, tissue-covered on both sides, no films.
- No folding props. All models rubber-powered only.
- Model must ROG from a card tabletop unassisted from a three-point rest.
- Landing gear legs must have 3/16-in.-dia. wheels or larger.
- Four attempts for three official rise above the tabletop level flights.
- Highest flight total plus bonus wins. Flyoff to break tie.
- A bonus for the following details will be given: 5 sec. for a raised cabin or windscreen with open hole and headrests; 3 sec. for three-dimensional wheel pants; 1 sec. for three-dimensional exhaust pipes.
Transcribed from original scans by AI. Minor OCR errors may remain.

