
Custom Film Lettering
Vern Weaver
You, too, can make custom lettering from iron-on films for AMA numbers and the like.
Probably one of the most head-scratching steps in the process of finishing a model aircraft is adorning it with professional-looking AMA numbers. However, by following a few basic steps and using a good, sharp X-Acto knife, successful results are possible. Almost any style, color, or size of lettering can be manufactured in a reasonable amount of time and without the artistic talents you may have assumed would be needed.
If you can cut out paper dolls, you're in luck — that's about the only talent needed to become your club's official AMA-number maker.
Before going to the steps shown below, some preliminary work must be done: you must make Xerox copies of your AMA number in the size and type style you require. This can be done by purchasing what is known at most artist supply shops as "press type." These are plastic sheets with several letters and numbers on them that, when placed on a dry, clean surface, will transfer by rubbing them with a stylus.
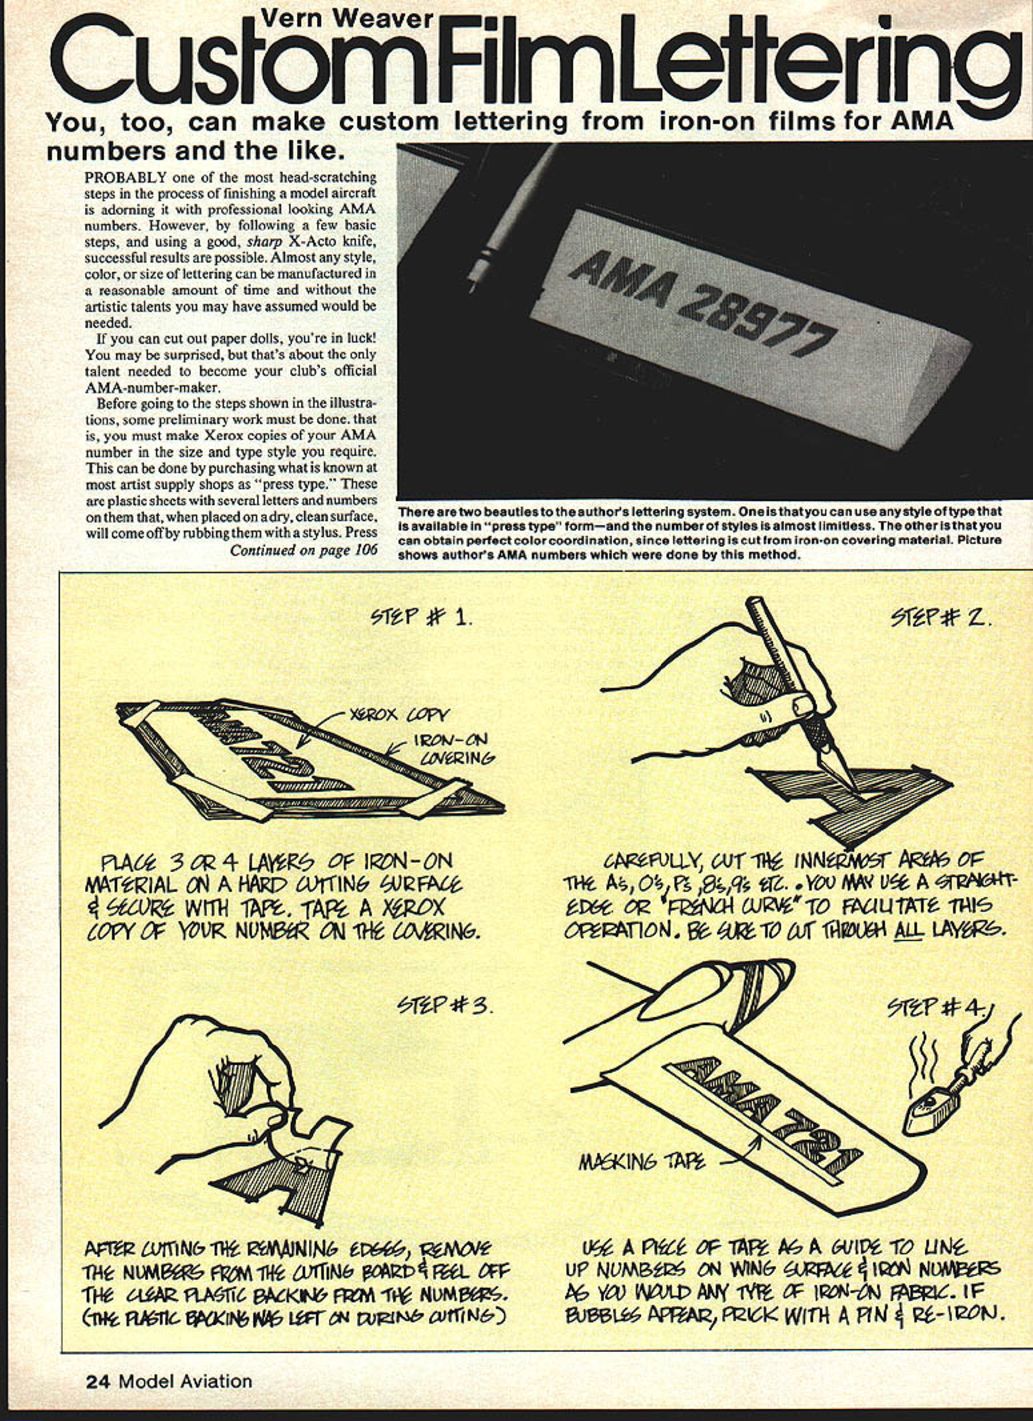
There are two beauties to this lettering system. One is that you can use any style of type that is available in press type form — the number of styles is almost limitless. The other is that you can obtain perfect color coordination, since lettering is cut from iron-on covering material. (A picture shows the author's AMA numbers done by this method.)
Using press type
Directions for using press type are explained in the catalogs put out by various manufacturers (Zip-A-Tone, Formatt, Letraset). In short, you draw a straight line on a sheet of paper, position the appropriate letters and numbers on the line, and rub that area with a stylus (such as a pencil or ball-point pen). Remove the plastic sheet and presto — a beautiful master. Use this master to make your Xerox copies, and you're ready to proceed to the illustrated steps.
Press type can also be used directly on your model. Exercise some care to avoid rubbing too hard and ruining the surface of the model. After application, the press-applied number must be fuel-proofed. Light coats of sprayed-on clear dope, or any of the new fuel-proof clear finishes, will work as long as you lightly apply the first few coats.
STEP #1
Place 3 or 4 layers of iron-on material on a hard cutting surface and secure with tape. Tape a Xerox copy of your number onto the covering.
STEP #2
Carefully cut the innermost areas of the A's, O's, P's, B's, 9's, etc. You may use a straight-edge or French curve to facilitate this operation. Be sure to cut through ALL layers.
STEP #3
After cutting the remaining edges, remove the numbers from the cutting board and peel off the clear plastic backing from the numbers. (The plastic backing was left on during cutting.)
STEP #4
Use a piece of tape as a guide to line up numbers on the wing surface and iron the numbers as you would any type of iron-on fabric. If bubbles appear, prick with a pin and re-iron.
Transcribed from original scans by AI. Minor OCR errors may remain.

