
Customized Field Box
Dr. D. B. Mathews
A properly designed and outfitted carrier of support equipment can do much to add to your RC flying enjoyment. Use the ideas and suggestions in this article as parameters to design a new field box or to make the one you already have more efficient.
Getting started (advice for newcomers)
To the newcomer to RC flying, the variety of field boxes at the average flying site can be nearly as confusing as the variety of trainers. Our personal advice to the novice is to start with minimal, inexpensive support equipment and confirm whether RC flying is something he wants to pursue. For early flying sessions an old cardboard box is sufficient to carry the essentials.
- 1-1/2 V door-bell-type battery to light the glow plug
- $1.75 fuel bulb for transfer
- Hand-start the engine for a while rather than buying a starter immediately
If a balky engine is encountered, there is usually someone at the field willing to lend a starter. Starting with minimal equipment keeps investment low while you decide whether to continue.
Choosing a battery
Many field boxes accommodate the common motorcycle battery, but we do not think it is the best choice for our purposes.
- Motorcycle battery: typically 5–6 ampere-hours (Ah). A flooded glow plug can pull about 3 A on its own; add a starter and power-panel losses and the small battery quickly becomes inadequate. These units are compact and light but require frequent charging and have limited life.
- Tractor-type 12 V wet-cell battery: usually rated at 200 Ah or more and available in department stores (e.g., Sears). They cost about three times as much as a small motorcycle battery but provide roughly 30+ times the capacity.
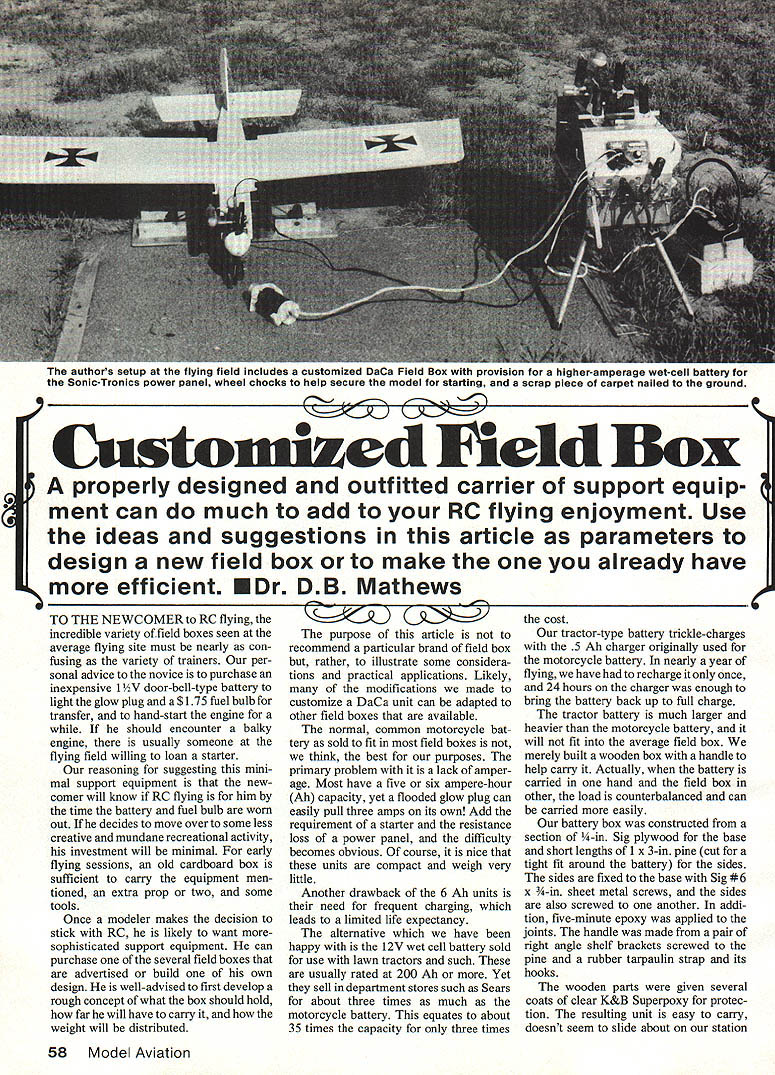
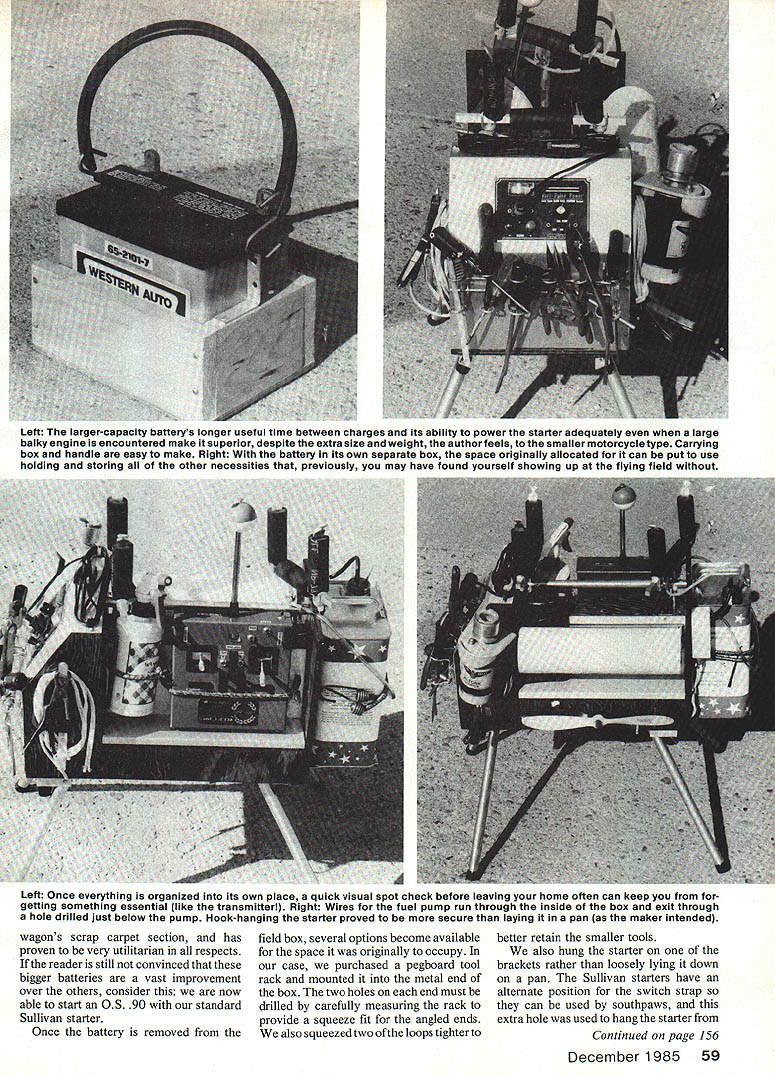
We have been happy with the tractor battery. It trickle-charges with a 0.5 A charger originally used for the motorcycle battery; in nearly a year of flying we had to recharge it only once, and 24 hours on the charger brought it back to full charge. The larger capacity and ability to power starters for large engines make it superior despite increased size and weight.
Building a separate battery box
Because the tractor battery is larger and heavier than a motorcycle battery and won't fit in the average field box, we built a separate wooden battery box. Carrying the battery in its own box also frees space inside the field box for other items.
Construction details:
- Base: 1/4 in. Sig plywood
- Sides: short lengths of 1 x 3 in. pine cut for a tight fit around the battery
- Fastening: Sig #6 x 3/4 in. sheet-metal screws; sides also screwed to one another
- Joints: five-minute epoxy applied to joints
- Handle: a pair of right-angle shelf brackets screwed to the pine, plus a rubber tarpaulin strap with hooks
- Finish: several coats of clear K&B Superpoxy for protection
The resulting unit is easy to carry and keeps the battery from sliding about.
Organizing the field box and hanging the starter
Carrying the battery separately creates space to reorganize the box for tools and accessories. We made several practical modifications:
- Pegboard tool rack: purchased and mounted into the metal end of the box. Drill the two holes on each end carefully to provide a squeeze fit for the angled ends; squeeze two of the pegboard loops tighter to better retain smaller tools.
- Starter hanging: hook-hanging the starter is more secure than laying it in the maker’s pan. Sullivan starters have an alternate position for the switch strap that can be used as a hanging hole; ours has not vibrated off the bracket in transit. Other starters can be modified by cutting a slot in the plastic safety flange or adding a screwed-on metal plate or hook.
- Glow-plug lead keeper: bend a pair of Du-Bro metal straps and screw them into the wood above the power panel to wrap the glow-plug lead around and keep it out of the way.
- Wire routing: wires for the pump and other items run through drilled holes close to the bottom-side junction in the tool compartment. The power cable to the fuel pump exits the bottom and is kept in place with a Radio Shack butyrate cable clip.
Wiring advice:
- Use heavier utility wire like starter lead rather than small lamp cord—reduced resistance and increased strength.
- Always attach the battery clamps to the metal bracket for transporting. Do not clip the clamps back onto their wires; clipping can chew through insulation and create a short with a powerful battery.
- The wire and clamps used to connect the battery to the power panel are about 4 ft. in length; the battery is usually kept underneath the field box.
Straps, shelving and vibration fixes
- Straps: use straps sold for wagons (with springs on both ends) to hold the fuel can, transmitter, spray cleaner bottle, etc. The strap for the fuel can can be used as-is; other straps can be cut to length and have the ends rewrapped with soft wire.
- Sunglasses: bungee straps make a handy, visually checkable place to hold sunglasses on the side of the transmitter.
- Shelf rattle: metal shelves can produce an annoying rattle in transit; cure it with saddle-foam tape along the lip of the shelves.
Fuel pump and defueling tip
We found that turning the fuel pump so the bottom is up improves defueling pressure. Keep the pump cable secured as noted above.
Prop hanger
A simple, effective prop hanger can be made by:
- Drilling three 3/16 in. holes into a wooden block
- Gluing in sections of dowel (outer dowels positioned to prevent rotation; center dowel fits inside the prop shaft hole)
- Keeping props on the dowels by slipping a piece of windshield-washer hose over the end
It’s not fancy, but props stay on very well.
Ground comforts
If your flying site has rough ground cover (for example, Mexican sandburr), consider nailing scraps of carpet to the ground to improve kneeling comfort. Use cleats of scrap wood to keep the carpet in place through wind and winter.
Wheel chocks are another simple addition: they secure the model in the car and in the pits. The author recalls a model that climbed its legs during a run—wheel chocks help prevent that.
Model restraint (favorite method)
A reliable method to hold a model in the pits:
- Use a piece of 5/8 in. roofing plywood
- Screw a pair of 1 x 2 in. strips to the plywood
- Hold the whole thing in place with a burned-out fluorescent light ballast (make sure the ballast is stamped “no PCBs”)
This setup has held .90-powered models with no movement.
Conclusion
These are simple modifications to an off-the-shelf field box that can be accomplished with readily available hardware and minimal effort. Not all ideas will apply to every field box, but trying some of them may improve your setup.
If you’ve discovered the pleasure of building and flying model aircraft and are ready to move out of the cardboard-box phase, consider assembling a first-class field box and battery arrangement.
Transcribed from original scans by AI. Minor OCR errors may remain.

