
Cyrano II
"Of course you can make a flying wing model fly, but it will never be competitive with conventional models." This statement has appeared in various forms in model magazines and in conversation so often that I felt the prejudice should be challenged.
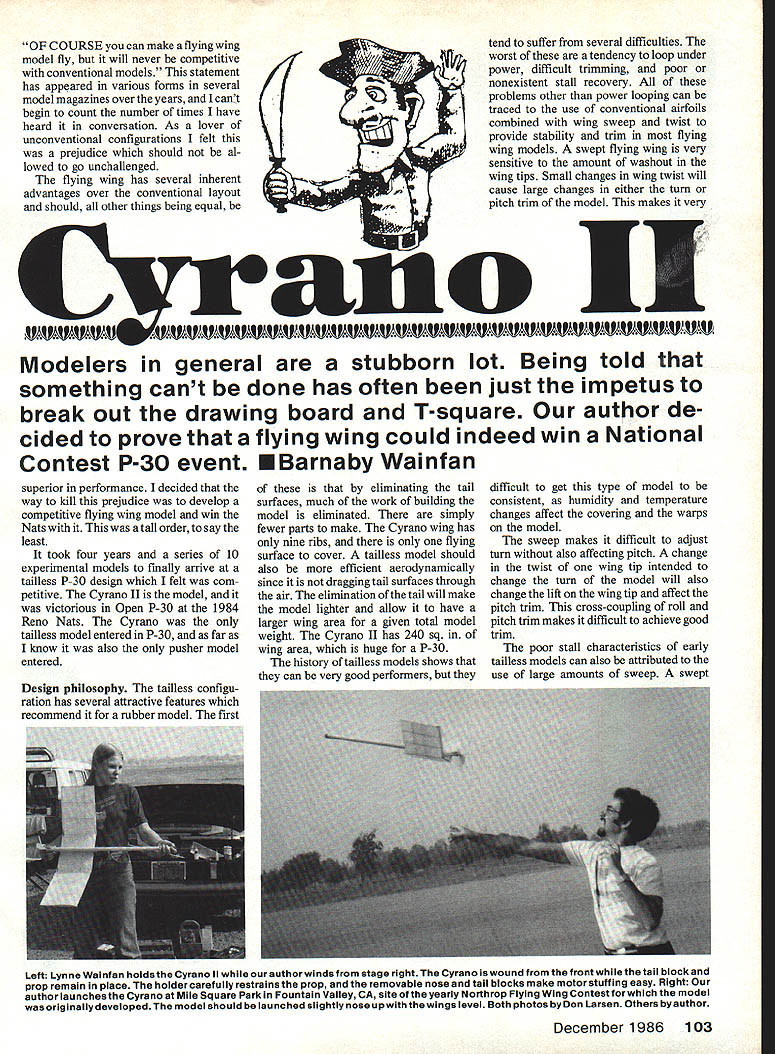
The flying wing has several inherent advantages over the conventional layout and should, all other things being equal, be superior in performance. I decided to develop a competitive flying wing model and win the Nats with it. It took four years and a series of ten experimental models to arrive at a tailless P-30 design I felt was competitive: the Cyrano II. The Cyrano II won Open P-30 at the 1984 Reno Nats. It was the only tailless and, as far as I know, the only pusher model entered in P-30 that year.
— Barnaby Wainfan
Design philosophy
The tailless configuration has several attractive features for a rubber model:
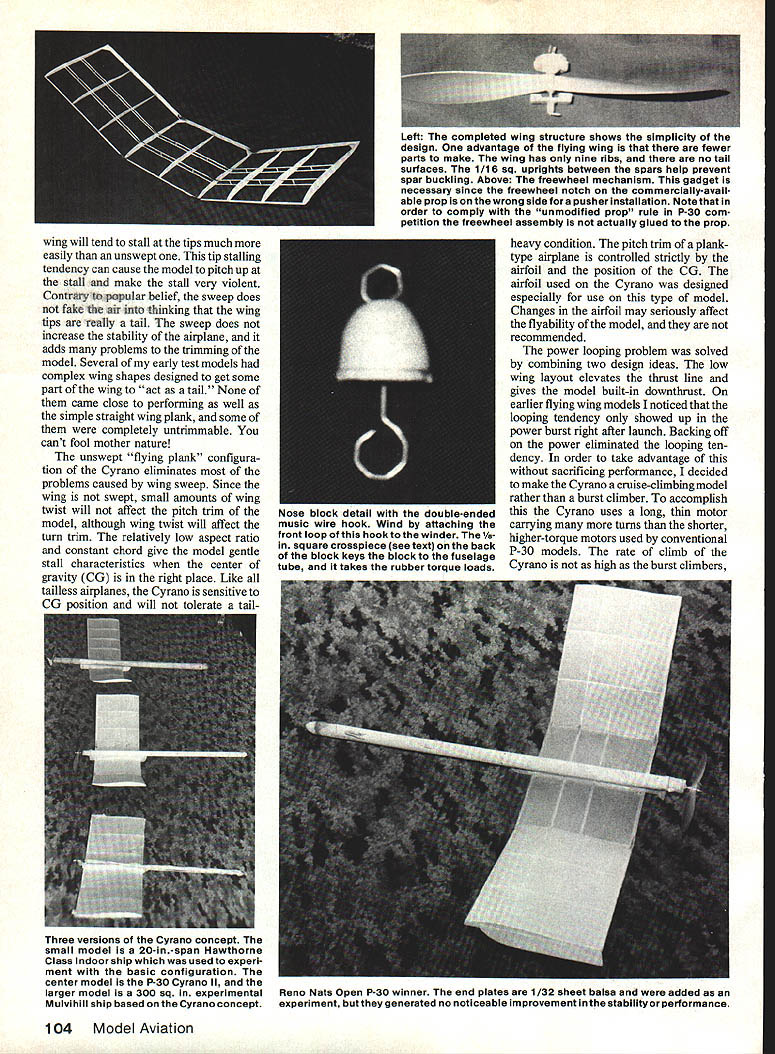
- Eliminates tail surfaces, reducing the amount of work and the number of parts. The Cyrano wing has only nine ribs and a single flying surface to cover.
- Aerodynamic efficiency: no tail surfaces being dragged through the air.
- Lower weight and the ability to have larger wing area for a given total model weight. The Cyrano II has 240 sq. in. of wing area, large for a P-30.
Tailless models can perform very well, but they tend to suffer from several difficulties: a tendency to loop under power, difficult trimming, and poor or violent stall recovery. These problems (except power looping) usually stem from using conventional airfoils combined with wing sweep and twist to provide stability and trim. A swept flying wing is very sensitive to washout in the tips: small changes in twist cause large changes in turn or pitch trim, and humidity or temperature changes that affect covering and warps make consistency difficult.
Sweep also cross-couples roll and pitch trim. Changing the twist of one wing tip to alter turn will also change lift at the tip and affect pitch. Swept wings also tend to tip-stall more readily, which can produce violent pitch-up stalls. Contrary to popular belief, sweep does not "fake" a tail: while it increases some stability, it also adds trimming problems.
An unswept flying-plank configuration like the Cyrano eliminates problems caused by wing sweep. With an unswept, relatively low-aspect-ratio, constant-chord wing, small amounts of wing twist mainly affect turn trim, and the wing gives gentle stall characteristics when the center of gravity (CG) is properly placed. Like other tailless airplanes, Cyrano is sensitive to CG position; pitch trim is controlled primarily by the airfoil position relative to the CG. The airfoil used on Cyrano was designed specifically for this type of model; changing the airfoil may seriously affect flyability.
The power-looping problem was solved by combining two ideas:
- Low-wing layout that elevates the thrust line to give built-in downthrust.
- Make Cyrano a cruise-climbing model rather than a burst climber by using a long, thin motor carrying more turns than the shorter, higher-torque motors typical of conventional P-30 models.
This combination produces a long, low-power climb that is smooth and easy to trim. The Cyrano gains as much altitude under power as burst climbers, but more slowly. That is an advantage because the glide must then convert less altitude into time to make the max.
No vertical fins are used on Cyrano. Early plank tests with small winglet fins tended to spiral in under power; reducing the fin size mitigated the issue, and ultimately the fins were removed entirely. Small end plates have little effect on stability or performance.
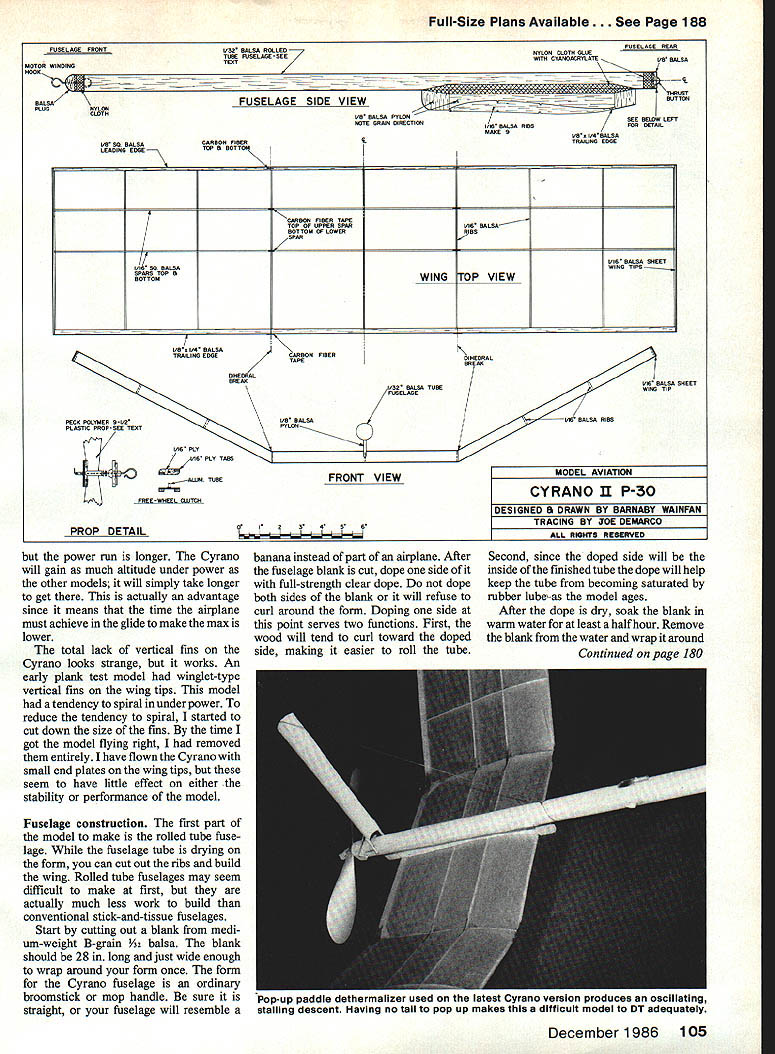
Fuselage construction
Materials and preparation
- Start with a medium-weight B-grain 3/8 in. × 28 in. blank, just wide enough to wrap once around your form.
- The form is an ordinary straight broomstick or mop handle. Ensure it is straight.
Forming the tube
- Dope one side of the blank with full-strength clear dope. Do not dope both sides, or the blank will resist curling. Doping one side helps the wood curl toward the doped side and provides an inner surface that resists saturation by rubber lube over time.
- After the dope is dry, soak the blank in warm water for at least a half hour.
- Remove the blank from the water and wrap it around the broomstick form, working from one end and molding the wood to the form with your hands.
- Hold the balsa to the form with an elastic, porous wrap—do not use rubber bands (they leave grooves). A nylon stocking wrapped in Ace-bandage style works well; it holds the wood and allows drying.
- Let the tube dry overnight, then unwrap and remove it from the form.
- Join the edges with thick cyanoacrylate (CyA) glue to form the finished tube.
Reinforcement and keys
- Reinforce the tube ends with cloth insets as shown on the plans and shape them to handle loads on the ends.
- Do not cut the keying notches until after the nose and tail blocks are made. Cut the notches so 1/8-in. square keys fit the end blocks tightly—these keys carry the torque of the wound rubber.
Rolled-tube fuselages take some practice but are generally less work than conventional stick-and-tissue fuselages.
Wing
- Ribs: nine ribs from 1/16-in. balsa.
- Spars: 1/8 × 1/4 in., spruce or hard balsa.
- Trailing edge: 1/4 × 1/4 in. set on the bottom of the ribs. This allows sanding the trailing edge to the proper contour without cutting into the ribs.
- Center rib: slightly thicker to form the joiner area.
- Wingtip ribs: bevel to match the washout (twist). Do not overdo the washout—about 1/8 in. at the tip is plenty.
Preserve the reflex in the airfoil. Changing the reflex angle is effectively like changing the incidence of a stab on a conventional model. It is difficult to adjust the trailing edge after the wing is complete, so set the trailing-edge angle correctly during assembly.
Cover the wing before final assembly. The wing on my Cyrano is glued permanently to the fuselage and cannot be covered afterward. Use lightweight tissue and shrink it with rubbing alcohol rather than water for slower, more controlled shrinkage and fewer warps. Finish with two coats of thinned clear dope.
Pylon
- Pylon is made of 1/8-in. balsa in three pieces; follow grain-direction notes on the plans. The center piece grain runs fore-and-aft; the end pieces grain runs up-and-down.
- Glue the upright pieces firmly to the wing leading and trailing edge spars when assembling the model.
- Reinforce the junction of the pylon and fuselage with cloth as shown on the plans—this distributes load across the tube wall and has proven strong in practice.
Nose and prop assemblies
- The motor is not attached by a conventional motor dowel. A music-wire hook is set into the nose block and has a winding loop at its opposite end. Glue this wire very firmly into the nose block; it must bear the motor torque.
- Allow thin CyA to flow into the hole alongside the wire from both ends, then add an epoxy fillet at the nose between the block and the winding loop.
- The rubber motor is easy to install: drop the motor through the tube and attach it to the hooks on the nose and tail blocks.
- Nose and tail blocks are conventional except for 1/8-in. square keys that prevent block twisting under torque. Make these keys from hard balsa and avoid cutting them too short; sand them flush for a smooth fit.
- Prop driver: because of the "unmodified propeller" rule and the lack of commercial pusher plastic props, use a standard Peck-Polymers propeller installed backwards with the freewheel notch on the tail side against the bearing. The drive dog is 1/16-in. plywood.
Trimming and flying
Trimming technique differs from conventional models. Work on the glide first.
- Test glide over tall grass if available, or the softest substitute possible.
- Pitch (glide) trim: adjusted only by CG. Add clay to the nose if the model stalls; add clay to the tail if it glides nose-down. There is no tail incidence to change.
- Turn: set with a small rudder tab on the trailing edge of the pylon. If more is needed, use a small drag tab at a wing tip.
- Pattern: Cyrano flies a left-hand pattern. Do not attempt to fly it to the right—it will spiral in every time.
- Power turn and thrust line: set the power turn by adjusting thrust line. A small amount of left thrust is usually required for a tight, stall-free climb. Achieve left thrust by placing a shim under the right side of the tail block or sanding a little off the left side of the fuselage where the tail block rests. A small amount of downthrust may be needed to control power stalling.
Winding and motor
- Winding: hook onto the wire loop in the nose with the winder while a holder restrains the model and propeller. Ensure the freewheel notch has engaged the propeller shaft before winding to avoid injury to the holder.
- Start test flights at low power and work up slowly to maximum winds.
- Motor: one 10-gram loop of 1/4-in. FAI rubber. Weigh your motors—changing motor weight will change pitch trim, and tailless models are sensitive to CG shifts.
Cyrano is relatively easy to build and has contest-winning performance. It's worth building one just to watch the expressions of disbelief as it cruises overhead. Flying wings are competitive—try one.
Transcribed from original scans by AI. Minor OCR errors may remain.

