

Czech Mate
By Joe Johnson
This delightful little sport model was named before it was designed. In fact, it was constructed as the result of discovering a name.
The Czechoslovakian Modella CO-2 engine was no longer being sold in the U.S. when this was written, but it can be ordered from Micro-Mold. They will ship via air mail for a total price of 14 Pounds Sterling. (Checks in Pounds Sterling are available at most larger banks. Check the foreign exchange section of a daily paper for the current price; at the time of writing, 14 Pounds Sterling was $25.90.)
- Micro-Mold
- Station Road, East Preston
- Littlehampton, West Sussex BN16 3AG, England
Testing this new import in the hand quickly revealed our intended model would be much too small to handle the power of this remarkable engine. To our considerable pleasure, the Modella produces torque far in excess of any CO-2 power plant previously experienced. Consequently, we needed a design to best mate with the potential of this Czech engine. We needed a Czech Mate. With an inspired name like this, who could long postpone developing a model to match the name?
We have long enjoyed designing and building low-wing free-flight sport and scale models, primarily to debunk the prejudices of many "experts" who maintain they are extremely tricky to trim. One need only follow accepted aeronautical principles for success with a low-wing free-flight.
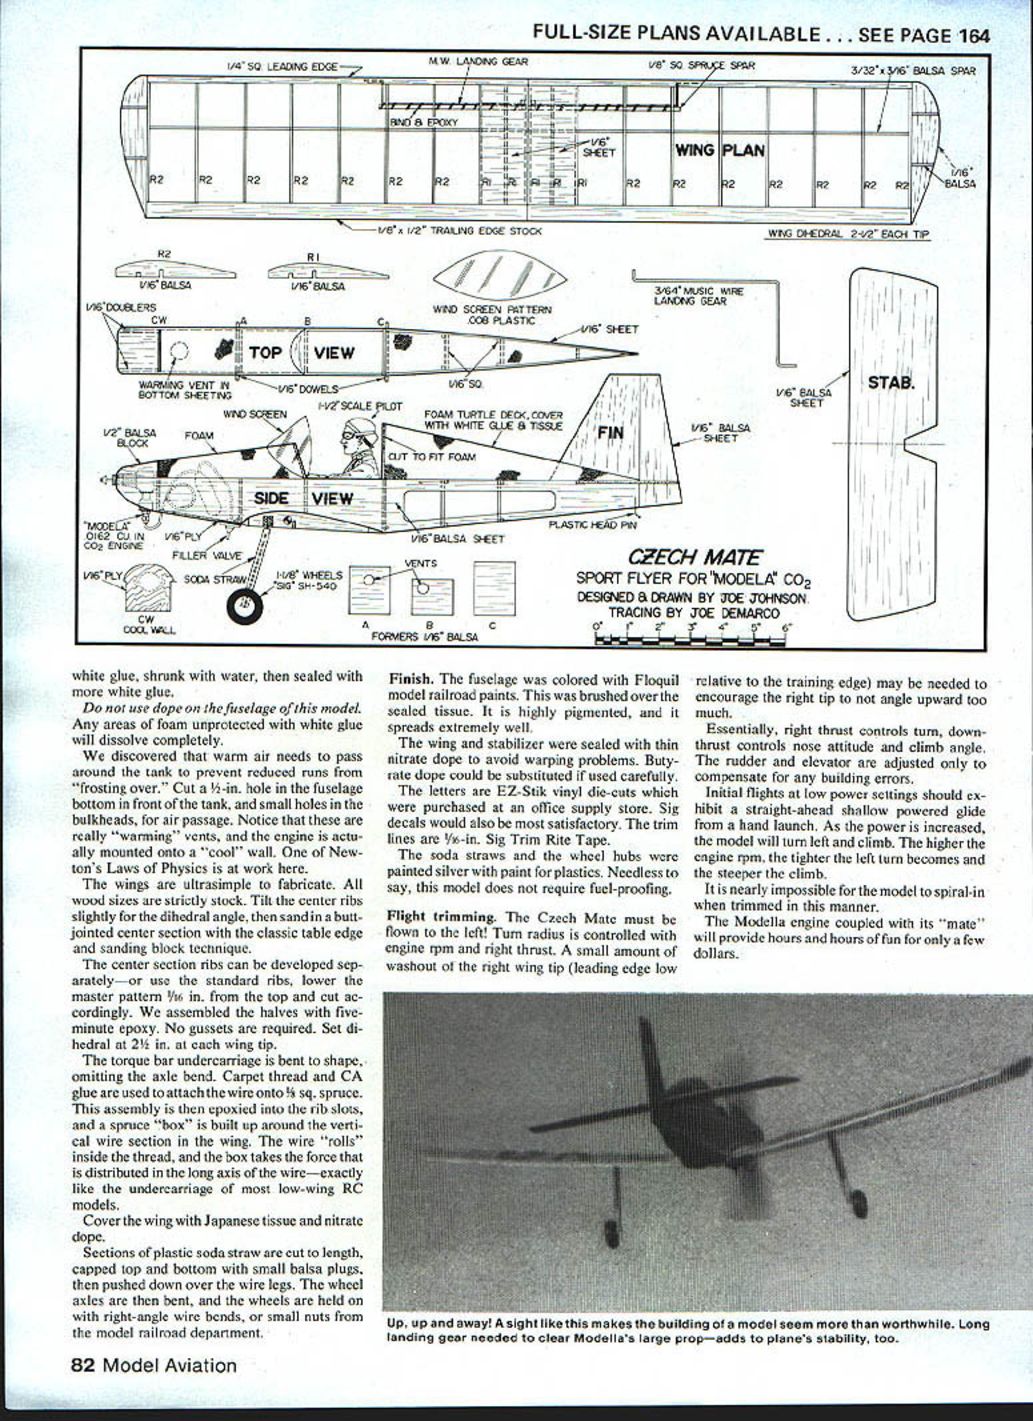
In this design a relatively large dihedral angle is used to raise the center of lift into reasonable proximity to the center of mass. The long undercarriage legs also further enhance this relationship by placing the relatively heavy wheels well under the center of lift. The proof of this concept is the fact that the Czech Mate flew beautifully the first time it was launched. We have subsequently flown it more than 100 times and have yet to change the original settings. Luck? Certainly. But as Frank Monts once told us, "I seem to get luckier as I learn more about trimming model aircraft."
The standard tank supplied with the Modella provides 30- to 50-second flights depending on the engine speed selected. A direct relationship exists between engine rpm and run length, as there is a finite volume of fuel. Speed is controlled by screwing the cylinder head clockwise for increased revs. Trimmed for a left power pattern, the Czech Mate climbs in tight circles, then flattens out as the gas is discharged. The prop is usually still barely ticking over as the model lands in a most realistic manner. Though certainly not a soarer, Czech Mate is one of those models capable of providing countless hours of low-cost flying from a relatively small field. It's great for running over to the neighborhood playground after work for a few relaxing flights as the sun sets.
Construction
General
- Cyanoacrylate adhesive (CA) was used throughout construction, except where noted.
- Drill all holes before assembly, but do not permanently install the dowels until the fuselage is covered.
- The motor and tank are installed before closing up the bottom—but after the covering stage.
- The rudder and stabilizer are not installed until the final stages of assembly.
Fuselage
The fuselage is a simple balsa box constructed of two sides and a few bulkheads. Basic assembly is done with one side pinned flat onto the building surface. Use a 90° triangle to position the bulkheads. Place the second side into position, then pull the tail post together and add the crosspieces.
Drill all holes before assembly. Do not permanently install the dowels until the fuselage is covered. Install the motor and tank before closing the bottom (after covering). Leave the rudder and stabilizer until final assembly.
Foam turtledeck
The foam turtledeck is rough-cut to an oversize outline, then spot-glued to the fuselage top with dabs of 5-minute epoxy. Cut the foam with a sharp knife "drawn" in one direction through the material—most gouging results from pulling previously-cut scraps ahead of the knife.
Sanding is best accomplished with #80 or #100 sandpaper on a block. Sand in one direction only, and keep the paper clear of foam scraps and balls. Since no two turtledecks are expected to turn out exactly the same (this provides the builder a chance to customize), we do not draw cockpit bulkheads. Rather, after arriving at a satisfactory shape, place sheet wood against the foam face and draw formers with a pencil.
Apply three or four coats of Elmer's white glue thinned to brushing consistency with water to provide a hard surface when covering with Japanese tissue. The tissue can be adhered with thinned Elmer's white glue. Do not use dope on the fuselage of this model—any areas of foam unprotected with white glue will dissolve completely.
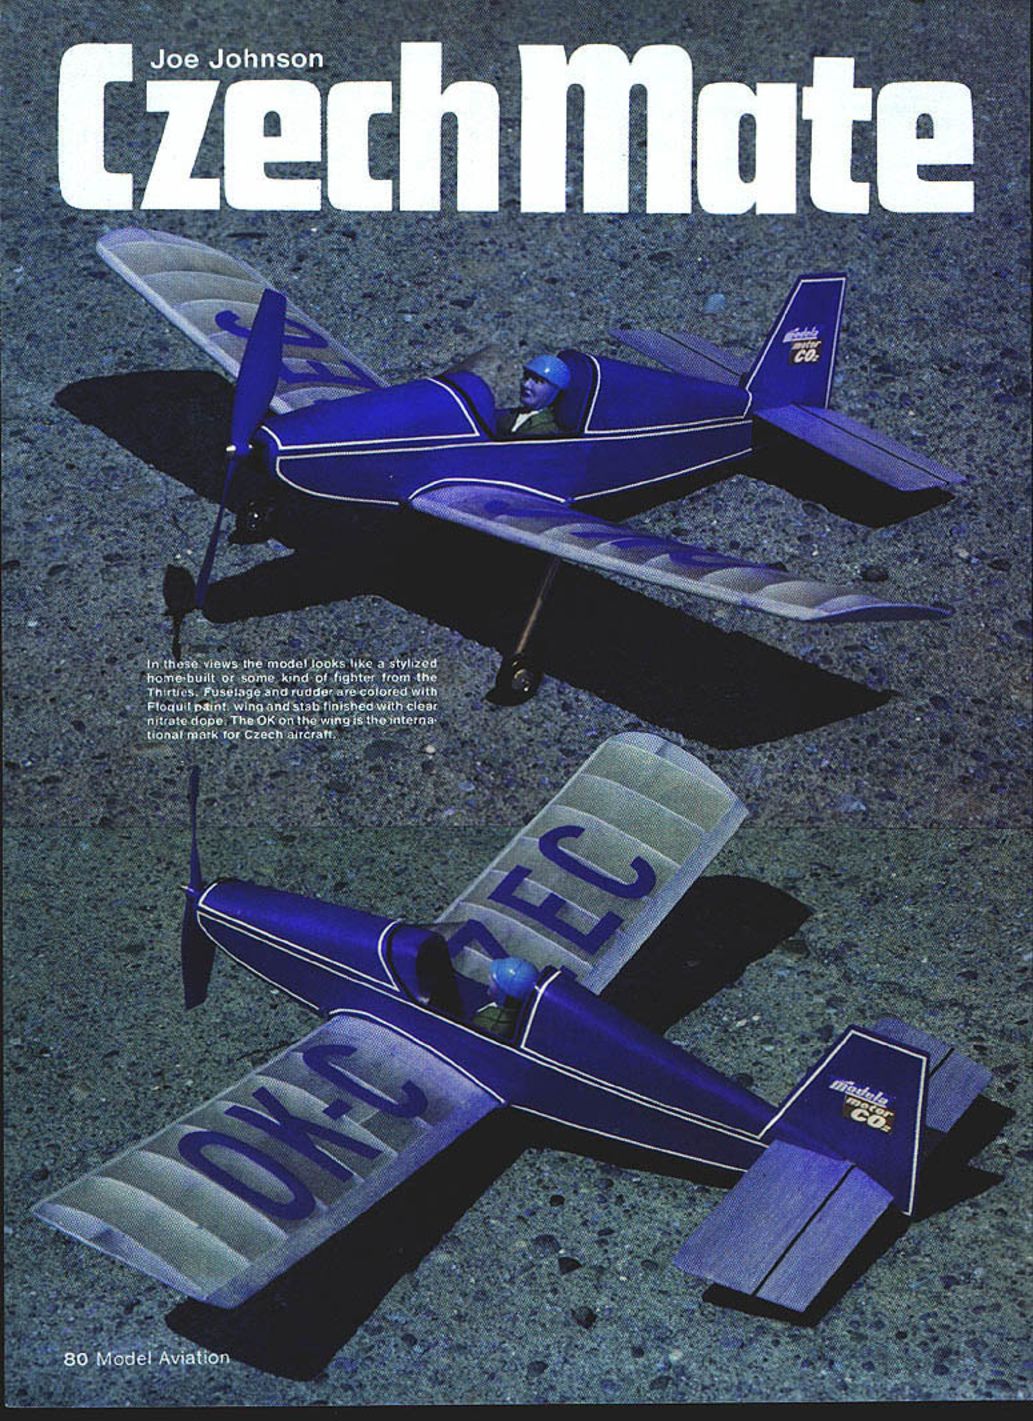
We discovered that warm air needs to pass around the tank to prevent reduced runs from "frosting over." Cut a 1/2-in. hole in the fuselage bottom in front of the tank, and small holes in the bulkheads for air passage. These are warming vents; the engine is actually mounted onto a cool wall.
Wings
The wings are ultra-simple to fabricate. All wood sizes are strictly stock. Tilt the center ribs slightly for the dihedral angle, then sand in a butt-jointed center section using the classic table edge and sanding block technique.
The center-section ribs can be developed separately—or use the standard ribs, lower the master pattern 1/16 in. from the top and cut accordingly. Assemble the halves with five-minute epoxy. No gussets are required. Set dihedral at 2-1/2 in. at each wing tip.
Cover the wing with Japanese tissue and nitrate dope.
Torque-bar undercarriage
The torque-bar undercarriage is bent to shape, omitting the axle bend. Carpet thread and CA glue are used to attach the wire onto 5/8-in.-sq. spruce. This assembly is then epoxied into the rib slots, and a spruce "box" is built up around the vertical wire section in the wing. The wire "rolls" inside the thread, and the box takes the force distributed in the long axis of the wire—exactly like the undercarriage of most low-wing R/C models.
Sections of plastic soda straw are cut to length, capped top and bottom with small balsa plugs, then pushed down over the wire legs. The wheel axles are then bent, and the wheels are held on with right-angle wire bends or small nuts from the model-railroad department.
Finish
The fuselage was colored with Floquil model-railroad paints brushed over the sealed tissue. Floquil is highly pigmented and spreads extremely well.
The wing and stabilizer were sealed with thin nitrate dope to avoid warping problems. Butyrate dope could be substituted if used carefully.
The letters are EZ-Stik vinyl die-cuts purchased at an office-supply store. Sig decals would also be satisfactory. The trim lines are 1/16-in. Sig Trim Rite Tape.
The soda straws and the wheel hubs were painted silver with paint for plastics. This model does not require fuel-proofing.
Flight trimming
- The Czech Mate must be flown to the left.
- Turn radius is controlled with engine rpm and right thrust.
- A small amount of washout of the right wing tip (leading edge low relative to the trailing edge) may be needed to discourage the right tip from angling upward too much.
Essentially, right thrust controls turn; down-thrust controls nose attitude and climb angle. The rudder and elevator are adjusted only to compensate for any building errors.
Initial flights at low power settings should exhibit a straight-ahead, shallow powered glide from a hand launch. As power is increased, the model will turn left and climb. The higher the engine rpm, the tighter the left turn becomes and the steeper the climb.
It is nearly impossible for the model to spiral in when trimmed in this manner.
The Modella engine coupled with its "mate" will provide hours and hours of fun for only a few dollars.
Transcribed from original scans by AI. Minor OCR errors may remain.

