
Dawnwalker III
There is nothing new under the sun. In the late 1960s George Perryman flew a 2.5‑oz Unlimited Rubber (later called Mulvihill) ship that featured a 5‑minute motor run, a fixed prop for dethermalizing, and condenser‑paper covering. Zaic's three‑view drawing noted a heavier, "regular" version that would survive better competition. Since then both AMA FF Rubber events and several emerging "special" contests have evolved.
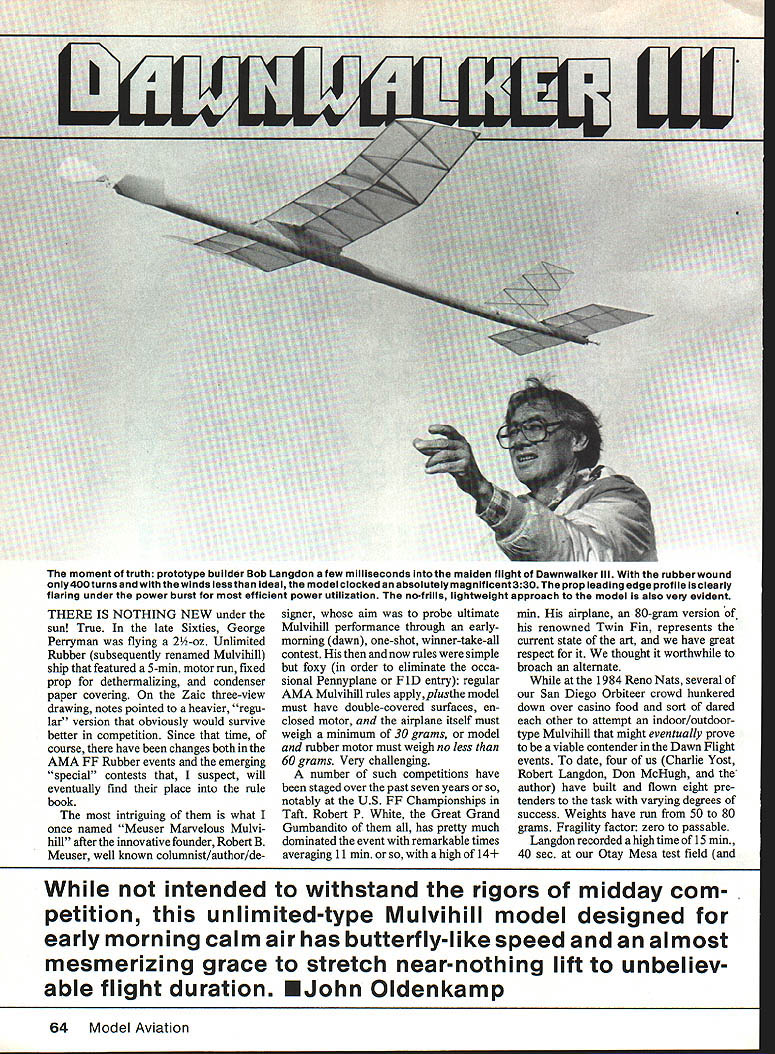
One intriguing special was what I once called the "Meuser Marvelous Mulvihill," named for Robert B. Meuser. His aim was to probe ultimate Mulvihill performance through an early‑morning (dawn), one‑shot, winner‑take‑all contest. His rules were simple but selective: regular AMA Mulvihill rules apply, plus the model must have double‑covered surfaces, an enclosed motor, and the airplane must weigh at least 30 grams (or the model and rubber motor together at least 60 grams). Very challenging.
Such competitions have been staged over the past several years, notably at the U.S. FF Championships in Taft. Robert P. White has dominated the event with remarkable times averaging about 11 minutes and a high of 14+ minutes. His airplane, an 80‑gram version of the Twin Fin, represents the state of the art. We thought it worthwhile to explore an alternate approach.
At the 1984 Reno Nats several of our San Diego Orbiteer group dared one another to design an indoor/outdoor‑type Mulvihill that might contend in Dawn Flight events. Charlie Yost, Robert Langdon, Don McHugh and I built and flew eight pre‑tenders with mixed success. Weights ranged from 50 to 80 grams; fragility varied from negligible to passable. Langdon recorded a high time of 15 minutes 40 seconds at our Otay Mesa test field.
This is an experiment and we are still experimenting. The model presented here could be a starting point for an aspiring Mulvihill flier. In my view it is a safe design that rewards the builder with uncommon pleasure: Dawnwalker I captured first place in its first outing at a regular Mulvihill event, even after the pilot omitted the downthrust shim on the first flight.
Given light or non‑thermal conditions Dawnwalker will butterfly along at roughly 150 rpm through a prop run of 5 to 8 minutes (depending on trim and air density), then settle into a heart‑stoppingly slow glide after the prop folds. Lightweights need to fly slowly; once upset they often go into a power stall and dive. They handle poorly in ground turbulence and usually need downthrust to cure stall tendencies. But in light air their performance is magnificent.
— John Oldenkamp
Construction
Target weight of the finished model, less rubber motor, is about 55 grams. Selection of materials and prudent use of glue are critical. Weigh everything ahead of time on a good triple‑beam balance and discard parts that are clearly overweight.
Typical balsa sheet weights (guideline):
- Motor tube blank, 3/4 × 36 in.: ~9.5 g
- Rib sheet stock, 3 × 36 in., B‑grain: ~12 g
- Leading edge / trailing edge stock, 3/32 × 1/8 in.: ~1.5 g
Some 6‑lb stock can be stronger than 10–12‑lb stock depending on grain. Use the lightest acceptable stock that preserves strength.
Propeller
Start with the prop, since it differs from the norm. Cut blade outlines and lay them up with thinned white glue on a form. No soaking is necessary; tape the blades in position separated by wax paper and let them dry for a few days.
The hub is a small spruce block cut and drilled to size, relieved for the shaft at the front, then hardened with Hot Stuff or similar. The solderless hub concept keeps weight low and strength adequate.
After the blades dry, edge‑sand and cover with dope and tissue on the bottom only. Cut an inlet slot for the tubing that carries the hangers; glue the tubing in place with cyanoacrylate (CyA). Fit plywood cheeks and form the hangers as simple wire "L"s. Test‑fit hangers to the tubing inlets. Set one blade in the pitch jig at the proper orientation, tape the hanger at 90° to the thrust line, and secure with a dab of 5‑minute epoxy.
Once both blades are assembled, mount them on the hub and retain them with short tubing pieces glued to the hanger ends. Target prop size is about 23 in. diameter by .30 in. pitch. With hub, spring, and washers the prop assembly should weigh about 12–14 grams.
Stabilizer and fin
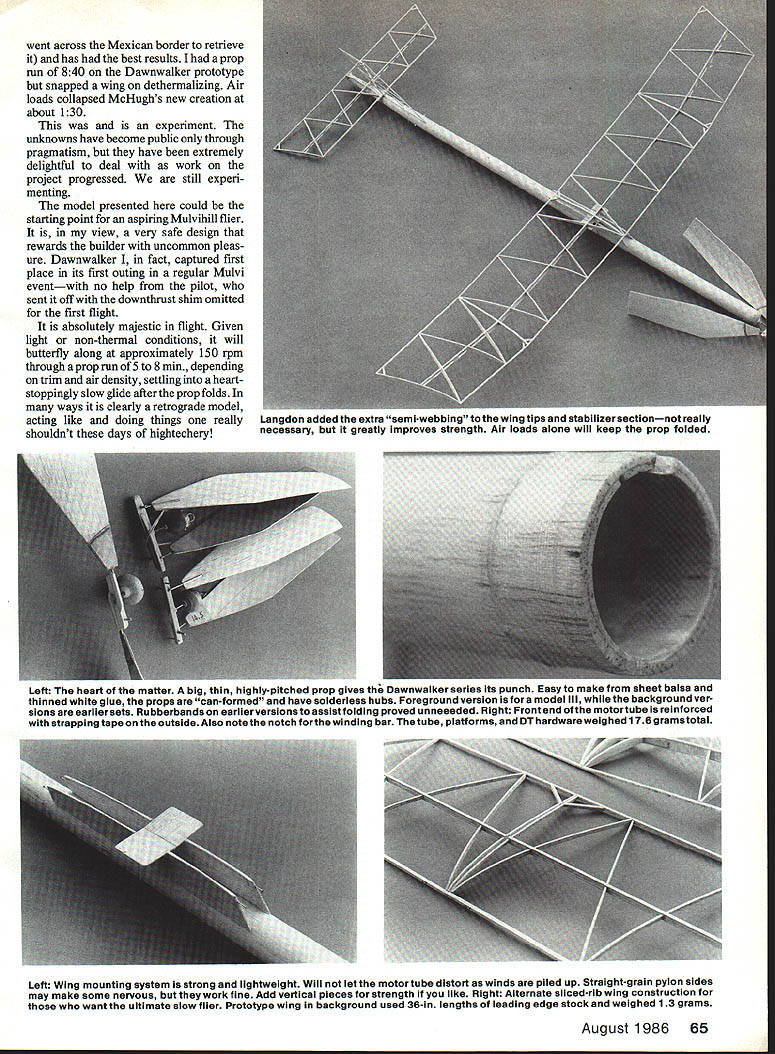
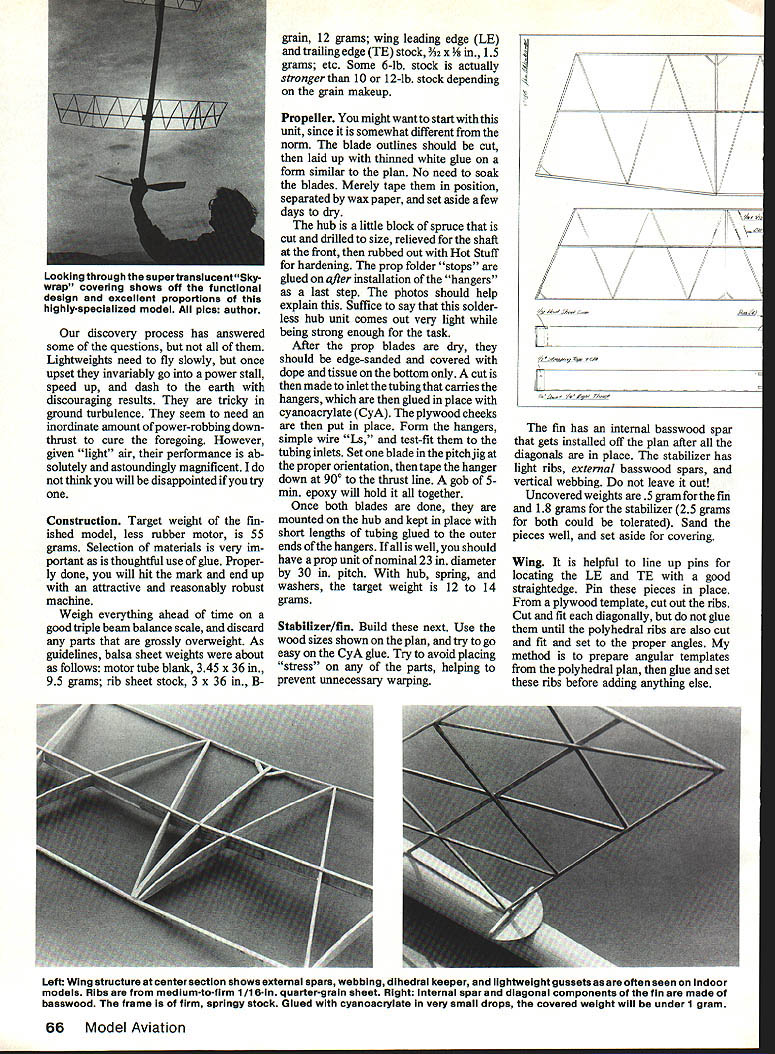
Build the stabilizer and fin next using the wood sizes shown on the plan. Go easy on CyA to avoid stressing parts and causing warp. The fin contains an internal basswood spar installed after the diagonals are in place. The stabilizer uses light ribs, external basswood spars, and a vertical webbing—do not omit the vertical webbing.
Uncovered weights: fin ~0.5 g; stabilizer ~1.8 g (up to 2.5 g for both is tolerable). Sand parts well and set aside for covering.
Wing
Pin LE and TE pieces in place with a good straightedge. From a plywood template cut ribs. Fit each diagonal but postpone gluing until the polyhedral ribs are cut and fitted to the proper angles. Use angular templates for polyhedral and glue those ribs in place first.
Shim tip washout as indicated. As insurance, "crack" the TE slightly and soak with CyA to hold the setting. Razor‑plane shims to contour; they can be reused. Add the top external basswood spar.
Remove the wing from the plan and glue the bottom spar on the underside. Fit vertical webbing and glue—air loads on this lightweight model demand the webbing. Sand, cut panels apart, and install the proper polyhedral. Add the plywood center brace by hogging out holes in three center ribs and gluing with CyA. The uncovered wing should weigh about 12–16 grams.
Fuselage
Rolled‑tube motor sticks are unpleasant to make but unbeatable for strength‑to‑weight. The plans call for nominal dimensions based on stock availability. If you can buy good A‑grain sheet weighing ~9–11 g per 4‑in.‑wide sheet, use the larger tube diameter.
Method:
- Sand a straight sheet of balsa on both sides; dope one side three times with thinned nitrate dope.
- Hold the blank undoped side up under hot shower water for ~30 seconds (keep the doped side dry). Pat dry.
- Wrap the blank around a mandrel (closet rods work) and hold with masking tape or rubber bands. Cut the blank about .06 in. wider than the circumference (π × D + .06 in.). Set to dry in the sun or near gentle heat; it typically dries and takes a set in an hour.
- Wiggle the blank free of the mandrel; slip a card under the seam if needed. While holding seam pointed down, tack‑glue every inch or so as you slide the tube off the form. Set the tube upright over a paper bag and run a fat bead of CyA down the seam, letting gravity help. Square the ends with a sanding block and install collars as shown on the plan.
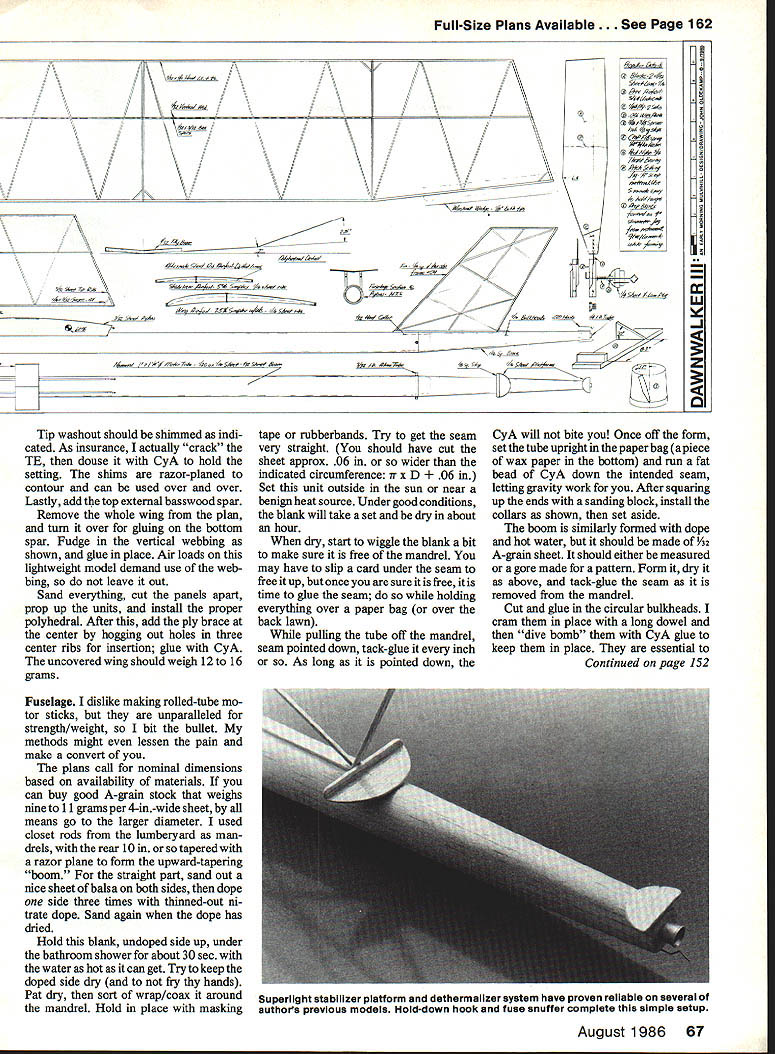
The boom is similarly formed using 1/2 A‑grain sheet. Cut and glue circular bulkheads into place (I cram them in with a long dowel and fix with CyA). They maintain rigidity aft of the motor peg and provide mounts for the DT tube and platforms.
True up the main joint, slide the boom over the aft motor collar, and glue everything with white glue or CyA. Check symmetry, sand the fuselage, and set down/right thrust. Add platforms, front‑edge strapping or tape reinforcement with CyA (it bonds well), and make pylons, pins, wing platform, etc. Sand the wing‑mounting unit to contour but do not glue it on yet. Make and drill the nose plug. Raw balsa is light and acceptable if you prefer not to paint.
A big, thin, highly pitched prop gives the Dawnwalker series its punch. Sheet balsa thinned and formed with white glue produces good props; use a solderless hub.
Covering and assembly
One stumbling block was locating lightweight covering. We found a non‑modeling product I called Skywrap (used for supermarket produce bags). It weighs roughly 40% of the best tissue, adheres with white glue or RC56, shrinks under passive heat (open oven door), accepts spray dope for accents, can be drawn on with drafting ink, and is quite puncture‑proof. If you can source unprinted Skywrap, it's worth using.
Ordinary modeling tissue will work if applied carefully. Finish with a weak alcohol spray, then two thin coats of plasticized nitrate dope or Krylon Crystal Clear. Tissue jobs may sag in damp weather; Skywrap avoids that problem.
Try to get a smooth finish. Add AMA numbers and an identification label with your name, address and phone number. A bright spot of color on the left wing tip helps the timer keep the plane in sight.
Assembly steps:
- Finish the prop assembly and install platforms.
- Line up and install the vertical fin.
- Mount the stabilizer with rubber bands and insert the DT fuse.
- Strap the wing to the pylons/platform unit.
- Add the prop assembly and set the model on an inch‑edge surface for balancing (extra hands may help).
- Adjust until the correct balance point is achieved; pencil‑mark mounting positions and Hot Stuff the wing mount in place.
- Check for warps and misalignments; this aircraft will not tolerate gross aberrations. Weigh the finished airframe and mark the gram figure on the plane.
Trimming and flying
Assuming an airframe weight of 55–60 grams, beginning power is about 5–6 turns of 3/8‑in. rubber ~40 in. long. Make up three motors, lube them well, and let them rest overnight. Break in two motors by winding to their breaking point; rubber batches vary even within the same batch. Note the maximum safe wind figure and agree with yourself never to exceed 90% of it.
Test glides with a motor installed and prop folded can help set stabilizer shim: a thin shim under the rear of the stabilizer up to 1/16 in. might be needed. For initial flights, wind 400 turns and launch smoothly—this won't be a ball of fire.
Stalls are cured by adding downthrust and a touch of right thrust. The ship wants to go low and slow and take forever getting there; resist over‑elevating. Expect prop rpm around 150. Add power in 100‑turn increments, trimming and winding off unwanted tendencies. Eventually you may reach ~1,150 turns, at which point the model will come alive like a butterfly. The ship is strong enough to be flown in 2 o'clock thermals, but after that it’s beyond what you normally want to ask of it.
Changes and Dawnwalker III notes
Dawnwalker III is a starting point for exploring maximum Mulvihill performance. The design centers on a low‑aspect‑ratio wing with a very slow prop/rubber combination, favoring prolonged low‑energy flight rather than high‑climb, long‑glide performance. The airfoil used allows better penetration of turbulence, a superior glide and improved durability.
V‑dihedral and taller pylons have been tried; they added little and introduced structural complications. Increasing motor tube length is possible but unlikely to appreciably enhance performance.
Dawnwalker III was flown indoors at a club meeting and won a trophy; in strong bursts it can be thrown off course into a terminal tail slide. The prototype performed magnificently even on 400 turns in less‑than‑ideal winds: the prop leading edge clearly flared under power bursts, revealing efficient power utilization and a lightweight, no‑frills approach.
There are many variations possible—alternate sliced‑rib or polyhedral planforms, different airfoils, and construction tweaks can be explored for ultimate slow flight and duration. If you build one, you’ll likely extract the same pleasure we did from this unconventional pursuit.
August 1986
— John Oldenkamp
Transcribed from original scans by AI. Minor OCR errors may remain.

