
D.H. 89 Rapide
Allen Wulf
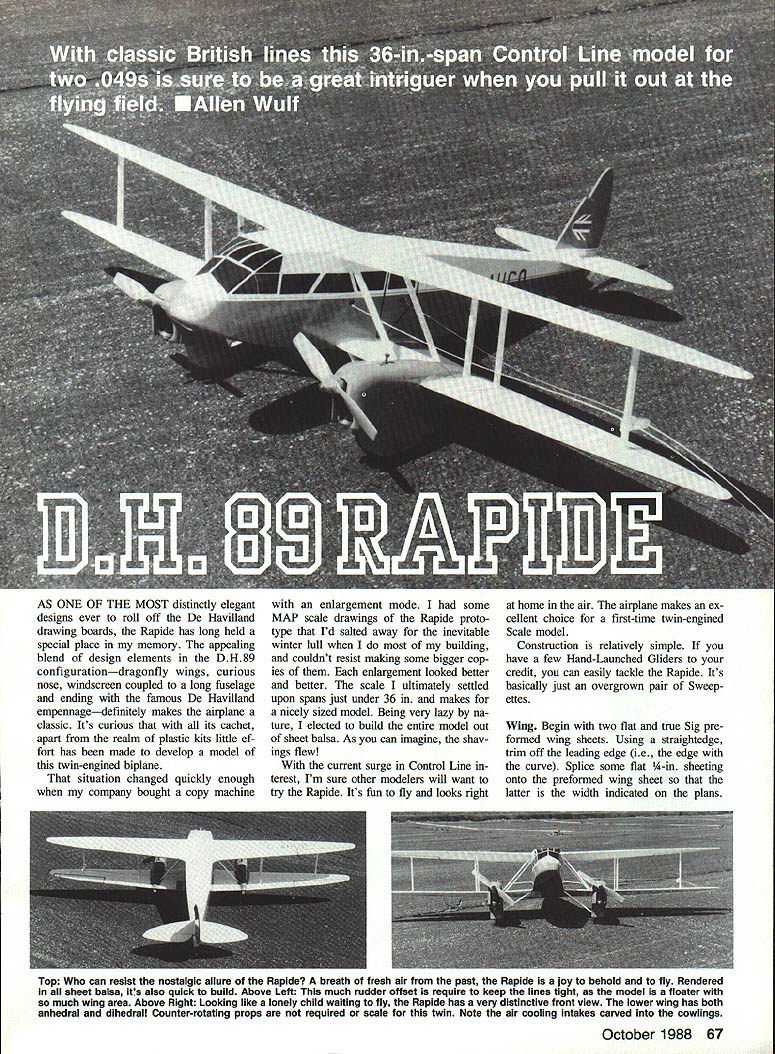
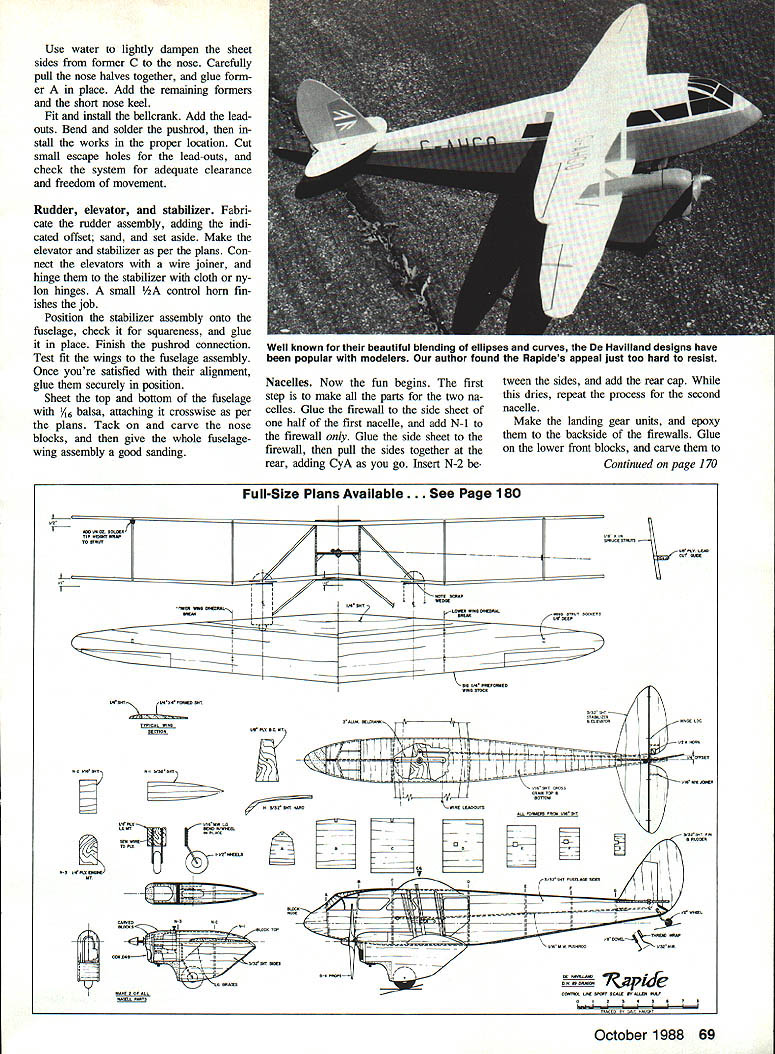
As one of the most distinctly elegant designs ever to roll off the De Havilland drawing boards, the Rapide has long held a special place in my memory. The appealing blend of design elements in the D.H. 89 configuration — dragonfly wings, a curious nose, a windscreen coupled to a long fuselage and ending with the famous De Havilland empennage — definitely makes the airplane a classic. It's curious that with all its cachet, apart from the realm of plastic kits little effort has been made to develop a model of this twin-engined plane.
That situation changed quickly enough when my company bought a copy machine with an enlargement mode. I had some map-scale drawings of the Rapide prototype that I'd salted away for the inevitable winter lull when I do most of my building, and couldn't resist making some bigger copies of them. Each enlargement looked better and better. The scale I ultimately settled upon spans just under 36 in. and makes for a nicely sized model. Being lazy by nature, I elected to build the entire model out of sheet balsa. As you can imagine, the shavings flew!
With the current surge in control-line interest, other modelers will likely want to try the Rapide. It's fun to fly and looks right at home in the air. The airplane makes an excellent choice for a first-time twin-engined scale model. Construction is relatively simple — if you have built a few hand-launched gliders, you can easily tackle the Rapide. It's basically an overgrown pair of Sweepettes.
Construction overview
- Model size: just under 36 in. wingspan.
- Materials: sheet balsa construction throughout, spruce for struts, light hardware for controls.
- Tools/adhesives: straightedge, drafting triangle, sanding tools, cyanoacrylate (CyA), slow-setting epoxy for struts, sanding sealer, dope and paint.
Wing
Materials and prep
- Begin with two flat, true Sig preformed wing sheets.
- Using a straightedge, trim off the leading (rounded) edge.
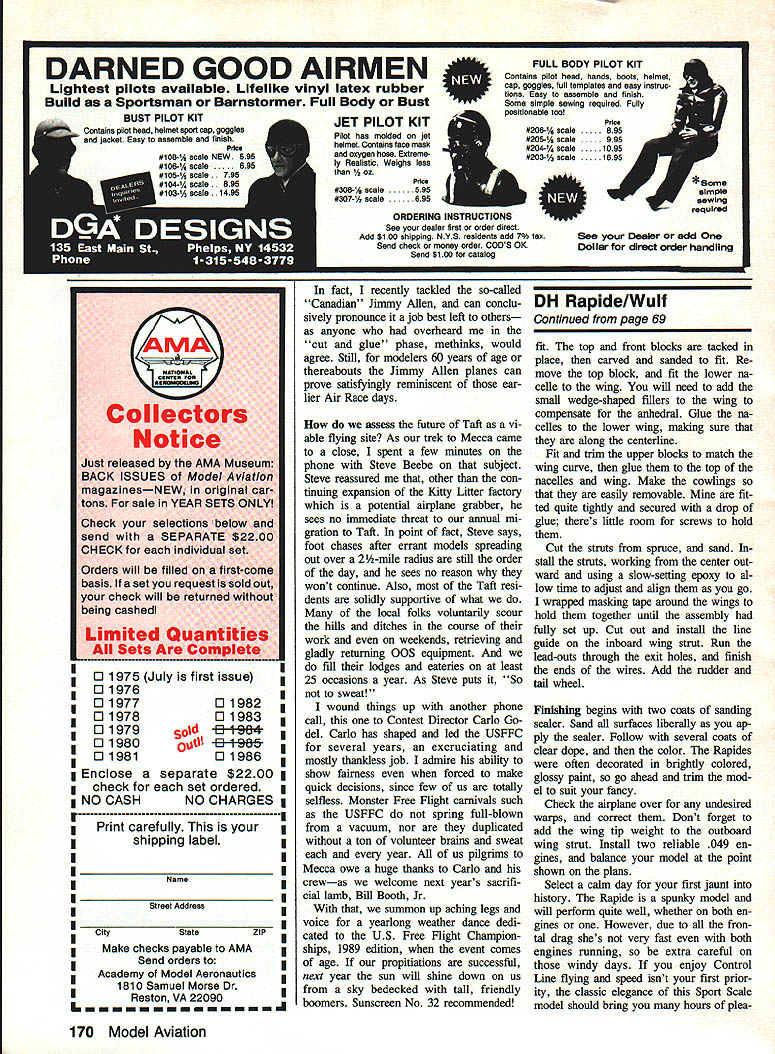
- Splice some flat 1/8-in. sheeting onto the preformed wing sheet so that the combined wing panel attains the width indicated on the plans.
Cutting and shaping
- Cut out the wing shapes. Top and bottom wings have the same outline but different dihedral breaks.
- Sand the leading edges to the airfoil shape shown on the plans.
- Make notches for the wing struts (notch top and bottom wings as indicated).
- Cut the wings at the required dihedral breaks. Note: the lower wing has both anhedral and dihedral, which complicates construction — the dihedral breaks lie along the same line as the engine nacelles.
Assembly
- Preglue end grains where required.
- Dry-block the appropriate wing panels to set dihedral, then glue the dihedral joints.
- Once dry, test-fit to the fuselage and glue securely when alignment is correct.
Fuselage
Materials and prep
- Select two sheets of 1/8-in.-thick, 4-in.-wide balsa, matching grain and firmness.
- Cut out fuselage sides, formers, the bellcrank mount and its gussets.
Assembly
- Glue formers C and D to the sides using a fast-setting glue such as CyA. Use a drafting triangle to keep everything square.
- Glue remaining formers to the opposite side and assemble tail halves over the plans; glue tail halves together.
- Install the short nose keel. Carefully pull the nose halves together and glue former C in place.
- Add the remaining formers and the short nose keel as shown on the plans.
- Fit and install the bellcrank; bend the solder pushrod and install it, making sure it works freely in its proper location.
- Cut small escape holes for the lead-outs and check the system for adequate clearance and freedom of movement.
Nacelles and engine pods
Nacelle construction
- Make all parts for both nacelles.
- Glue the firewall to the side sheet of one half of a nacelle, add former N-1 to the firewall only.
- Pull the sides together at the rear, adding CyA as you go. Insert N-2 between the sides and add the rear cap.
- Repeat for the second nacelle.
Gear and fairings
- Make the landing gear units and epoxy them to the backs of the firewalls.
- Glue on the lower front blocks and carve them to shape.
- Tack the top and front blocks in place, then carve and sand to fit the wing curve.
- Fit the lower nacelle to the wing; add small wedge-shaped fillers to the wing to compensate for the lower wing anhedral.
- Glue the nacelles to the lower wing, ensuring they lie on the centerline.
- Fit and trim upper nacelle blocks to match the wing curve, then glue them to the top of the nacelles and wing.
Cowling and servicing
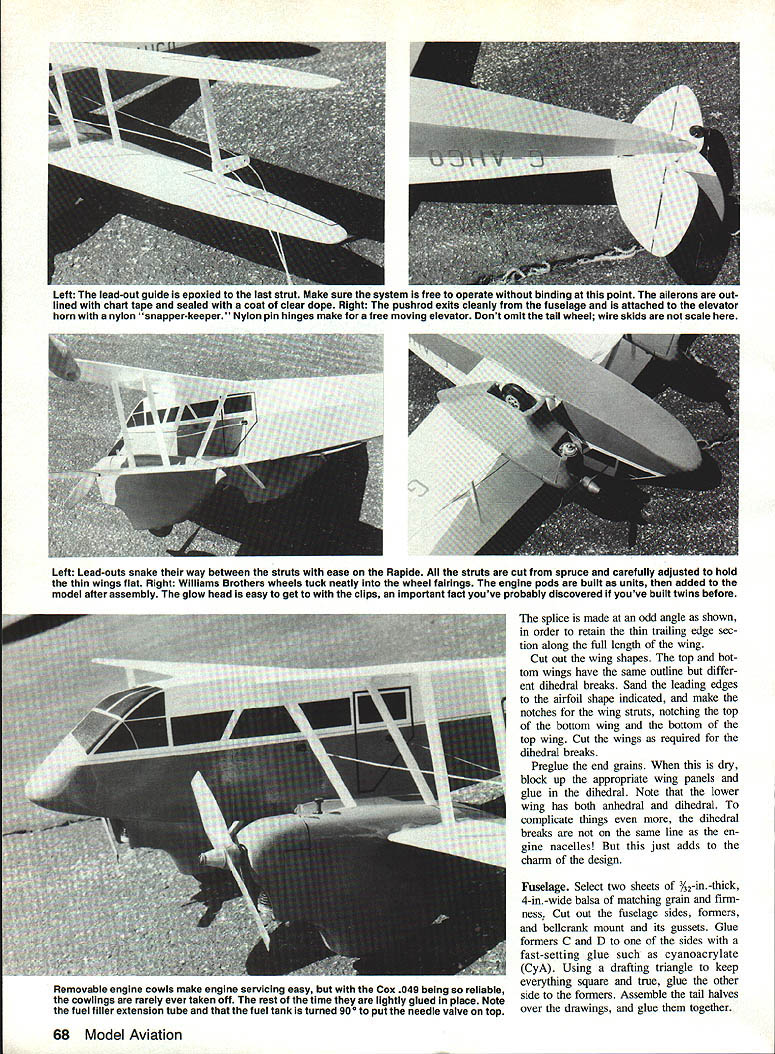
- Make the cowlings removable for servicing. Mine are fitted tightly and secured with a drop of glue; there is little room for screws.
- Note the fuel filler extension tube and that the fuel tank is rotated so the needle valve is on top.
Struts and lead-outs
- Carefully cut the Rapide struts from spruce and sand to shape.
- Install struts working from the center outward. Use a slow-setting epoxy to allow time to adjust and align.
- Wrap masking tape around the wings to hold them together until epoxy sets.
- Cut small escape holes for lead-outs and ease the lead-outs through the strut openings.
- Run the lead-outs through the exit holes and finish the ends of the wires.
- Install the line guide on the inboard wing strut.
- Ensure the system operates without binding at the ailerons; seal and tape lead-out joiners and coat with clear dope.
Wheels and landing gear
- Williams Brothers wheels tuck neatly into the wheel fairings.
- Install wheels and finish fairings after nacelles and gear are in place.
- Add the rudder and tail wheel; include the wire tail skid or skids for scale appearance if desired.
Controls and tail
- Fabricate the rudder assembly, adding the indicated offset; sand and set aside.
- Make the elevator and stabilizer per the plans.
- Connect the elevators with the wire joiner and hinge the stabilizer with cloth-covered nylon hinges or small nylon pin hinges for a free-moving elevator.
- Don’t omit the tail wheel.
- Position the stabilizer assembly onto the fuselage, check for squareness, and glue in place.
- Finish the pushrod connections and ensure the elevator horn and retaining hardware (nylon snapper-keeper or similar) are securely installed.
Finishing
- Apply two coats of sanding sealer, sanding liberally between coats.
- Follow with several coats of clear dope, then apply color coats.
- The Rapide was often decorated in brightly colored, glossy paint — trim the model to your taste.
- Check the airplane for any undesired warps and correct them.
- Don’t forget to add the wing tip weight to the outboard wing strut as shown on the plans.
Balance and flying
- Install two reliable glow engines and balance the model at the point shown on the plans.
- Select a calm day for the first flight.
- The Rapide is a spunky model and will perform well on both engines or even on one. Because of its frontal drag it isn’t very fast even with both engines running, so be extra careful on windy days.
- If you enjoy control-line flying and speed isn’t your first priority, the classic elegance of this sport-scale model should bring you many hours of pleasure.
Transcribed from original scans by AI. Minor OCR errors may remain.

