

DOUBLE WHAMMY
DOUBLE WHAMMY was designed as a simple model to introduce indoor rubber trim, handling, and some building techniques to modelers who had never before tried the world of indoor model aircraft.
It has been a very successful airplane: scores have been built by people of all skill levels, and regular contests have been scheduled as a one-design event using a mass-launch approach. It is quite spectacular to see 25 or more of these brightly colored aircraft simultaneously circling toward the ceiling.
The one criterion was that all materials and equipment for construction and flying must be readily available. Three items are normally found in the workshop and required:
- A transport box for the model. This container should allow the disassembled components to lay flat on the bottom. The popular copier paper box is often just a little too small. The importance of a proper box cannot be overstated; most indoor models are broken by mishandling, and hardly ever by crashes or flight stresses.
- A geared winder. A 16:1 geared winder is suitable (often available for under $20). Since the rubber motor will require well in excess of 1,000 turns for respectable flights, hand-winding or using a winder with a lesser gear ratio can be very tiring.
- A good supply of 1/16" width TAN-II rubber (FAI Model Supply) for motors.
Specifications:
- Type: Free Flight (FF) Indoor
- Wingspan: 17 inches
- Flying weight: 5–6 grams
- Motor: Tan II rubber strip
- Construction: Built-up
- Covering: Tissue (no finish)
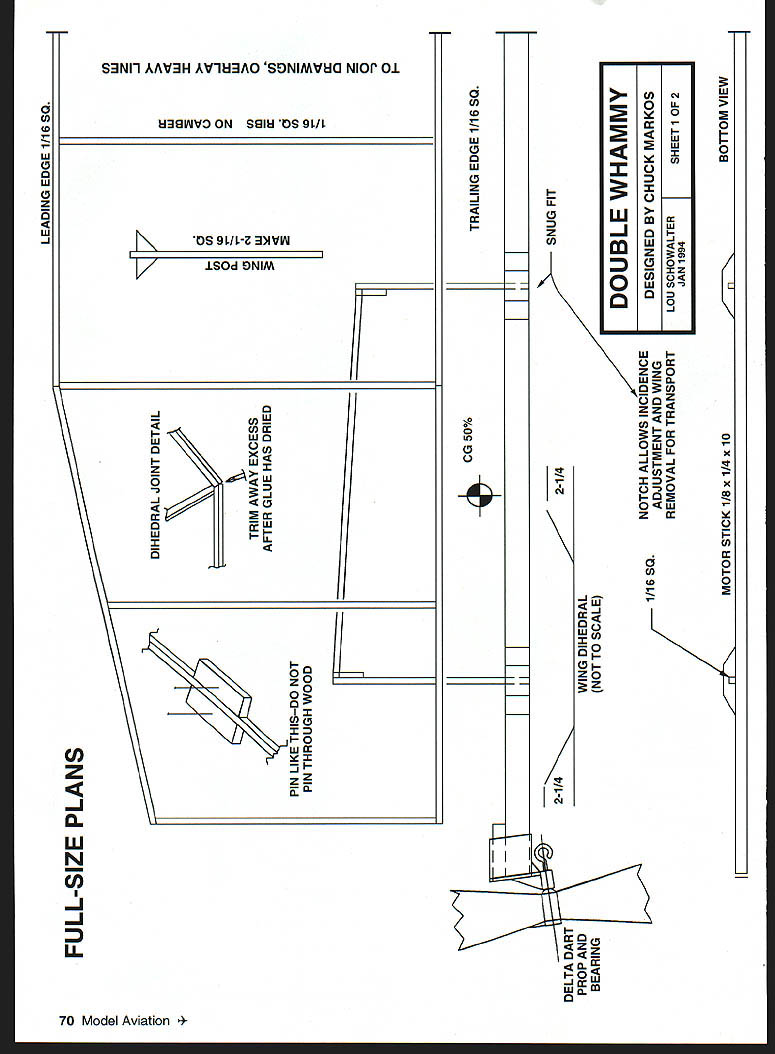
FULL-SIZE PLANS
Notes and dimensions from the plans:
- Leading edge: 1/16" sq.
- Trailing edge: 1/16" sq.
- Ribs: 1/16" sq., no camber
- Wing post: make 2 — 1/16" sq.
- Wing dihedral: shown on plans (not to scale)
- Motor stick: 1/8" x 1/4" x 10"
- Tail boom: 1/8" x 1/4" x 8" — taper to 1/16" sq.
- Rear post: canted to create wing twist (1/8" to left to stab)
- Delta Dart prop and bearing (pin like this — do not pin through wood)
- Notch allows incidence adjustment and easy removal for transport
- CG: approximately 50% (of chord)
- Snug fit at joints; trim away excess after glue has dried
- Cover left side of fin only
- Note: Right wing is shorter than the left — model flies in a left circle
- Straight pin at anchor of fin only; glue well
Designer credits:
- Double Whammy designed by Chuck Markos and Lou Schowalter
CONSTRUCTION
Use firm balsa for the motorstick, the inner portions of the wing leading and trailing edges, and the vertical wing posts. All other balsa should be quite lightweight.
Proper wood selection is critical for an indoor model. Incorrect choices may result in a finished model that is constantly in need of repair (too light), requires excess ballast to maintain the center of gravity, or is simply overweight (a heavy model is not necessarily a strong model).
Most precut strip balsa is firm enough for the high-stress components above. The rest can be cut from sheet balsa of the appropriate thickness and density using a metal straightedge and a single-edge razor blade.
The finished airframe should weigh about five to six grams.
Building surface and pinning:
- Place the plans on a surface that will accept pins easily (a Celotex ceiling tile works well). Cover the plans with plastic food wrap before construction to keep glue from sticking the structure to the plans.
- Hold strips of balsa in place using opposed scraps and pins to gently clamp pieces without pinning through the wood (this prevents splits).
Adhesives and small-quantity application:
- Use Duco or Ambroid cement.
- To apply small quantities, make a glue well from a short section of plastic drinking straw pushed into modeling clay. Use a toothpick to transfer glue to joints. Make sure the glue gets between the two pieces of wood to be joined.
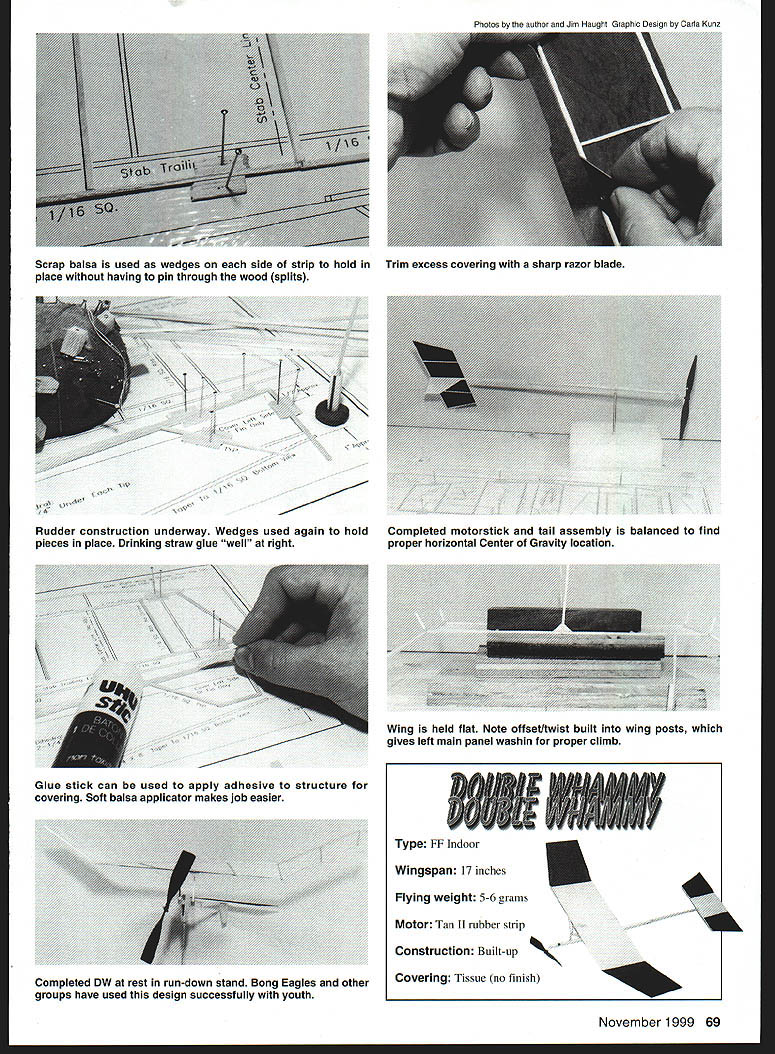
Construction tips (from photos/captions):
- Scrap balsa wedges are used on each side of a strip to hold it in place without pinning through the wood.
- Trim excess covering with a sharp razor blade.
- Use drinking straw sections as glue wells.
- Use a glue stick (Kidstick or UHU Stic) to apply adhesive to structure for covering; a soft balsa applicator makes the job easier.
- Hold the wing flat while building; note the offset/twist built into wing posts to give left main panel washin for proper climb.
- Completed model at rest in a run-down stand; several local clubs and youth groups have used this design successfully with beginners.
Tailboom, Fin, and Stabilizer
If you cannot form the double-tapered boom shown on the plans, you may use medium-weight 1/16" balsa sheet and make a single taper from 1/16" x 1/4" to 1/16" square over its length.
Make precise bevel cuts in the soft 1/16" square fin leading and trailing edge pieces to match the attachment angle to the tailboom. These should be slightly overlength when glued in place. Use scrap balsa wedges and pins to hold everything in place while glue dries.
Mark the location of the tip piece on the LE and TE and cut through using a sharp razor blade so as not to crush the balsa. Hint: place a scrap of manila folder paper under the two marked fin members so the cut doesn't go through the plastic wrap on the plans. The gap will allow excess glue to seep onto the paper and make removal of the completed fin easier.
The 1/16" square fin tip is cut slightly longer than final dimension and glued in place; trim to length after glue has dried.
Stabilizer:
- Designed to be minimum area so it can be made from lightweight wood yet still be rugged.
- LE and TE are cut slightly overlength and held in place with balsa scraps and pins.
- Crosspieces (ribs) must be fit precisely between the LE and TE. To fit, place one end of the crosspiece against the LE while cutting partially through it at the TE location; complete the cut on a cutting board so the piece fits cleanly.
- If a crosspiece bows or causes LE/TE to bow, it is too long and must be shortened.
- If a crosspiece won't stay in place without glue, it is too short — discard it and cut a new piece just a hair longer.
- Do not prebend or glue to fill gaps; that makes the structure heavier and weaker than properly fitted pieces.
- Once all crosspieces are glued and dry, trim excess LE/TE length.
Covering the fin and stabilizer:
- Cover while still in contact with the plastic wrap so glue seepage holds them to the wrap.
- Cut the tissue about 1/2" longer than the piece to be covered. Ensure the grain of the tissue runs spanwise for the stabilizer.
- Coat wood that will contact the covering with a glue stick. Place the covering over the adhesive-treated structure and rub gently to adhere.
- Use a scrap of manila folder cardboard to loosen the structure from the plastic wrap.
- Trim excess paper with a very sharp razor blade; be careful not to tear the paper when cutting across the grain.
- Place the stabilizer upside-down and glue the tailboom and fin to it at the LE and TE locations.
Wing
Wing construction is similar to the stabilizer. A major difference is that dihedral is added to each tip section after covering. Prepare for this by placing some glue over the joints where the center section LE and TE meet the tip sections; this will act as a hinge.
Be sure the paper grain runs spanwise on the wing. Do not attempt to tighten the tissue by spraying with water or alcohol (as you might on an outdoor model). The structure of this model is not strong enough to resist warping when the tissue shrinks.
To add dihedral:
- Place the covered wing upside-down on a support 2-1/4" high (three sheets of plywood) under the center section, with the tips bent down and hanging over the edges.
- Place a weight on the center section to hold it in place while the tips are held down with scrap balsa and pins.
- Sharpen four "stakes" from 1/16" square balsa, put a glob of glue on each and some glue in the gaps formed between center section and tip LE/TE.
- Push the pre-glued stakes into the joints and let the glue dry for about one hour.
- Trim the excess stake material away (a fingernail clipper works well).
Prepare the two wing posts and gussets to be added at the center rib location. Be sure these posts will be skewed so the inboard wing will be washed-in (higher angle of attack) when the wing posts are forced into a parallel configuration as they are placed into the sockets on the motorstick.
Ensure all glue joints are dry before assembling the wing to the motorstick.
Motorstick
- The motorstick is a 10" length of 1/8" x 1/4" balsa.
- Using wood from the same hard piece, prepare two notched sockets that will receive the wing posts.
- Bevel the tailboom end so it will be offset to the left by about one inch when glued to the motorstick. Glue the tailboom to one end of the motorstick with about 1/2" of "up" in addition to the left offset.
- Push a straight pin into the motorstick at the tailboom end and assemble the propeller and bearing to the front of the motorstick using a scrap of 1/8" balsa to fill any gap.
- Prepare a rubber motor loop about 15" in length. Double it and connect it to the thrust hook and the rear pin.
- Find the location where this assembly balances on your finger and mark it. Place the two socket pieces equidistant from this balance point on the left side of the motorstick; total distance between sockets should be 4-1/16".
Flying
This indoor rubber model is built asymmetrically to fly left-hand circles. Note that the left wing is longer than the right. Make sure the wing is assembled to the motorstick maintaining this orientation.
As noted in construction, the wing is also twisted to provide more incidence inboard than outboard. If the model doesn't show this twist when assembled, reposition the wing posts to correct it.
If the flight circle is too large (model tends to hit the wall), the model may need some left thrust. To add left thrust:
- Remove the propeller and bearing.
- Slice a thin wedge from the right-front of the motorstick and glue the same wedge to the left-front side.
- Replace the propeller and bearing.
The only adjustable part of the model is wing incidence, which is changed by sliding the wing posts up or down in their sockets to correct stalls or dives.
Initial flights:
- Start with about 200–300 turns in the motor.
- After the motor is tied to form a single loop, coat it with commercial rubber lubricant or a substitute (hand cream) to increase usable turns and reduce internal friction.
- Have a helper hold the model at the thrust bearing while you stretch the rubber motor rearward to about four to five times its relaxed length with the winder. As you wind, move in so the last winds are put in just as you approach the rear pin.
- Remove the motor from the winder by pinching it (to prevent unwinding) and attach it to the rear pin. Take the propeller from your helper and hold the model at the motorstick just under the wing. Simultaneously release the propeller and give the DW a gentle push forward.
For indoor rubber models there should be no nonpowered/deadstick glide phase of flight. For best duration, the model should be under power from launch until touchdown, using every bit of energy stored in the motor.
If the model lands with many turns left in the motor, it may be too heavy. To use more of the motor:
- Change to a lower pitch propeller by twisting both blades to a lower angle, or
- Reduce propeller diameter (more drastic).
Impressive increases in flight duration can be obtained by optimizing the propeller-motor combination on an already trimmed model.
Double Whammy will outperform a Delta Dart, but the intent of the design is to teach newcomers the basics, not to be a pure performance model. The model can be converted into a Pennylane by changing to a 12" diameter wood prop and using a cambered wing; such changes can produce flights of about five minutes. This was the original intent of the design—two for one, hence the name Double Whammy.
Happy landings!
Chuck Markos 655 Carlisle Ave. Deerfield, IL 60015
Transcribed from original scans by AI. Minor OCR errors may remain.

